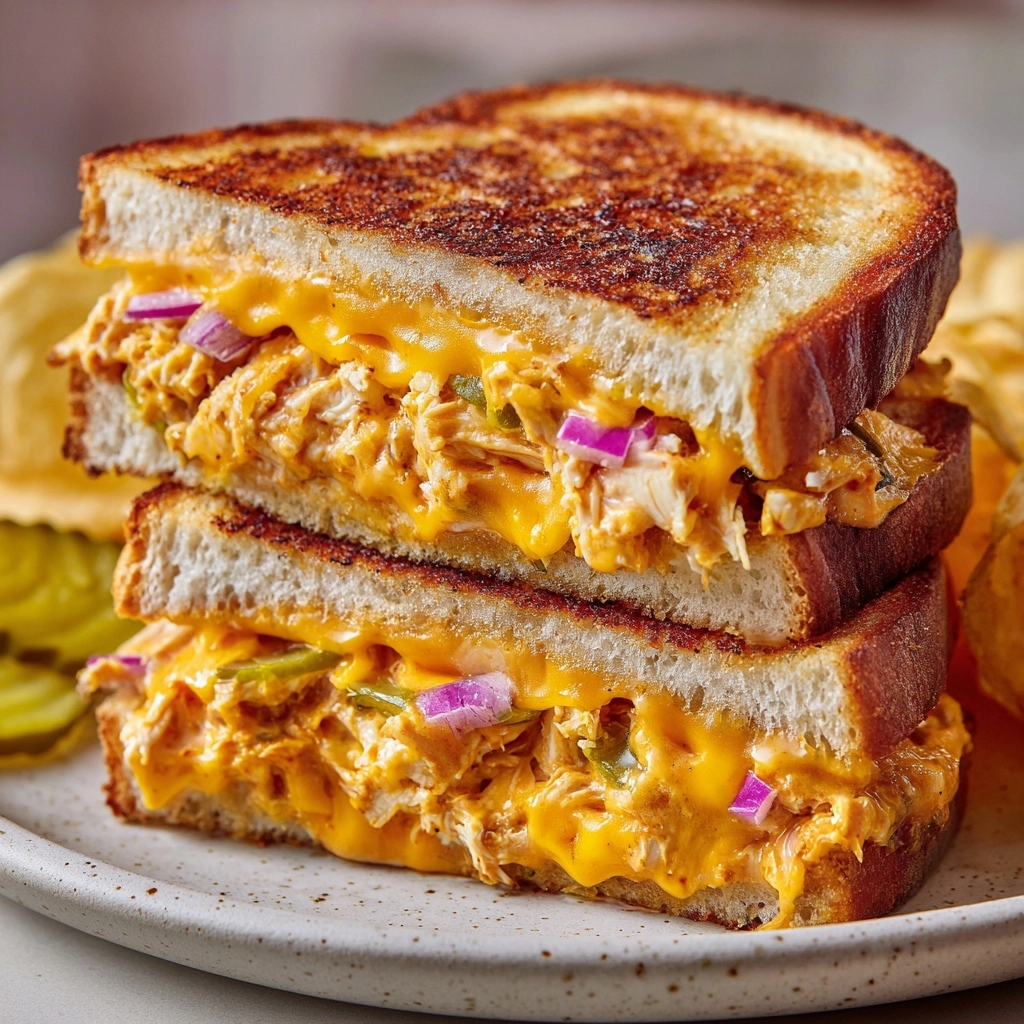
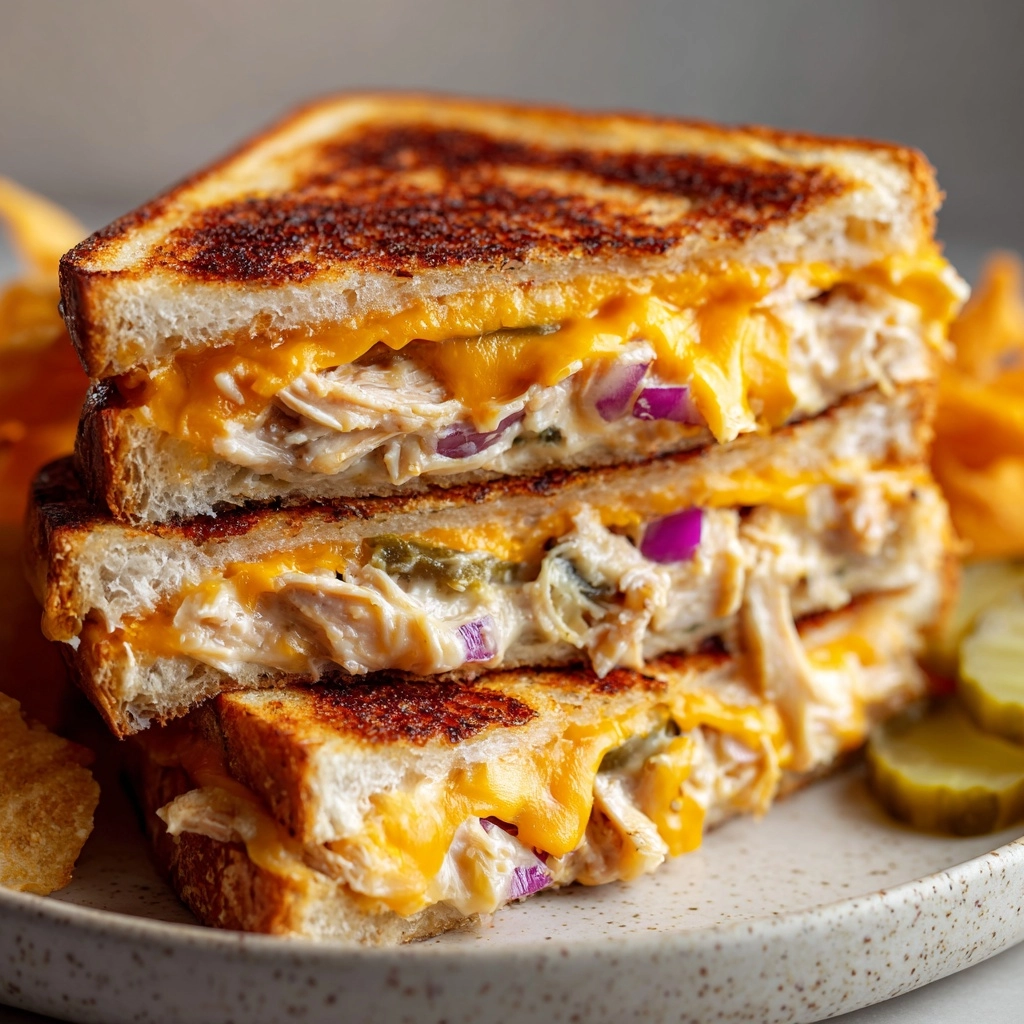
There’s nothing cozier or more satisfying than a classic Tuna Melt—the perfect marriage of creamy tuna salad, gooey cheese, and beautifully crisped bread. This ultimate comfort food delivers everything you want for a quick lunch or simple dinner: savory flavor, melty goodness, and a crispy exterior that yields delightfully to every bite. Whether you remember it from after-school snacks, diner favorites, or just need a new way to upgrade canned tuna, this Tuna Melt recipe will slide right into your rotation and have you making it again and again!
Ingredients You’ll Need
The magic of a Tuna Melt truly lies in its handful of thoughtfully chosen ingredients. Each one plays a starring role, bringing bold flavor, tempting texture, or even a splash of brightness that makes every bite irresistible. Here’s exactly what you’ll need, plus tips for getting the most from each component!
- Tuna: Go for high-quality canned tuna in water or oil and drain it well for the perfect base.
- Mayonnaise: Adds creaminess and brings everything together into a luscious filling.
- Dijon Mustard: For a lively tang and a touch of complexity that keeps the tuna salad from tasting flat.
- Red Onion: Sneaks in a little crunch and gentle sharpness for terrific contrast.
- Celery (optional): If you want even more crunch and freshness, chopped celery is a tasty addition!
- Lemon Juice: Just a splash brightens the flavors and balances the richness.
- Salt and Black Pepper: Simple seasoning that makes all the other flavors pop—taste as you go.
- Sourdough or Sandwich Bread: The perfect canvas for your melt; try sturdy, thick-cut slices for the ultimate crisp.
- Cheddar or Swiss Cheese: Melts beautifully and gives the Tuna Melt its iconic cheesy pull; both choices are excellent, so go with your favorite.
- Butter: Softened butter on the bread ensures your sandwiches fry up golden and extra flavorful.
How to Make Tuna Melt
Step 1: Make the Tuna Salad
Start by combining the drained tuna, creamy mayonnaise, sharp Dijon mustard, finely chopped red onion, celery if you love extra crunch, a bit of fresh lemon juice, and that all-important pinch of salt and pepper. Mix it all up until every bite is flecked with vibrant onion and herbs, and the whole mixture is creamy and well-blended. Taste as you go and adjust the seasonings—you want that perfect, crave-worthy balance of savory and tangy.
Step 2: Assemble the Sandwiches
Lay out your slices of bread and generously butter one side of each piece—that’s the secret to getting that gorgeous, golden crust. Pile half the tuna mixture onto the unbuttered side of two slices, spreading it out to the edges. Top each mound of salad with two slices of your cheese of choice for the ultimate, gooey melt. Cap them with the other slices of bread, keeping the buttered sides facing out.
Step 3: Grill to Golden Perfection
Warm up a skillet or griddle over medium heat. Carefully place your sandwiches onto the hot surface and let them sizzle, pressing lightly with a spatula for even browning. Grill for about 3–4 minutes per side—take a peek underneath and flip when the bread turns tempting and golden. The cheese will be irresistibly melty, and the filling will be hot and oozing.
Step 4: Slice and Serve
Remove the crispy, melty sandwiches from the pan and let them cool for a moment. Then grab your sharpest knife and slice each Tuna Melt in half diagonally for instant diner vibes (trust me, it’s just more fun this way!). Serve while the cheese is perfectly gooey and the bread is crunchy.
How to Serve Tuna Melt

Garnishes
A Tuna Melt loves a little extra flair! Try adding a sprinkle of chopped fresh parsley or dill for a pop of color and freshness just before serving. For those who adore pickles, a couple of crisp dill pickle slices on top or alongside really complement the flavors and add some tangy snap.
Side Dishes
Pair your Tuna Melt with golden French fries, a handful of potato chips, or a light green salad to round out the meal. Creamy tomato soup is a timeless, comforting companion to the sandwich’s rich flavors, and a small bowl of coleslaw brings even more crunch and contrast.
Creative Ways to Present
Try making Tuna Melt sliders on mini buns for an irresistible party snack or serve open-faced on toasted bread slices under the broiler for a chic twist. If you’re feeling adventurous, cut your melts into strips for dunking in soup or stack slices on a platter with colorful toothpicks for crowd-friendly bites.
Make Ahead and Storage
Storing Leftovers
Let any leftover Tuna Melt sandwiches cool completely before popping them into an airtight container. Store in the refrigerator for up to 2 days, knowing that some of that bread crispiness will soften a bit but the flavor will still be delightful.
Freezing
While Tuna Melt isn’t an ideal candidate for long-term freezing due to the creamy filling and potential for sogginess, you can freeze just the tuna salad itself in a tightly sealed container for up to a month. When ready, thaw in the fridge, stir, and proceed with fresh bread and cheese for the best texture.
Reheating
To regain that golden crust, reheat leftover Tuna Melt in a nonstick skillet over low heat, pressing gently until heated through and crisp again. You can also warm in a toaster oven—just avoid the microwave if possible, as it tends to make the bread tough and the filling watery.
FAQs
What’s the best bread for Tuna Melt?
Hearty sourdough is a classic choice for its tang and sturdiness, but any thick-sliced sandwich bread will work. Brioche or whole wheat are tasty options too—just make sure your bread can hold up to the creamy tuna and melted cheese!
Can I use other types of cheese?
Absolutely! Cheddar and Swiss are traditional, but feel free to swap in Monterey Jack, provolone, or even a sharp American cheese if that’s your vibe. Try combinations for your own signature Tuna Melt.
Is there a way to make this lighter?
You can use Greek yogurt in place of some or all of the mayonnaise for a lighter (and protein-packed) tuna salad. Opt for lower-fat cheese and whole grain bread for a wholesome twist.
How do I get the cheese extra-melty?
Covering the skillet loosely with a lid helps trap heat and melt the cheese faster without burning the bread. Or try finishing the assembled (but not yet grilled) sandwich under the broiler until the cheese starts to bubble, then toast the outside in the skillet.
What extras can I add to jazz up my Tuna Melt?
Pickle slices, tomato, thinly sliced jalapeños, chopped herbs, or even a dash of hot sauce stirred into the tuna mix all add fun flavor twists. Don’t be afraid to experiment and make this melt your own!
Final Thoughts
Honestly, a warm, cheesy Tuna Melt always hits the spot—no matter the season or mood. Give this easy classic a try and let it become your go-to meal when you want something simple, satisfying, and packed with nostalgic comfort. You might just find yourself craving another one tomorrow!