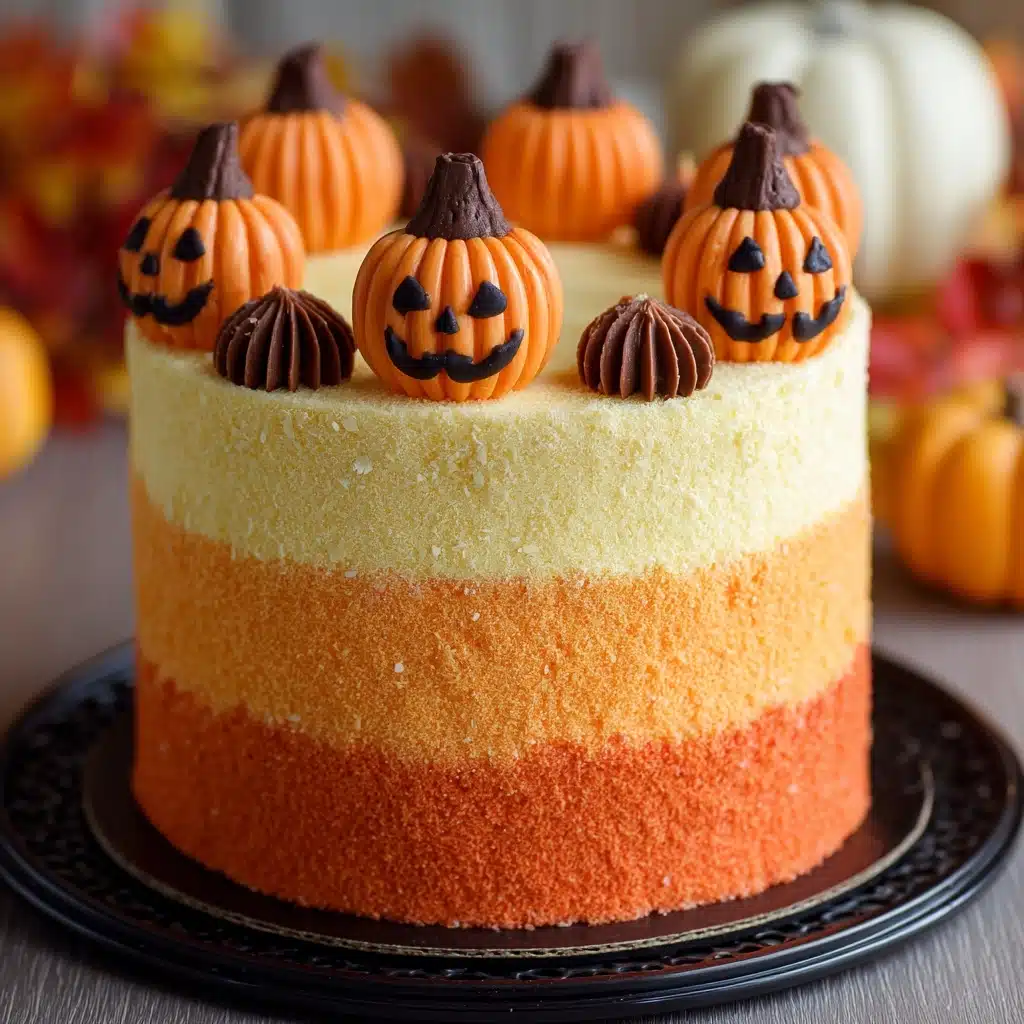
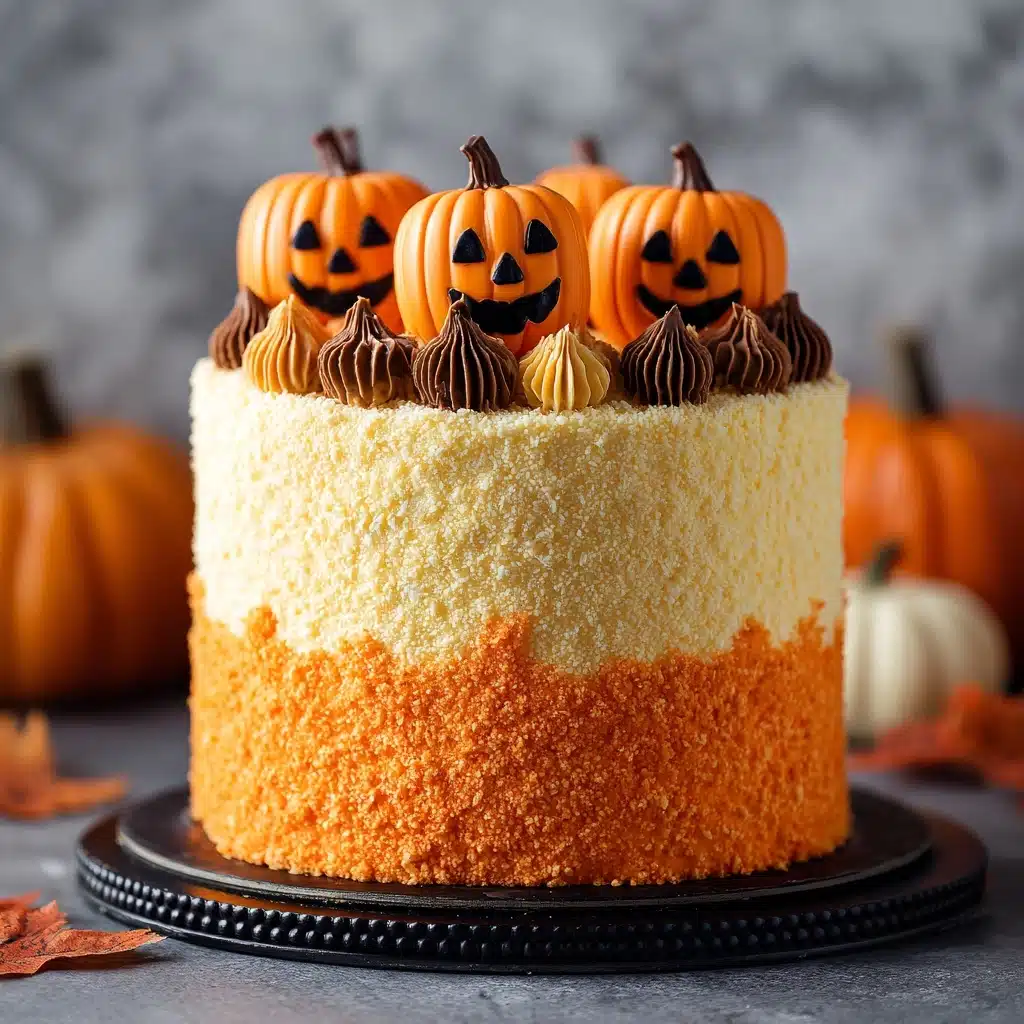
Stenciled Halloween Sprinkle Cake Recipe
The Stenciled Halloween Sprinkle Cake is your ticket to creating a show-stopping centerpiece for any spooky celebration! With vibrant layers studded with festive sprinkles, fluffy colored buttercream, and a striking stenciled design on top, this cake looks like it came straight from a bakery window—but is surprisingly easy to make at home. Whether you’re baking for a kids’ party, a grown-up Halloween bash, or just to treat your household, this cake delivers both delightful flavor and playful Halloween flair. Get ready to wow your guests with a dessert that’s as fun to make as it is to eat!
Ingredients You’ll Need
The magic of the Stenciled Halloween Sprinkle Cake comes from a handful of everyday ingredients, each adding its own special touch. From rich butter to festive sprinkles, every element plays a role in creating the cake’s moist crumb, sweet flavor, and eye-catching appearance.
- All-purpose flour: The backbone of the cake, providing structure and a tender bite.
- Baking powder: Gives the cake a light, fluffy rise that makes every slice irresistible.
- Salt: Just a pinch enhances all the other flavors and balances the sweetness.
- Unsalted butter (for cake and frosting): Adds richness and a creamy texture—make sure it’s softened for best results.
- Granulated sugar: Sweetens the cake and helps create that perfect golden crumb.
- Large eggs: Bind everything together and add moisture for a soft, cohesive batter.
- Vanilla extract: Infuses a warm, bakery-style aroma that pairs perfectly with the sprinkles.
- Whole milk: Keeps the cake moist and tender, complementing the richness of the butter.
- Halloween-themed sprinkles: The star of the show—choose a mix of orange, black, purple, and green for that festive pop!
- Powdered sugar: Essential for a smooth, fluffy buttercream frosting.
- Milk or cream (for frosting): Lightens and softens the buttercream, making it easy to spread.
- Food coloring (orange, purple, black, or green): Gives your frosting those Halloween hues that make this cake unforgettable.
- Halloween sprinkles for decorating: Extra sprinkles never hurt—scatter them for a playful finish.
- Stencil with Halloween shapes: A simple paper or plastic stencil transforms your cake into edible art.
- Cocoa powder or colored sugar: For dusting over the stencil and revealing your spooky design.
How to Make Stenciled Halloween Sprinkle Cake
Step 1: Prep Your Pans and Preheat the Oven
Begin by preheating your oven to 350°F (175°C). Grease and flour two 8-inch round cake pans or line them with parchment paper. This step ensures your cakes will come out easily and beautifully, with no crumbling or sticking—trust me, it’s worth those extra seconds!
Step 2: Mix the Dry Ingredients
In a medium bowl, whisk together the flour, baking powder, and salt. This not only combines your leavening ingredients evenly but also helps prevent clumps, giving you a super smooth batter later on.
Step 3: Cream the Butter and Sugar
In a large mixing bowl, beat the softened butter and granulated sugar together until light and fluffy. You’re looking for a pale, creamy texture—this is the secret to a cake that’s both airy and rich. Take your time here; it sets the stage for the whole dessert!
Step 4: Add Eggs and Vanilla
Beat in the eggs one at a time, fully mixing each before adding the next. Then, stir in the vanilla extract. This not only flavors the cake but helps ensure everything is smoothly incorporated.
Step 5: Combine Wet and Dry Ingredients
With your mixer on low, add the dry ingredients to the butter mixture in three parts, alternating with the milk. Start and finish with the flour mixture. Mixing in stages keeps the batter tender and prevents over-mixing.
Step 6: Fold in the Halloween Sprinkles
Now for the fun part—gently fold in those colorful Halloween sprinkles! This is what transforms a classic vanilla cake into a festive Stenciled Halloween Sprinkle Cake, with bursts of color in every bite.
Step 7: Bake the Cakes
Divide the batter evenly between your prepared pans and smooth the tops. Bake for 25–30 minutes, or until a toothpick inserted in the center comes out clean. Let the cakes cool in their pans for 10 minutes, then turn them out onto a wire rack to cool completely. Patience here pays off—a fully cooled cake means perfect frosting later!
Step 8: Make the Buttercream Frosting
While the cakes cool, beat the softened butter until it’s creamy and pale. Gradually add the powdered sugar, mixing until fluffy. Add milk (or cream) and vanilla, beating until smooth. Tint the frosting with your chosen Halloween colors—think swirling orange and purple or a bold black and green combo!
Step 9: Frost and Stack the Cake
Once the cakes are completely cool, spread frosting between the layers, then cover the top and sides. Use an offset spatula for a smooth, bakery-style finish. Don’t worry if it’s not perfect—sprinkles and stencils will cover any little imperfections!
Step 10: Create the Stenciled Halloween Sprinkle Cake Topper
Lay your Halloween stencil gently on top of the frosted cake, making sure it sits flat. Sift cocoa powder or colored sugar over the stencil, then carefully lift it away to reveal the festive design. It’s like magic—your cake instantly looks pro-level!
Step 11: Add the Final Festive Touches
Scatter more Halloween sprinkles around the base or sides for extra flair. Step back and admire your masterpiece—the Stenciled Halloween Sprinkle Cake is ready to steal the show!
How to Serve Stenciled Halloween Sprinkle Cake
Garnishes
To really make the Stenciled Halloween Sprinkle Cake pop, sprinkle a handful of extra Halloween-themed sprinkles around the edge or base just before serving. If you’re feeling fancy, add a few edible glitter stars or tiny candy eyes to amp up the spook factor. A drizzle of colored chocolate or a few piped buttercream webs can also take your presentation up a notch.
Side Dishes
This cake is a star on its own, but if you want to build a dessert table, pair it with bowls of candy corn, chocolate-dipped pretzels, or a fruit platter with blackberries and orange slices for a Halloween color theme. For a grown-up gathering, coffee or mulled cider is the perfect match for a slice of Stenciled Halloween Sprinkle Cake.
Creative Ways to Present
For extra wow factor, serve the cake on a black cake stand or a platter lined with parchment “spider webs.” You can even slice the cake at the table to reveal the surprise of colorful sprinkles inside. For kids, consider mini versions baked in ramekins or cupcakes with mini stenciled tops—everyone loves a personal-sized treat!
Make Ahead and Storage
Storing Leftovers
Cover any leftover Stenciled Halloween Sprinkle Cake tightly with plastic wrap or store in an airtight container at room temperature for up to two days. If your kitchen is warm or humid, refrigerate it to keep the buttercream looking and tasting fresh.
Freezing
To freeze, wrap individual slices or the whole cake tightly in plastic wrap and then foil. Store in the freezer for up to two months. For best results, freeze the cake before adding the stencil topping and final sprinkles, then decorate after thawing.
Reheating
The cake is delicious served at room temperature, but if you prefer a slightly softer texture, let refrigerated slices sit out for 20–30 minutes before serving. Avoid microwaving, as it can melt the buttercream and ruin your beautiful stenciled design.
FAQs
Can I make the Stenciled Halloween Sprinkle Cake a day ahead?
Absolutely! In fact, making the cake a day in advance allows the flavors to develop and makes slicing even easier. Simply store it covered at room temperature or in the fridge, and add the stencil decoration just before serving for best results.
What kind of stencil works best for the cake topper?
You can use a store-bought plastic stencil or make your own from sturdy paper. Look for classic Halloween shapes like bats, pumpkins, or ghosts. Make sure the stencil is large enough to cover the cake’s surface and sits flat so your design comes out crisp.
Can I use different colors or types of sprinkles?
Definitely! While Halloween-themed sprinkles make the cake festive, you can use any color combo to suit your party theme or personal taste. Just be sure to use “jimmies” or confetti-style sprinkles, which hold up well during baking.
Is there a gluten-free version of this cake?
You can easily substitute a good-quality 1:1 gluten-free all-purpose flour blend for the regular flour in this recipe. Just check that your sprinkles and other ingredients are gluten-free as well, and bake as directed.
What’s the best way to get vibrant frosting colors?
Use gel food coloring for the brightest, most saturated shades without watering down your buttercream. Add color a little at a time and mix thoroughly for even, vivid hues that really make your Stenciled Halloween Sprinkle Cake stand out.
Final Thoughts
I hope this recipe inspires you to grab your mixing bowl and create your own Stenciled Halloween Sprinkle Cake—because nothing says “celebration” like a homemade cake with a spooky, sparkling twist! It’s the kind of treat that makes memories, so don’t be afraid to get creative and have fun with it. Happy baking and happy haunting!
Print
Stenciled Halloween Sprinkle Cake Recipe
- Total Time: 55 minutes (plus cooling and decorating)
- Yield: 12 servings 1x
- Diet: Vegetarian
Description
A festive and fun Stenciled Halloween Sprinkle Cake featuring moist vanilla layers loaded with Halloween-themed sprinkles, topped with vibrant colored buttercream frosting and decorated with spooky stencil designs using cocoa powder or colored sugar.
Ingredients
Cake
- 2 1/2 cups all-purpose flour
- 2 1/2 teaspoons baking powder
- 1/2 teaspoon salt
- 1 cup unsalted butter, softened
- 1 3/4 cups granulated sugar
- 4 large eggs
- 1 tablespoon vanilla extract
- 1 cup whole milk
- 1/2 cup Halloween-themed sprinkles
Buttercream Frosting
- 1 cup unsalted butter, softened
- 3 1/2 cups powdered sugar
- 2–3 tablespoons milk or cream
- 1 teaspoon vanilla extract
- Food coloring (orange, purple, black, or green)
- Halloween sprinkles for decorating
Stencil Decoration
- 1 paper or plastic stencil with Halloween shapes (pumpkin, bat, ghost, etc.)
- Cocoa powder or colored sugar
Instructions
- Prepare the pans: Preheat the oven to 350°F (175°C). Grease and flour two 8-inch round cake pans or line them with parchment paper to prevent sticking.
- Mix dry ingredients: In a medium bowl, whisk together the all-purpose flour, baking powder, and salt until well combined.
- Cream butter and sugar: Using a large bowl, beat the softened butter and granulated sugar together until the mixture is light and fluffy, about 3–5 minutes.
- Add eggs and vanilla: Beat in the eggs one at a time, ensuring each is fully incorporated before adding the next. Then stir in the vanilla extract.
- Combine wet and dry ingredients: Gradually add the dry ingredient mixture to the wet ingredients, alternating with milk, starting and ending with the dry ingredients. Mix gently until just combined. Avoid overmixing.
- Fold in sprinkles: Gently fold the Halloween-themed sprinkles into the batter to evenly distribute them without bleeding color.
- Bake the cakes: Divide the batter evenly between the prepared pans, smoothing the tops. Bake for 25–30 minutes, or until a toothpick inserted into the center comes out clean.
- Cool the cakes: Allow cakes to cool in their pans for 10 minutes, then carefully turn them out onto wire racks to cool completely before frosting.
- Make the buttercream frosting: Beat the softened butter until creamy. Gradually add powdered sugar, mixing well. Add milk and vanilla extract, continuing to beat until smooth and fluffy. Tint the frosting with desired food coloring.
- Assemble and frost: Once cakes are completely cool, spread a layer of frosting between the two cake layers and then cover the entire cake with the remaining frosting, smoothing with an offset spatula.
- Apply stencil design: Gently place the Halloween stencil on top of the frosted cake. Sift cocoa powder or colored sugar evenly over the stencil. Carefully lift the stencil to reveal the themed design.
- Decorate with sprinkles: Add additional Halloween sprinkles around the sides or base of the cake for a festive finishing touch.
Notes
- For a black velvet cake variation, replace 1/4 cup of flour with cocoa powder and add black food coloring to the batter.
- You can substitute cream cheese frosting if you prefer a tangier flavor.
- For best flavor and texture, make the cake a day ahead to allow the flavors to develop.
- Prep Time: 25 minutes
- Cook Time: 30 minutes
- Category: Dessert
- Method: Baking
- Cuisine: American
Nutrition
- Serving Size: 1 slice
- Calories: 450
- Sugar: 38g
- Sodium: 190mg
- Fat: 24g
- Saturated Fat: 15g
- Unsaturated Fat: 8g
- Trans Fat: 0g
- Carbohydrates: 54g
- Fiber: 1g
- Protein: 4g
- Cholesterol: 90mg


