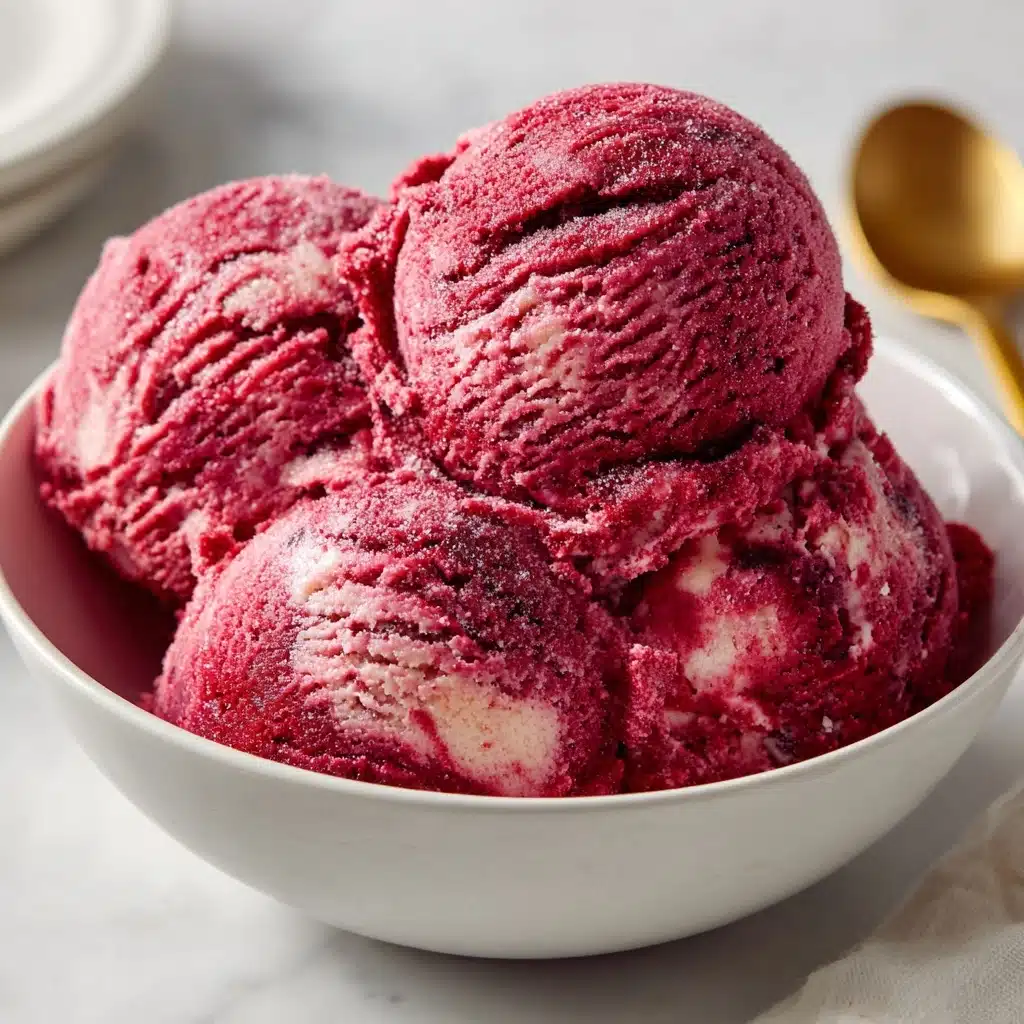
Red Velvet Ice Cream Recipe
If you’ve ever wished you could spoon up the decadent flavor of red velvet cake in a cold, creamy treat, you’re in for an absolute delight. This Red Velvet Ice Cream Recipe captures everything you adore about the classic cake—rich cocoa undertones, a gorgeous scarlet hue, and buttery crumbs swirling through every scoop. Best of all, you don’t even need an ice cream maker to create this show-stopping dessert at home! With just a few everyday ingredients and a little freezer patience, you can turn a handful of pantry staples into something that looks and tastes like a celebration.
Ingredients You’ll Need
This recipe uses simple but essential ingredients—each one plays an important role in achieving that signature flavor, luscious texture, and eye-popping color. Don’t skip or substitute if you can help it; everything here is working hard to give you an authentic Red Velvet Ice Cream Recipe experience.
- Heavy whipping cream (2 cups): Whipped to stiff peaks, this forms the creamy, airy base that makes your ice cream light and scoopable.
- Whole milk (1 cup): Adds just the right amount of richness and helps the ice cream freeze to a perfectly soft texture.
- Sweetened condensed milk (1 can, 14 oz): Sweetens the base and eliminates the need for churning while ensuring smoothness.
- Red velvet cake crumbs (1/2 cup plus extra for swirl): Infuses every bite with true cake flavor and a pleasant bite; use homemade or store-bought if you like.
- Cocoa powder (1/4 cup): Delivers the subtle chocolate notes that every classic red velvet dessert needs.
- Vanilla extract (1 teaspoon): Adds warmth and depth to round out all the flavors.
- White vinegar (1 teaspoon): The secret ingredient that brings true red velvet tang—don’t skip it!
- Red gel food coloring (as needed): A generous squeeze brings that bold, festive color to life—gel coloring gives the best vibrancy.
- Pinch of salt: Just a touch sharpens all the sweet, chocolatey notes.
How to Make Red Velvet Ice Cream Recipe
Step 1: Mix Up the Red Velvet Base
Grab a large mixing bowl and pour in the sweetened condensed milk. Whisk in the cocoa powder, vanilla extract, white vinegar, salt, and red gel food coloring. The color should be bold and vivid—don’t be shy with the gel! This step perfumes your base with chocolate and vanilla and gives you that iconic red velvet look.
Step 2: Whip the Cream
In a separate chilled bowl, pour the heavy whipping cream and whip until stiff peaks form. A hand mixer speeds things along, but you can absolutely use elbow grease and a sturdy whisk. This is where the fluffiness happens, so take care not to over-whip or let the cream turn grainy.
Step 3: Gently Combine
Now for a bit of kitchen magic! Gently fold the whipped cream into the red velvet mixture in two additions. Use a spatula and a light touch—this keeps your base airy, creamy, and effortless to scoop. Mix just until no streaks remain, but don’t stir too aggressively.
Step 4: Add Red Velvet Cake Crumbs
Sprinkle in 1/2 cup of your red velvet cake crumbs and fold gently to incorporate. Each bite will have a tender, cakey surprise, perfectly blending ice cream and cake textures. Don’t be afraid to break up larger crumbs with your fingers as you add them.
Step 5: Freeze and Swirl
Pour the finished mixture into a 9×5-inch loaf pan or a freezer-safe airtight container. For extra drama, swirl in a few more cake crumbs on top. Cover tightly and freeze for at least 6 hours, or overnight if you can bear to wait. By morning, your Red Velvet Ice Cream Recipe will be scoop-ready and spectacular.
How to Serve Red Velvet Ice Cream Recipe

Garnishes
To make your ice cream irresistibly pretty and even tastier, sprinkle more cake crumbs over the top just before serving. For a bakery-style flourish, add a dollop of whipped cream or a few white chocolate curls—these touches turn every bowl into a treat that feels extra special.
Side Dishes
Pair this decadent Red Velvet Ice Cream Recipe with thin chocolate wafer cookies, classic sugar cones, or a drizzle of hot fudge. If you’re feeling ambitious, serve alongside mini cream cheese brownies for a match made in dessert heaven. This ice cream is just begging to be part of an over-the-top sundae platter!
Creative Ways to Present
Why not scoop your ice cream into parfait glasses, alternating layers with more cake crumbs or a tangy ribbon of cream cheese frosting? Layering creates a gorgeous effect and adds amazing flavor complexity. Another fun option—sandwich a generous scoop between soft red velvet cookies for an ice cream sandwich everyone will rave about.
Make Ahead and Storage
Storing Leftovers
Cover your loaf pan tightly with plastic wrap or transfer the ice cream to a lidded container. Stored properly in your freezer, it’ll stay creamy and delicious for up to two weeks. Just be sure to press a piece of parchment or wax paper directly on the surface to prevent ice crystals from forming.
Freezing
This Red Velvet Ice Cream Recipe is the definition of make-ahead ease! It freezes beautifully and holds its dreamy texture for days. For best results, keep it stored toward the back of your freezer so the temperature remains steady, ensuring each scoop is as perfect as the first.
Reheating
While you don’t ‘reheat’ ice cream, you can let it sit on the counter for 5–10 minutes before scooping. This softens it just enough for that perfect, creamy spoonful—no more bent spoons or crumbling cones! If your ice cream seems overly hard, try dipping your scoop in hot water before serving for silky-smooth results every time.
FAQs
Can I use boxed red velvet cake mix for the crumbs?
Absolutely! Whether you have leftover homemade cake or opt for a boxed mix, both will work beautifully for the crumbs. The key is to have soft, moist pieces for that authentic contrast in the ice cream.
What if I don’t have red gel food coloring?
You can use liquid food coloring in a pinch, but gel gives the deepest, most consistent color without thinning your base. Start with a little and add more as needed—it’s all about getting that perfect ruby red shade.
Can I include a cream cheese swirl?
Yes, and it’s delicious! Simply beat together cream cheese, a splash of milk, and some powdered sugar until smooth, then gently swirl it through the ice cream just before freezing. This adds extra tang and makes your Red Velvet Ice Cream Recipe truly reminiscent of the classic cake.
Is there a way to make this dairy-free?
You can experiment with coconut cream and sweetened coconut condensed milk as substitutes, but keep in mind the flavor and texture will be a bit different. Still, you’ll get a tasty, creamy dessert with a fun red velvet twist.
Does this recipe need an ice cream maker?
Nope! The beauty of this Red Velvet Ice Cream Recipe is that it’s 100% no-churn. The whipped cream brings all the lightness you need, so your freezer does all the work—no fancy gadgets required.
Final Thoughts
If you’re hunting for a conversation-starting dessert that’s easy enough for a weeknight but dazzling enough for any party, you’ll love this Red Velvet Ice Cream Recipe as much as I do. Rich, velvety, and truly unforgettable—it’s everything you love about red velvet, made freezer-friendly and fabulously fun. Treat yourself or share it with your favorite people!
Print
Red Velvet Ice Cream Recipe
- Total Time: 6 hours 15 minutes
- Yield: 10 servings 1x
- Diet: Vegetarian
Description
Indulge in the rich and creamy goodness of Red Velvet Ice Cream with this simple no-churn recipe. This decadent dessert features red velvet cake crumbs swirled into a luscious ice cream base, creating a delightful treat for any occasion.
Ingredients
Ice Cream Base:
- 2 cups heavy whipping cream
- 1 cup whole milk
- 1 can (14 oz) sweetened condensed milk
- 1/4 cup cocoa powder
- 1 teaspoon vanilla extract
- 1 teaspoon white vinegar
- Red gel food coloring (as needed)
- Pinch of salt
Additional:
- 1/2 cup red velvet cake crumbs (plus extra for swirl)
Instructions
- Prepare the Ice Cream Base: In a large mixing bowl, whisk together the sweetened condensed milk, cocoa powder, vanilla extract, white vinegar, salt, and red gel food coloring until smooth and vibrant.
- Whip the Cream: In a separate chilled bowl, whip the heavy cream until stiff peaks form.
- Combine: Gently fold the whipped cream into the red velvet mixture in two batches, being careful not to deflate the mixture. Stir in 1/2 cup red velvet cake crumbs, folding gently to incorporate.
- Freeze: Pour the mixture into a 9×5-inch loaf pan or airtight freezer-safe container. Swirl in additional cake crumbs on top if desired. Cover and freeze for at least 6 hours or overnight, until firm.
- Serve: Scoop and serve directly from the freezer.
Notes
- For best flavor, use freshly baked or leftover red velvet cake.
- You can also stir in white chocolate chips or a cream cheese swirl for extra richness.
- No ice cream maker required!
- Prep Time: 15 minutes
- Cook Time: 0 minutes
- Category: Dessert
- Method: No-Churn
- Cuisine: American
Nutrition
- Serving Size: 1/2 cup
- Calories: 310
- Sugar: 27g
- Sodium: 90mg
- Fat: 20g
- Saturated Fat: 12g
- Unsaturated Fat: 6g
- Trans Fat: 0g
- Carbohydrates: 28g
- Fiber: 1g
- Protein: 5g
- Cholesterol: 70mg


