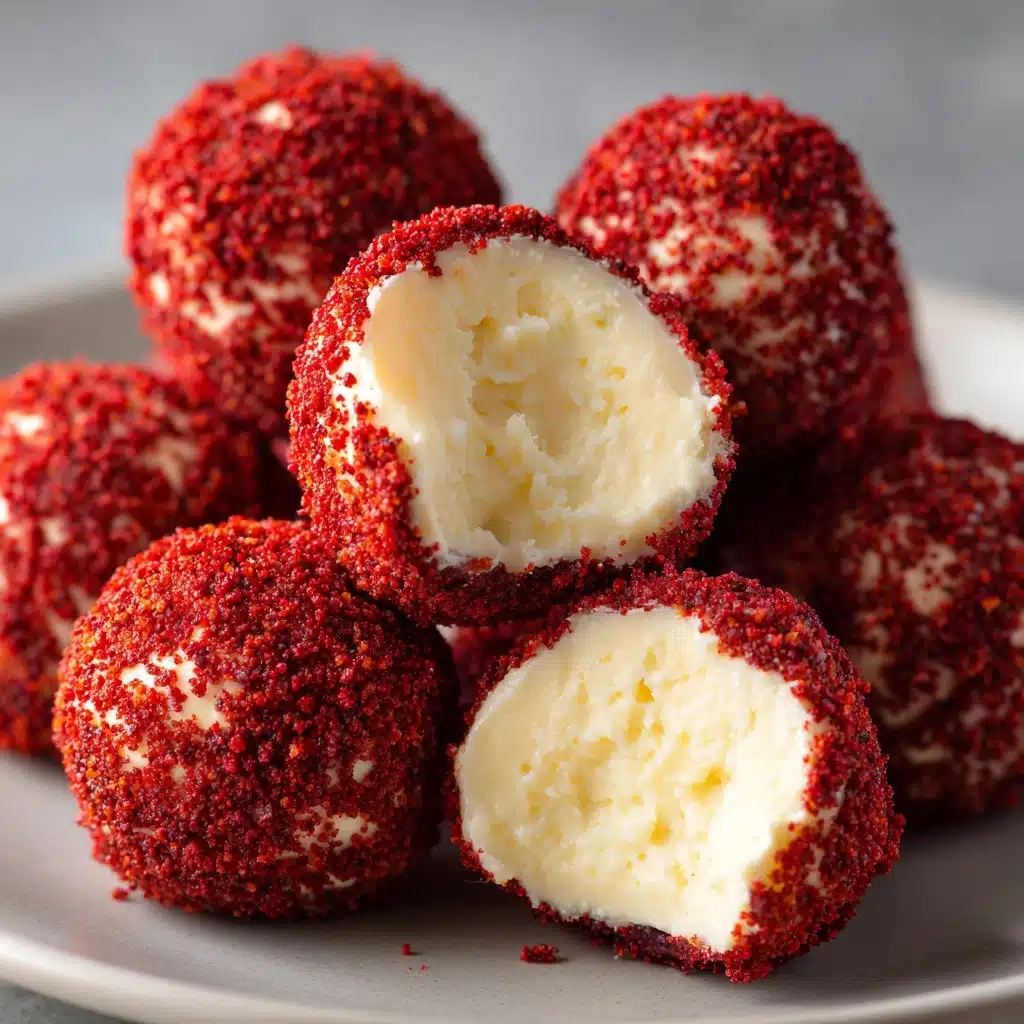
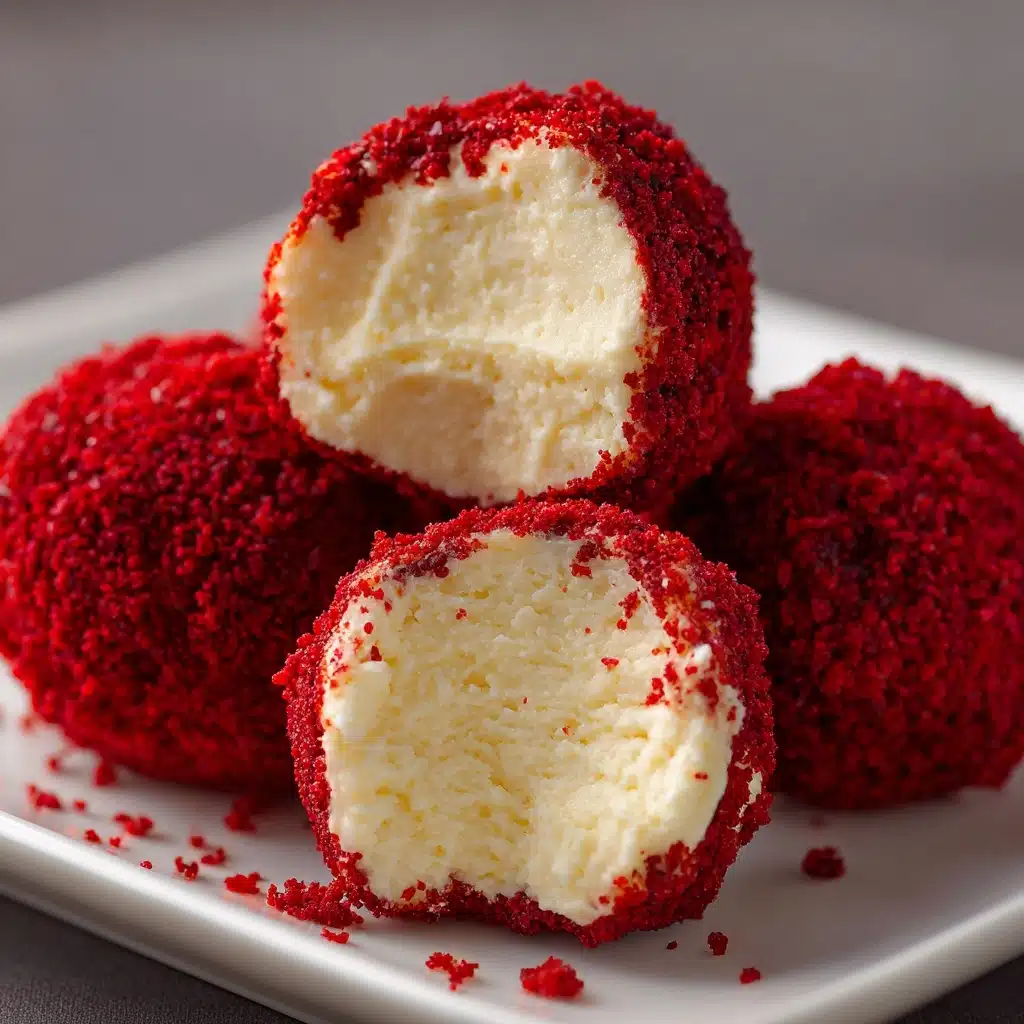
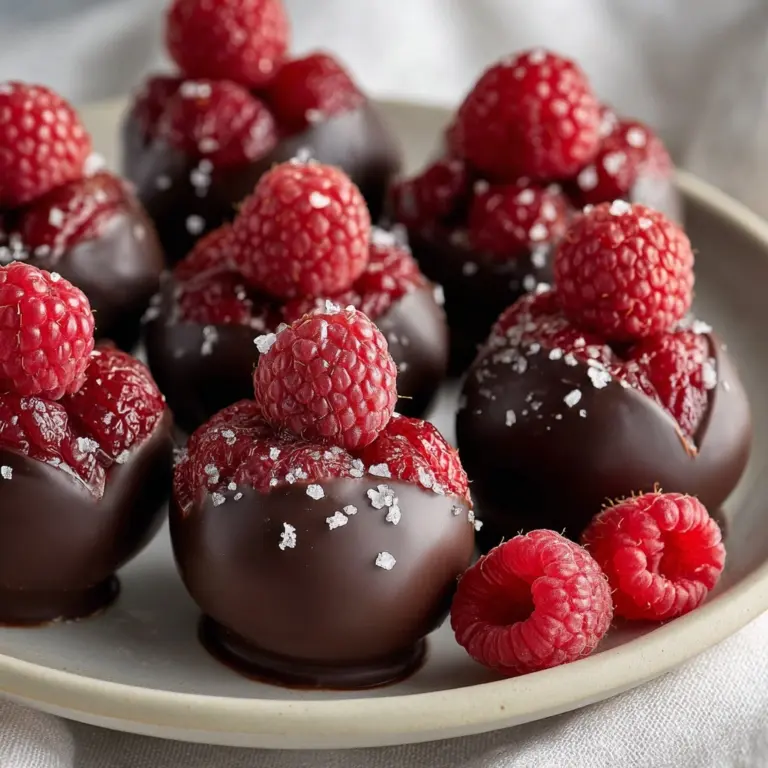
Red Velvet Cheesecake Balls Recipe
If you’re searching for a dessert that’s irresistibly indulgent yet eye-catchingly vibrant, Red Velvet Cheesecake Balls deliver on every level. These sweet little gems combine the timeless charm of red velvet cake with the dreamy creaminess of cheesecake, all enveloped in a smooth white chocolate shell. Whether you’re throwing a party, planning a holiday spread, or just need a treat to brighten someone’s day, Red Velvet Cheesecake Balls are joyfully simple to make and guaranteed to spark conversation (and cravings!) after just one bite.
Ingredients You’ll Need
The beauty of Red Velvet Cheesecake Balls is in their simplicity—each ingredient is carefully chosen to create the perfect balance of rich flavor, velvety texture, and signature color. Here’s what you’ll need and why each one matters:
- Red velvet cake mix (1 box, baked and cooled): The foundation of our flavor and that show-stopping red hue—bake your favorite boxed mix for ultimate ease.
- Cream cheese (8 ounces, softened): The key to luscious, cheesecake-like richness and perfectly binds the cake crumbs.
- Vanilla extract (1 teaspoon): Adds a delicate warm undertone, making every bite more flavorful and aromatic.
- White chocolate (12 ounces, melted): Sweet, creamy, and glossy—a divine coating that contrasts beautifully with the tangy cake interior.
- Red velvet cake crumbs (1/4 cup, for garnish) or red sprinkles: Adds a final flourish of color and texture, perfect for both holiday sparkle and everyday fun.
How to Make Red Velvet Cheesecake Balls
Step 1: Bake and Cool the Cake
Begin by preparing your red velvet cake according to the instructions on the box. Once it’s baked, set it aside to cool completely. This will prevent the cream cheese from melting when you mix everything together later and ensures sturdy, beautiful cheesecake balls.
Step 2: Crumble the Cake
Once your cake is completely cool, use your hands or a fork to break it into fine, even crumbs. Aim for a sand-like texture so the cheesecake mixture will come together smoothly—this is the foundation of your Red Velvet Cheesecake Balls.
Step 3: Make the Cheesecake Mixture
Add the softened cream cheese and vanilla extract directly to the cake crumbs in a large mixing bowl. With clean hands (or a sturdy spoon), mix everything thoroughly until a thick, dough-like consistency forms. You’re looking for a texture that’s easy to roll but not too sticky.
Step 4: Shape the Balls
Take small scoops of the mixture (about 1 inch each) and roll them between your palms to form perfect balls. Place them onto a parchment-lined baking sheet, keeping a bit of space between each one to prevent sticking.
Step 5: Chill Until Firm
Refrigerate the tray of cheesecake balls for at least 1 hour. This crucial step helps them firm up and makes dipping them in chocolate a breeze. If you’re in a hurry, pop them in the freezer for 20-30 minutes instead.
Step 6: Dip in White Chocolate
Melt your white chocolate until silky smooth. Using a fork or dipping tool, carefully lower each ball into the chocolate, letting any excess drip off before returning it to the tray. Work in batches so the balls stay cold and firm.
Step 7: Garnish and Set
While the chocolate coating is still wet, garnish each ball with a sprinkle of red velvet cake crumbs or bright red sprinkles. Let them sit at room temperature or in the fridge until the coating sets completely. Now you’re ready to serve and dazzle!
How to Serve Red Velvet Cheesecake Balls
Garnishes
A sprinkle of reserved red velvet crumbs or a confetti of red sprinkles adds a delightful pop of color and texture. For an extra festive twist, drizzle a little melted dark chocolate over the top once the white chocolate sets—it’s a gorgeous contrast that wows every guest.
Side Dishes
Red Velvet Cheesecake Balls pair fabulously with a platter of fresh strawberries or raspberries. If you’re serving them after a meal, offer a simple espresso or robust black coffee alongside to balance the sweetness and create a true dessert experience.
Creative Ways to Present
Arrange your Red Velvet Cheesecake Balls on a pretty cake stand or tiered tray for instant elegance. For parties, skewer each ball with a festive toothpick, or serve them in mini cupcake liners for an effortless grab-and-go treat that doubles as party decor.
Make Ahead and Storage
Storing Leftovers
Store your Red Velvet Cheesecake Balls in an airtight container in the refrigerator for up to 5 days. The chilled environment keeps them tasting fresh and maintains that creamy, dreamy texture everyone loves.
Freezing
These cheesecake balls freeze beautifully! Place them in a single layer on a baking sheet until solid, then transfer to a freezer-safe bag or container. They’ll keep in the freezer for up to 2 months—perfect for making ahead for holidays or special occasions.
Reheating
No reheating required for Red Velvet Cheesecake Balls. Simply let frozen balls thaw in the fridge for a few hours or at room temperature for 30 minutes before serving, and they’ll taste as decadent as the day you made them.
FAQs
Can I use homemade red velvet cake instead of a mix?
Absolutely! If you have a favorite homemade red velvet recipe, go for it. Just be sure to let the cake cool completely and crumble it finely, just as you would with a boxed mix.
What’s the best way to melt white chocolate for dipping?
The microwave is your friend here—melt chocolate chips or chopped bars in 20-second intervals, stirring in between, until smooth. For an extra-silky finish, add a teaspoon of coconut oil before heating.
Can I make Red Velvet Cheesecake Balls gluten-free?
Yes—simply swap the regular cake mix for a gluten-free red velvet cake mix, and double-check that your other ingredients are certified gluten-free. The result is just as delicious and safe for gluten-sensitive friends!
How do I prevent the balls from falling apart in the chocolate?
Be sure to chill the shaped balls thoroughly before dipping; the firmer they are, the less likely they are to fall apart. Work in batches and keep the extras refrigerated until you’re ready to coat them.
What can I use if I don’t have a dipping tool?
No fancy tools needed! Just use a regular fork or even two skewers to lower each ball into the melted chocolate, then tap gently to shake off excess before transferring to your tray.
Final Thoughts
There’s something truly magical about sinking your teeth into a Red Velvet Cheesecake Ball—creamy, vibrant, and downright celebratory. Whether you’re marking a special occasion or just craving a sweet diversion, give these a try and watch them disappear right before your eyes. Go ahead and treat yourself, your friends, and your family to this delightful dessert—you’ll be the star of the dessert table every time!
Print
Red Velvet Cheesecake Balls Recipe
- Total Time: 50 minutes + chilling
- Yield: 24 balls 1x
- Diet: Vegetarian
Description
These Red Velvet Cheesecake Balls are a delightful treat that combines the rich flavors of red velvet cake with creamy cheesecake, all coated in white chocolate. Perfect for parties or as a sweet indulgence!
Ingredients
Red Velvet Cake Balls:
- 1 box red velvet cake mix, baked and cooled
- 8 ounces cream cheese, softened
- 1 teaspoon vanilla extract
Coating:
- 12 ounces white chocolate, melted
- 1/4 cup red velvet cake crumbs or red sprinkles
Instructions
- Bake the Red Velvet Cake: Prepare and bake the red velvet cake according to package instructions. Let it cool completely.
- Make the Cake Balls: Crumble the cooled cake into fine crumbs in a large mixing bowl. Add softened cream cheese and vanilla extract, mix until well combined into a thick dough.
- Form Balls: Roll the mixture into 1-inch balls and place on a parchment-lined baking sheet. Chill in the refrigerator until firm.
- Coat in White Chocolate: Dip each ball into melted white chocolate, let excess drip off, then place back on the sheet. Sprinkle with cake crumbs or sprinkles.
- Set and Serve: Allow the coating to set at room temperature or refrigerate until firm before serving.
Notes
- Store in an airtight container in the refrigerator for up to 5 days.
- They can be frozen for up to 2 months; thaw before serving.
- For a festive touch, drizzle with melted dark chocolate.
- Prep Time: 20 minutes
- Cook Time: 30 minutes (cake baking)
- Category: Dessert, Confection
- Method: Baking, No-Bake Assembly
- Cuisine: American
Nutrition
- Serving Size: 1 ball
- Calories: 160
- Sugar: 14 g
- Sodium: 135 mg
- Fat: 9 g
- Saturated Fat: 5 g
- Unsaturated Fat: 3 g
- Trans Fat: 0 g
- Carbohydrates: 18 g
- Fiber: 0 g
- Protein: 2 g
- Cholesterol: 20 mg

