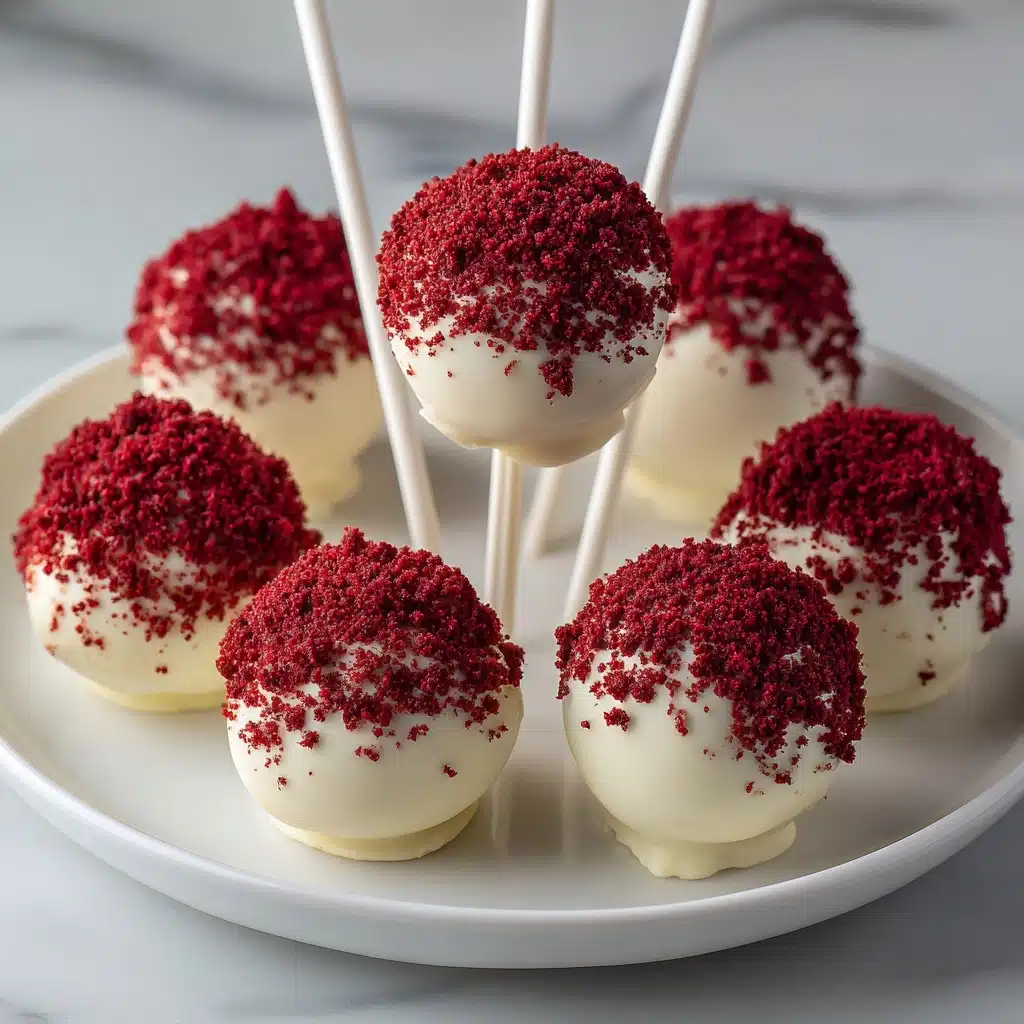
Red Velvet Cake Pops Recipe
If you’re looking for a crowd-pleasing dessert that’s every bit as adorable as it is delicious, Red Velvet Cake Pops are sure to steal the show. These bite-sized treats offer everything people love about classic red velvet cake, but with the fun twist of being served on a stick. Inside, you’ll find moist and rich morsels laced with tangy cream cheese frosting, all wrapped in a thin shell of white chocolate and decked out with colorful sprinkles. Whether you’re celebrating a birthday, a holiday, or pulling together a last-minute treat for friends, Red Velvet Cake Pops are endlessly festive and impossible to resist.
Ingredients You’ll Need
You’ll be pleasantly surprised at how approachable and essential each ingredient is in creating these magical Red Velvet Cake Pops. Every component plays a starring role in delivering the signature flavor, texture, and eye-catching look we all love in these treats.
- Red velvet cake mix: The perfect shortcut that guarantees vibrant color and that hint of cocoa flavor.
- Large eggs: These help bind the batter and add moisture for the perfectly tender crumb.
- Vegetable oil: Keeps the cake extra moist, ensuring your pops are melt-in-your-mouth and never dry.
- Water: Activates the cake mix and ensures a smooth, luscious batter.
- Cream cheese frosting: The soul of red velvet! It brings creaminess, tang, and helps hold everything together.
- White chocolate or candy melts: Delivers a crisp, sweet shell that contrasts beautifully with the tender inside.
- Coconut oil or shortening: Makes your chocolate coating silky-smooth and easy to work with.
- Sprinkles: The final flourish! Choose colors to match your occasion for a festive touch.
- Lollipop sticks: The classic cake pop handle, making these treats party-perfect and fun to eat.
How to Make Red Velvet Cake Pops
Step 1: Bake the Cake
Start by preparing your red velvet cake exactly as the box instructs by mixing together the cake mix, eggs, oil, and water. Pour the batter into your baking pan, smooth out the top, and bake until a toothpick comes out clean. Let the cake cool in the pan—patience here pays off, as a cool cake crumbles best.
Step 2: Crumble the Cake
Once the cake is completely cool, gently use your hands (it’s the most satisfying part!) or a fork to break it into fine crumbs in a large mixing bowl. This step is key: the finer the crumbs, the smoother your cake pop centers will be.
Step 3: Mix with Frosting
Add the cream cheese frosting to the bowl with your cake crumbs. Stir and mash everything together until you have a dense, pliable mixture that holds together when you press it. Don’t be shy—your hands are the best tools here!
Step 4: Shape Into Balls
Scoop out approximately one tablespoon of the mixture at a time and roll it between your palms to form smooth, 1-inch balls. Place each ball onto a baking sheet lined with parchment paper. You should get 30 to 35 cake balls, perfect for a party or sharing!
Step 5: Insert Sticks and Freeze
Now, gently insert a lollipop stick halfway into each cake ball. Once all the sticks are in place, pop the tray into the freezer for about 30 minutes. This step is crucial for ensuring the balls stay firm and don’t fall apart when dipping into the chocolate coating.
Step 6: Melt Chocolate Coating
While your cake pops are chilling, melt the white chocolate or candy melts with coconut oil. Microwave in 30-second bursts, stirring between each, until perfectly smooth and pourable. The coconut oil will give you that lovely, glossy dip!
Step 7: Dip and Decorate
Take the cake pops out of the freezer. Holding each by the stick, dip them into the melted chocolate, making sure to coat fully. Let any excess drip off before placing them upright into a foam block or cake pop stand. Immediately sprinkle with your chosen decorations for a burst of color. Let them set in the fridge until the coating hardens to a satisfying snap.
How to Serve Red Velvet Cake Pops

Garnishes
Add flair to your Red Velvet Cake Pops with a final flurry of sprinkles, colored sugars, or edible glitter. For a truly elegant look, try a drizzle of contrasting chocolate or a dusting of freeze-dried berry powder—your creativity is the limit!
Side Dishes
Pair these pops with mugs of coffee, a chilled glass of milk, or a simple fruit salad for a complete dessert spread. They also make an adorable centerpiece on a dessert table alongside cookies, macarons, and small cheesecakes.
Creative Ways to Present
Display your Red Velvet Cake Pops upright in a decorated foam block, grouped in themed mugs or jars filled with candies, or wrapped in cellophane as party favors. For holidays, color-coordinate your sprinkles and ribbons—they’ll be as pretty as a picture before the first bite!
Make Ahead and Storage
Storing Leftovers
Store any leftover Red Velvet Cake Pops in the refrigerator. Keep them in an airtight container, and they’ll stay fresh and moist for up to five days, making them perfect for party prep.
Freezing
Want to get ahead? Once the cake pops are coated and set, arrange them in a single layer in a freezer-safe container. Freeze for up to two months. When you’re ready to serve, let them thaw in the refrigerator overnight for the best texture.
Reheating
Red Velvet Cake Pops are best enjoyed cold or at room temperature, so no reheating is needed. If they’ve just come out of the fridge or freezer, allow them to sit out for 20 to 30 minutes before serving, so the centers are perfectly soft and creamy.
FAQs
Why do my cake pops fall off the sticks?
If your Red Velvet Cake Pops aren’t holding onto their sticks, it’s usually because the cake mixture is too soft or the balls aren’t cold enough. Make sure you chill them until firm before dipping, and don’t use too much frosting in the mix.
Can I use homemade red velvet cake instead of a mix?
Absolutely! If you have a favorite homemade red velvet cake recipe, feel free to use it. Just be sure it isn’t too moist or crumbly, so your cake pops hold together after mixing with the frosting.
What can I use instead of cream cheese frosting?
If you’d like an alternative, vanilla buttercream or chocolate frosting both work in a pinch. However, keep in mind that cream cheese adds that classic flavor you expect in Red Velvet Cake Pops.
How do I dip cake pops without making a mess?
The trick is to use a deep, narrow container for dipping, and be patient! Tap off any extra coating gently and rotate the pop to evenly distribute the chocolate before adding garnishes.
Can I make Red Velvet Cake Pops gluten-free?
Yes! Simply use a gluten-free red velvet cake mix for the base, and make sure all other ingredients are gluten-free too. The rest of the process remains exactly the same, so everyone can enjoy these tasty treats.
Final Thoughts
I can’t think of a sweeter way to turn any day into a celebration than with a batch of homemade Red Velvet Cake Pops. They’re charming, delicious, and guaranteed to make you the star of any dessert table. Give them a try—your friends and family will thank you!
Print
Red Velvet Cake Pops Recipe
- Total Time: 1 hour 10 minutes
- Yield: 30–35 cake pops 1x
- Diet: Vegetarian
Description
Indulge in these delightful Red Velvet Cake Pops that are perfect for any celebration. These bite-sized treats are made with moist red velvet cake, creamy cream cheese frosting, and coated in a decadent layer of white chocolate.
Ingredients
Cake:
- 1 box red velvet cake mix
- 3 large eggs
- 1/2 cup vegetable oil
- 1 cup water
Frosting and Coating:
- 1 1/2 cups cream cheese frosting
- 2 cups white chocolate or candy melts
- 2 teaspoons coconut oil or shortening
- sprinkles for decoration
- 30–35 lollipop sticks
Instructions
- Cake Preparation: Prepare red velvet cake according to package instructions and let it cool. Crumble cake into fine crumbs and mix in cream cheese frosting until well combined.
- Form Cake Balls: Roll mixture into 1-inch balls and place on a baking sheet. Insert lollipop sticks and freeze for 30 minutes.
- Coating: Melt white chocolate with coconut oil, dip cake pops, decorate with sprinkles, and let them set upright.
- Chill: Refrigerate until coating hardens.
Notes
- Ensure cake balls are cold before dipping.
- Dark or milk chocolate can be used as an alternative coating.
- Prep Time: 40 minutes
- Cook Time: 30 minutes
- Category: Dessert
- Method: Baking
- Cuisine: American
Nutrition
- Serving Size: 1 cake pop
- Calories: 160
- Sugar: 15 g
- Sodium: 120 mg
- Fat: 8 g
- Saturated Fat: 4 g
- Unsaturated Fat: 3 g
- Trans Fat: 0 g
- Carbohydrates: 20 g
- Fiber: 1 g
- Protein: 2 g
- Cholesterol: 20 mg

