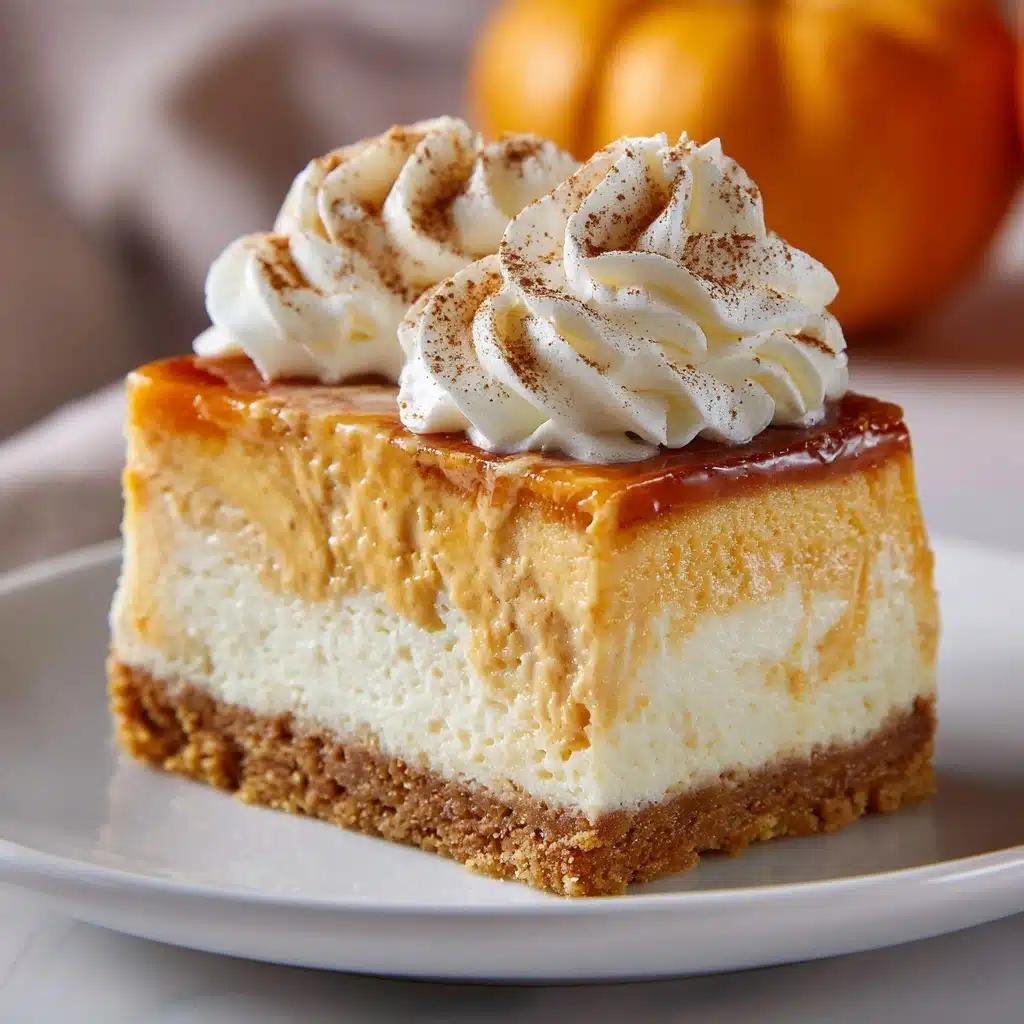
No-Bake Pumpkin Cheesecake Recipe
Creamy, pumpkin-spiced, and completely fuss-free, this No-Bake Pumpkin Cheesecake is my go-to treat when I crave all the cozy flavors of autumn without ever turning on the oven. With its velvety smooth filling and buttery graham cracker crust, it delivers everything you love about pumpkin pie and cheesecake in one effortless bite. Whether you’re planning a festive gathering or simply want an easy dessert that impresses every time, this luscious, chill-and-serve beauty will quickly become your new holiday classic.
Ingredients You’ll Need
You only need a handful of simple, easy-to-find ingredients to create this showstopping No-Bake Pumpkin Cheesecake. Each one plays an important role, combining for dreamy texture, balanced sweetness, and that signature pumpkin spice flair.
- Graham cracker crumbs: Lend a classic, sweet crunch and firm base to hold all the creamy goodness above.
- Brown sugar: Adds a caramel-like depth and enhances the crust’s irresistible flavor.
- Unsalted butter, melted: Binds the crust together so it stays perfectly sliceable.
- Cream cheese, softened: Creates the luxurious, tangy-smooth backbone of the filling.
- Pumpkin purée: Supplies that unmistakable autumn hue and a gentle, earthy sweetness.
- Granulated sugar: Sweetens the filling just enough without overpowering the spice.
- Ground cinnamon: Infuses the cheesecake with a warm, familiar pumpkin pie aroma.
- Ground nutmeg: Offers just the right subtle nuttiness and depth to the spice mix.
- Ground ginger: Adds a gentle zest and a whisper of heat that livens up the filling.
- Salt: A pinch of salt makes all the sweet and spiced flavors pop.
- Vanilla extract: Rounds everything out with rich, fragrant notes.
- Whipped topping (like Cool Whip): Gives the cheesecake its light, cloudlike texture that melts in your mouth.
How to Make No-Bake Pumpkin Cheesecake
Step 1: Make the Graham Cracker Crust
Start by mixing your graham cracker crumbs, brown sugar, and melted butter in a medium bowl until the texture is like wet sand and holds its shape when pressed. Press this mixture firmly and evenly into the bottom of a 9-inch springform pan or pie dish. Take a little time to compact it well along the bottom, ensuring your crust stays sturdy under all that creamy filling. Pop the pan in the fridge to chill while you make the pumpkin goodness.
Step 2: Mix the Cream Cheese Filling
In a large bowl, beat the softened cream cheese until it’s dreamy-smooth and lump free. Add your pumpkin purée, granulated sugar, cinnamon, nutmeg, ginger, salt, and vanilla extract. Keep beating until the mixture is perfectly unified, vibrant orange, and smelling like fall in a bowl. There’s no shortcut here: make sure everything is combined so each bite bursts with pumpkin spice.
Step 3: Fold in the Whipped Topping
Next comes the secret to that unbeatable, light-as-air texture: gently fold in the whipped topping. Use a spatula and a light hand, scooping from the bottom up, until the filling becomes pale, silky, and absolutely luscious. Overmixing would deflate all those airy bubbles, so just blend until combined for a cloudlike finish your guests will rave about.
Step 4: Assemble and Chill
Spread the pumpkin cheesecake filling evenly over the chilled crust, smoothing the top with a spatula for bakery-worthy presentation. Make sure the filling reaches the edges for beautiful slices later. Let it set in the refrigerator for at least four hours, but for the dreamiest texture, overnight chilling is pure magic. The wait is totally worth it!
Step 5: Slice and Serve
Once the No-Bake Pumpkin Cheesecake has set, run a butter knife along the edge before unlatching the springform pan (if using). Slice into generous wedges and serve cold, straight from the fridge. Every piece will have that irresistible creamy filling and crisp, buttery crust—fall dessert perfection!
How to Serve No-Bake Pumpkin Cheesecake

Garnishes
Dress up each slice with a swoosh of whipped cream, a sprinkle of extra cinnamon or nutmeg, or even a handful of crushed graham crackers. For festive flair, try a light drizzle of caramel sauce or a few candied pecans for crunch. These simple touches add color, texture, and a hint of indulgence to every bite.
Side Dishes
Serve this creamy No-Bake Pumpkin Cheesecake with a mug of spiced chai, hot coffee, or a scoop of vanilla ice cream if you want to double down on decadence. For a brighter finish, pair it with a citrus salad or baked apples to play up the warm fall flavors and keep your dessert spread balanced.
Creative Ways to Present
For a party-perfect presentation, assemble the cheesecake in mini mason jars for individual desserts everyone will love. Or, use a rectangular tart pan and cut into elegant bars—easy to serve and oh-so Instagrammable! If you’re feeling extra creative, layer cubes of cheesecake filling and crust in parfait glasses for gorgeous pumpkin trifles that steal the show.
Make Ahead and Storage
Storing Leftovers
Keep leftover No-Bake Pumpkin Cheesecake wrapped tightly in the refrigerator for up to five days. It maintains its smooth, creamy texture and holds together beautifully, making it perfect for prepping ahead when hosting a crowd. Just cover with plastic wrap or seal in an airtight container.
Freezing
Planning ahead for busy holidays? You can freeze the assembled cheesecake whole or in slices. Just wrap tightly in plastic and then foil, and store in the freezer for up to two months. Thaw overnight in the fridge before serving, and the texture will bounce right back. Leave off fresh garnishes until ready to eat.
Reheating
Good news—no reheating required! This is a true chill-and-serve dessert. If frozen, simply defrost slowly in the fridge and enjoy it cold straight from the tray for the creamiest results.
FAQs
Can I use homemade whipped cream instead of store-bought whipped topping?
Absolutely! Homemade whipped cream works perfectly in No-Bake Pumpkin Cheesecake. Just beat heavy cream with a little sugar until stiff peaks form and use cup for cup in place of store-bought whipped topping. It’s a bit richer and adds fresh flavor.
Is it possible to make this recipe gluten-free?
Yes, simply swap regular graham cracker crumbs for your favorite gluten-free variety. All other ingredients in the No-Bake Pumpkin Cheesecake are naturally gluten-free, so it’s an easy adaptation that doesn’t sacrifice taste or texture.
How long does the cheesecake need to chill to set up properly?
For the best results, chill your No-Bake Pumpkin Cheesecake for at least four hours, but overnight is ideal. The longer chilling time ensures the filling becomes firm and sliceable, making serving effortless and mess-free.
Can I use fresh pumpkin instead of canned pumpkin purée?
If you have extra time, freshly roasted and puréed pumpkin is a delicious option. Just be sure to blot or strain out any excess liquid so your filling stays thick and creamy, not watery.
Why is my filling runny?
A runny filling usually means the cheesecake didn’t chill long enough or the cream cheese wasn’t beaten until smooth before adding the pumpkin. Always be sure your filling is well-combined and give it plenty of time in the fridge for the perfect texture.
Final Thoughts
If you’re craving cozy, pumpkin-spiced goodness without any oven drama, this No-Bake Pumpkin Cheesecake is your stress-free ticket to dessert brilliance. Treat yourself and your loved ones—you’ll love how easy and delicious it is, and you might just start a new fall tradition!
Print
No-Bake Pumpkin Cheesecake Recipe
- Total Time: 4 hours 15 minutes (including chilling)
- Yield: 8 servings 1x
- Diet: Non-Vegetarian
Description
Indulge in the flavors of fall with this creamy and delicious No-Bake Pumpkin Cheesecake. Perfect for Thanksgiving or any autumn gathering, this easy-to-make dessert will impress your guests without keeping you tied to the oven. The smooth pumpkin filling sits atop a buttery graham cracker crust, creating a delightful treat that captures the essence of the season.
Ingredients
- 1 1/2 cups graham cracker crumbs
- 1/4 cup brown sugar
- 1/2 cup unsalted butter, melted
For the crust:
- 8 oz cream cheese, softened
- 1 cup pumpkin purée
- 1/2 cup granulated sugar
- 1/2 tsp ground cinnamon
- 1/4 tsp ground nutmeg
- 1/4 tsp ground ginger
- 1/4 tsp salt
- 1 tsp vanilla extract
- 1 1/2 cups whipped topping (like Cool Whip)
For the filling:
Instructions
- Prepare the crust: In a medium bowl, combine graham cracker crumbs, brown sugar, and melted butter until evenly moistened. Press the mixture into the bottom of a 9-inch springform pan or pie dish. Chill in the fridge while you prepare the filling.
- Make the filling: In a large bowl, beat the cream cheese until smooth. Add pumpkin purée, granulated sugar, cinnamon, nutmeg, ginger, salt, and vanilla extract. Beat until fully combined and creamy. Gently fold in the whipped topping until the mixture is light and fluffy.
- Assemble the cheesecake: Spread the filling evenly over the chilled crust. Refrigerate for at least 4 hours, or until firm. Slice and serve chilled.
Notes
- Top with extra whipped cream, a sprinkle of cinnamon, or crushed graham crackers for garnish.
- For best texture, let chill overnight.
- Prep Time: 15 minutes
- Cook Time: 0 minutes
- Category: Dessert
- Method: No-Bake
- Cuisine: American
Nutrition
- Serving Size: 1 slice
- Calories: 320
- Sugar: 21g
- Sodium: 240mg
- Fat: 20g
- Saturated Fat: 11g
- Unsaturated Fat: 7g
- Trans Fat: 0g
- Carbohydrates: 32g
- Fiber: 1g
- Protein: 4g
- Cholesterol: 45mg

