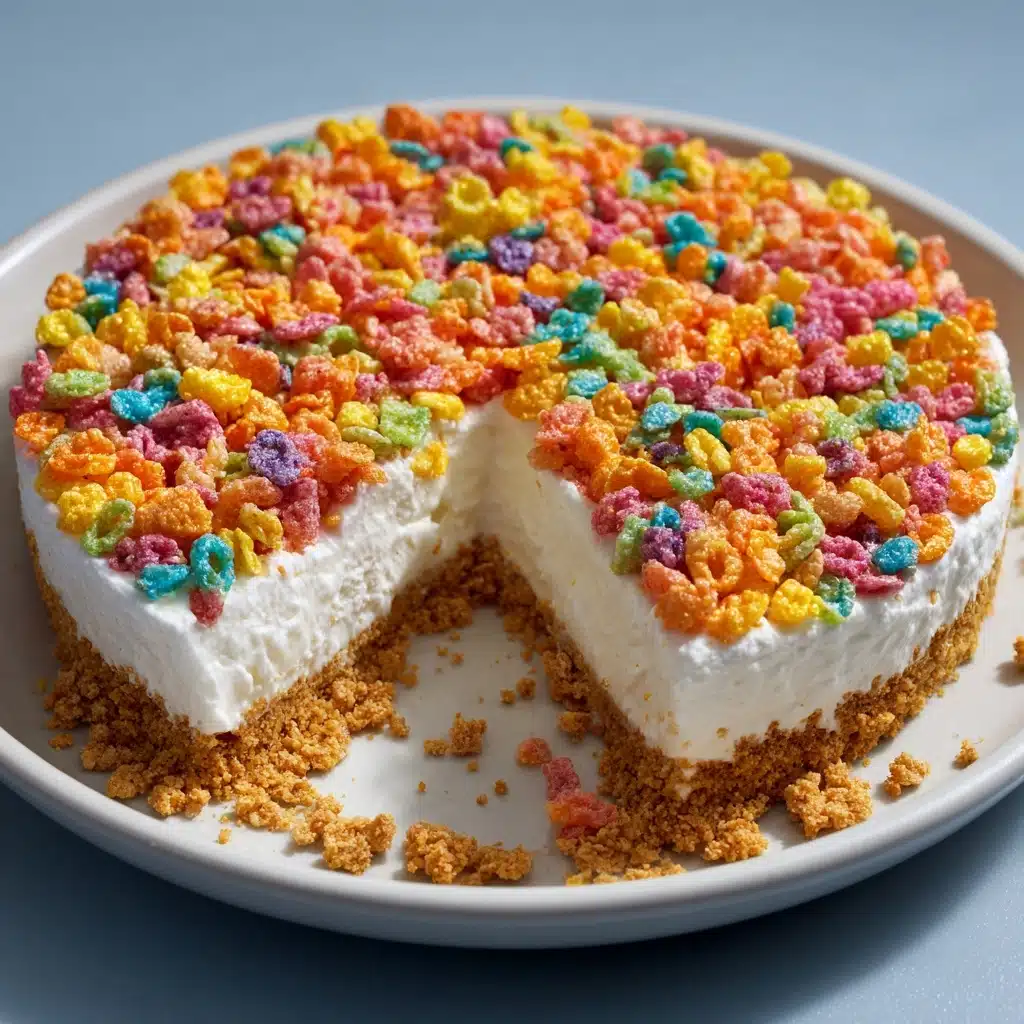
No-Bake Fruity Pebbles Cheesecake Recipe
If you’re looking for a vibrant, crowd-pleasing dessert that’s as fun to make as it is to eat, this No-Bake Fruity Pebbles Cheesecake is about to steal the show. Imagine every creamy, dreamy bite bursting with playful cereal crunch and bites of colorful nostalgia—no oven required! This easy, no-fuss recipe is perfect for birthday parties, summertime gatherings, or anytime you want to channel pure joy in dessert form. Let’s unlock the magic together!
Ingredients You’ll Need
The beauty of a No-Bake Fruity Pebbles Cheesecake is how each ingredient pulls its weight: crunch from the cereal, smoothness from the cream cheese, and a hint of tang from sour cream. These simple elements transform into a visually stunning and irresistibly tasty treat.
- Fruity Pebbles cereal: The star of the show, bringing rainbow colors and crisp texture to both the crust and creamy filling.
- Unsalted butter, melted: Binds the cereal for the crust and lends a rich, melt-in-your-mouth finish.
- Sugar: Adds a gentle sweetness to the crust, allowing the cereal’s fruitiness to shine.
- Cream cheese, softened: The creamy backbone of your cheesecake—make sure it’s properly softened for a super-smooth filling.
- Heavy cream: Whips up into silky clouds, helping the cheesecake set beautifully without baking.
- Powdered sugar: Dissolves fully, perfect for ensuring the filling is smooth and sweet—but never gritty.
- Vanilla extract: A little vanilla rounds out the flavors with a homey, comforting note.
- Sour cream: Adds a delicate tang that balances the sweetness and creates a lovely, smooth texture—swap for Greek yogurt if you like a zippier taste.
- Whipped cream (optional, for topping): A dollop on top makes it extra festive and creamy.
- Extra Fruity Pebbles cereal (optional, for garnish): For extra color and crunch, and to show everyone exactly what joy awaits in each slice!
How to Make No-Bake Fruity Pebbles Cheesecake
Step 1: Create the Colorful Crust
Start by grabbing a big bowl and mixing together Fruity Pebbles cereal, melted butter, and a sprinkle of sugar. As you stir, the butter helps every little piece get glossy and delicious. Once you’ve got an even coating, press the mixture firmly into the bottom of a springform pan or pie dish—use a spoon or even your fingers to press it into every nook for a solid, colorful foundation. Slide it into the fridge to chill while you focus on the dreamy filling.
Step 2: Beat the Cream Cheese
In a large mixing bowl, whip the softened cream cheese with an electric mixer until it loses all lumps and turns luxuriously creamy. This step is key! Room-temperature cream cheese makes all the difference for a truly smooth No-Bake Fruity Pebbles Cheesecake base.
Step 3: Combine the Dairy Delights
Next, pour in the heavy cream, powdered sugar, and vanilla extract, then beat until everything looks thickened and almost mousse-like. This combo will help the filling set up perfectly and lend it that over-the-top richness we all crave in a cheesecake.
Step 4: Add Sour Cream and More Fruity Pebbles
Now, gently mix in the sour cream along with a glorious cup of Fruity Pebbles cereal. The sour cream brings a gentle tang (kind of the secret weapon here), and the extra cereal adds fun color and a little surprise crunch in every bite.
Step 5: Assemble and Chill
Pour the fruity cheesecake mixture onto your chilled crust and smooth the top with a spatula. Back into the refrigerator it goes! Letting it chill for at least 4 hours (overnight is even better) will ensure the No-Bake Fruity Pebbles Cheesecake sets up beautifully, making perfect slices a breeze.
Step 6: Decorate to Delight
Once the cheesecake is firm, dress it up! Swirl on some whipped cream, sprinkle over extra Fruity Pebbles, and admire those rainbow colors. Presentation is half the fun with this dessert, so don’t be shy—go all out!
Step 7: Slice and Serve
Run a sharp knife around the edge before slicing to get those clean, showstopper wedges. Plate up, serve, and soak in those smiles—you just made everyone’s new favorite No-Bake Fruity Pebbles Cheesecake!
How to Serve No-Bake Fruity Pebbles Cheesecake
Garnishes
The classic finishing touch is a cloud of whipped cream and a generous shower of Fruity Pebbles on top. For extra pop, try adding white chocolate shavings, fresh berries, or a drizzle of raspberry sauce. This is your chance to get creative and really let those colors shine!
Side Dishes
No-Bake Fruity Pebbles Cheesecake pairs wonderfully with an ice-cold glass of milk, a fruity punch, or a mug of creamy coffee. For a fun party spread, set out bowls of fresh fruit or mini bowls of extra cereal for dipping bites of cheesecake—trust me, folks love the interactive twist!
Creative Ways to Present
Take this dessert to the next level by making individual mini cheesecakes in mason jars, or slicing it into bite-sized bars for a party platter. It’s also incredible served in small cups layered parfait-style with extra cereal and whipped cream between the layers for maximum color and crunch.
Make Ahead and Storage
Storing Leftovers
Leftover No-Bake Fruity Pebbles Cheesecake should be kept covered in the refrigerator. It’ll stay magically fresh for up to 3 days—the crust does soften a little, but those bright flavors remain at their best!
Freezing
If you want to make it ahead (or save some for later), you can freeze the cheesecake (without the whipped cream topping or cereal garnish) for up to a month. Wrap slices tightly in plastic wrap and place in an airtight container for easy storage. Thaw overnight in the fridge before serving for the best texture.
Reheating
No need for reheating here! This cheesecake is at its creamy, dreamy best served chilled. If it gets a bit too hard in the freezer, just allow it to sit at room temperature for 10-15 minutes before enjoying.
FAQs
Can I use a different cereal for the crust?
Absolutely! While Fruity Pebbles deliver a rainbow of color and fruitiness, you can swap in Cocoa Pebbles, Rice Krispies, or your favorite crunchy, sweet cereal for a fun twist on the classic No-Bake Fruity Pebbles Cheesecake.
How do I keep the Fruity Pebbles in the filling from getting soggy?
The cereal in the filling will soften slightly over time, which actually creates a nice texture contrast with the crunchy crust and topping. If you crave extra crunch, add a handful of fresh Fruity Pebbles as a garnish just before serving.
Can I make this recipe gluten-free?
Yes, you can! Look for gluten-free Fruity Pebbles (they’re often labeled gluten-free), and check that all your other ingredients are safe. It’s a great option for a celiac-friendly version of this colorful dessert.
What can I use instead of sour cream?
Greek yogurt is a fantastic substitute for sour cream in No-Bake Fruity Pebbles Cheesecake. It brings a tangy note and keeps the filling creamy and rich—plus, it’s a bit lighter if you’re watching calories.
How far in advance can I make the cheesecake?
You can make the No-Bake Fruity Pebbles Cheesecake up to 2 days ahead. Just hold off on adding the whipped cream and extra Fruity Pebbles garnish until you’re ready to serve, so everything looks and tastes its freshest.
Final Thoughts
If you’re ready to wow your friends and family with a dessert that’s as joyful as it is delicious, give this No-Bake Fruity Pebbles Cheesecake a try. It’s easy, eye-catching, and totally unforgettable—just the thing to turn everyday moments into celebrations. Whip it up and let the good times (and the compliments) roll!
Print
No-Bake Fruity Pebbles Cheesecake Recipe
- Total Time: 4 hours 15 minutes
- Yield: 8 servings 1x
- Diet: Vegetarian
Description
Indulge in the nostalgic flavors of childhood with this no-bake Fruity Pebbles cheesecake. Creamy, sweet, and colorful, this dessert is a delightful treat for any occasion.
Ingredients
For the crust:
- 2 cups Fruity Pebbles cereal
- 1/4 cup unsalted butter, melted
- 2 tablespoons sugar
For the filling:
- 8 oz cream cheese, softened
- 1 cup heavy cream
- 1/2 cup powdered sugar
- 1 teaspoon vanilla extract
- 1/2 cup sour cream
- 1 cup Fruity Pebbles cereal (for filling)
- 1/4 cup whipped cream (for topping, optional)
- Extra Fruity Pebbles cereal (for garnish, optional)
Instructions
- Start by making the crust: In a large bowl, combine the Fruity Pebbles cereal, melted butter, and sugar. Stir until the cereal is evenly coated with butter.
- Press the cereal mixture into the bottom of a 9-inch springform pan or pie dish: Create an even layer and press down firmly. Refrigerate the crust while preparing the filling.
- In a large mixing bowl, beat the softened cream cheese until smooth and creamy.
- Add heavy cream, powdered sugar, and vanilla extract: Beat until well combined and slightly thickened.
- Stir in sour cream and 1 cup of Fruity Pebbles cereal: Mix well.
- Pour the cheesecake filling into the chilled crust: Spread evenly.
- Refrigerate the cheesecake for at least 4 hours or overnight to set.
- Top the cheesecake with whipped cream and additional Fruity Pebbles cereal: Garnish to your liking.
- Slice, serve, and enjoy your no-bake Fruity Pebbles cheesecake!
Notes
- For a smoother filling, ensure the cream cheese is completely softened.
- You can substitute sour cream with Greek yogurt for a tangier flavor.
- Prep Time: 15 minutes
- Cook Time: 4 hours (chill time)
- Category: Dessert
- Method: No-Bake
- Cuisine: American
Nutrition
- Serving Size: 1 slice
- Calories: 330
- Sugar: 23g
- Sodium: 180mg
- Fat: 22g
- Saturated Fat: 10g
- Unsaturated Fat: 12g
- Trans Fat: 0g
- Carbohydrates: 34g
- Fiber: 1g
- Protein: 3g
- Cholesterol: 45mg


