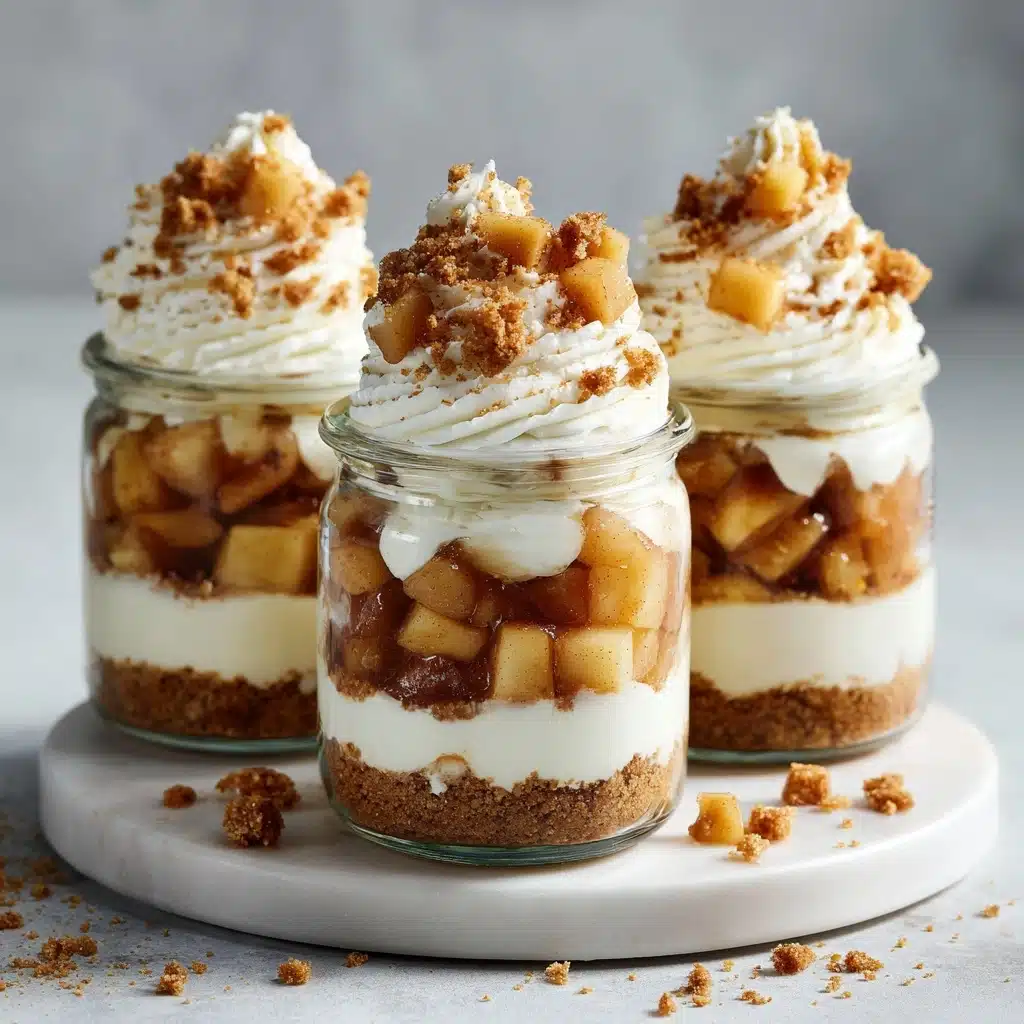
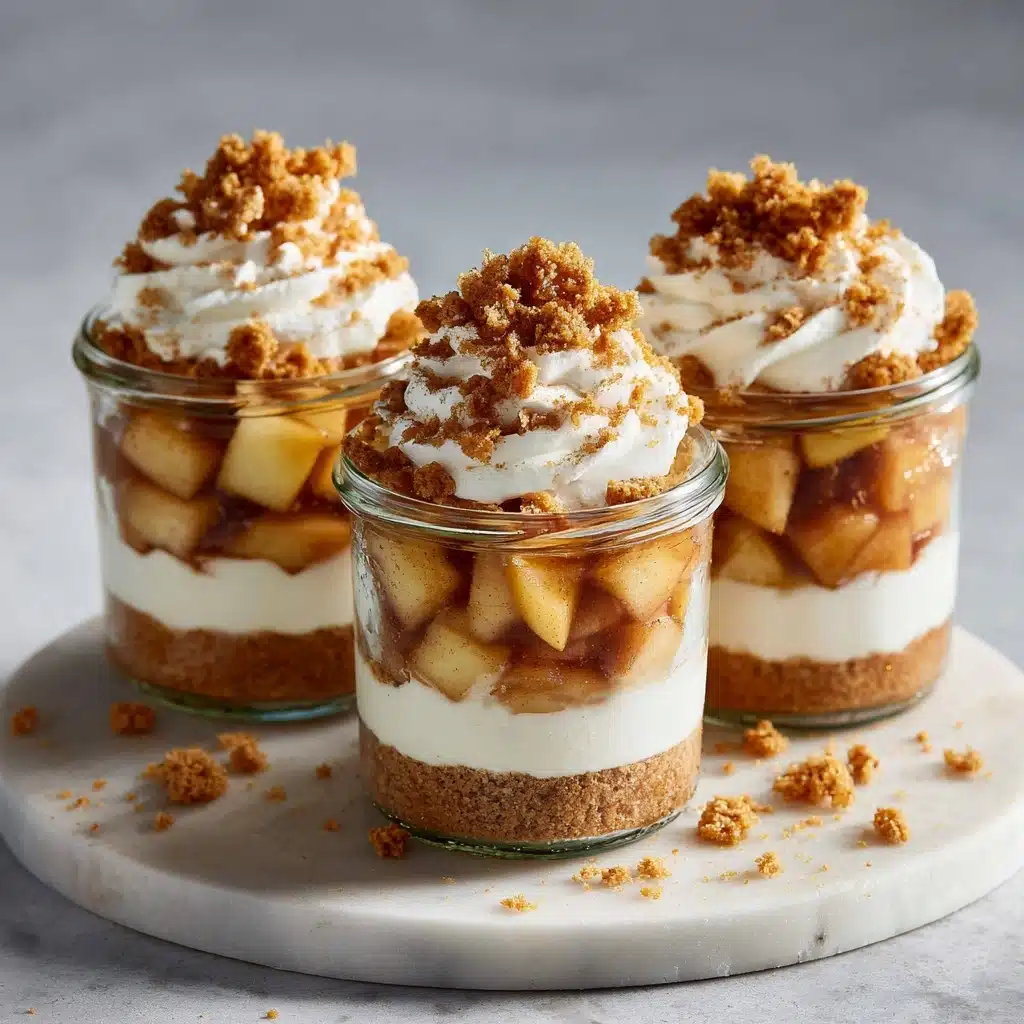
No-Bake Apple Cheesecake Jars Recipe
If you’ve been searching for a dessert that’s equal parts elegant, easy, and perfectly cozy, No-Bake Apple Cheesecake Jars are calling your name. Imagine layers of buttery graham cracker crumbs, the dreamiest cloud of cheesecake filling, and warm, cinnamon-spiced caramelized apples all tucked into a charming little jar. These jars deliver big flavor without fussing over baking—and their single-serve size makes them absolutely irresistible for parties and everyday treats alike.
Ingredients You’ll Need
Each ingredient for these No-Bake Apple Cheesecake Jars plays a delicious role—add them to your list, knowing that their real magic comes to life when combined. Think creamy, crumbly, sweet, and tangy, with a fall spice twist that makes every spoonful worth savoring.
- Graham cracker crumbs: The sweet and crunchy base that perfectly soaks up the buttery flavors.
- Unsalted butter (melted): Helps combine the crumbs for a crust that holds together without becoming greasy.
- Brown sugar (for crust): Adds a hint of molasses flavor and makes the crust slightly chewy and moist.
- Cream cheese (softened): The star of the filling—rich, tangy, and smooth as silk when whipped.
- Powdered sugar: Dissolves beautifully into the cheesecake mixture for sweetness without any graininess.
- Vanilla extract: Just a splash enhances the flavor, making the filling taste bakery-shop special.
- Heavy whipping cream (cold): Adds luscious lightness and makes the filling luxuriously fluffy.
- Apples (peeled, cored, and diced): The juicy, crisp bite on top that sings of autumn in every spoonful.
- Butter (for apples): Helps caramelize the apples and creates a silky, glossy apple topping.
- Brown sugar (for apples): Melts into a caramel, giving the apple topping its rich sweetness.
- Ground cinnamon: Warm spices are what make the apples totally irresistible.
- Nutmeg: Just a pinch brings out the best in the apples and adds depth to the spice profile.
- Water: Loosens up the apple topping and ensures everything cooks together smoothly.
How to Make No-Bake Apple Cheesecake Jars
Step 1: Prepare the Crust
Start by mixing the graham cracker crumbs with melted unsalted butter and brown sugar in a small bowl. Stir until the mixture resembles damp sand. Grab four little jars (or glasses), divide the crumb mixture evenly among them, and press gently with the back of a spoon or your fingertips to form a sturdy, delicious base.
Step 2: Whip the Cheesecake Filling
In a mixing bowl, beat the softened cream cheese until it’s smooth and creamy. Add in powdered sugar and vanilla extract, mixing until well incorporated. In a separate bowl, whip cold heavy cream to stiff peaks—this is what gives your cheesecake layer its dreamy, mousse-like texture. Fold the whipped cream gently into the cream cheese mixture so it stays airy and light.
Step 3: Assemble the Cheesecake Layer
Spoon or pipe the cheesecake filling over the crusts in each jar. Don’t be afraid to get generous; the filling is the creamy heart of your No-Bake Apple Cheesecake Jars. Smooth out the tops and get ready for the star-studded apple finale.
Step 4: Cook the Apple Topping
For the apple crown, melt butter in a skillet over medium heat. Toss in the diced apples, brown sugar, cinnamon, nutmeg, and water. Stir and cook for 5 to 7 minutes until the apples are irresistibly tender and caramelized with a syrupy sauce. Allow the apple topping to cool slightly before spooning it over the cheesecake layer—this keeps the layers distinct and pretty.
Step 5: Chill and Serve
Finish by covering and refrigerating the jars for at least 2 hours. This vital chill time sets the cheesecake so it’s rich and sliceable with a spoon. When you’re ready to serve, unveil your creations and bask in the excited smiles they inspire!
How to Serve No-Bake Apple Cheesecake Jars
Garnishes
Topping these jars is your chance to add both flair and extra flavor. Try a sprinkle of granola or chopped pecans for crunch, a dollop of whipped cream, or a drizzle of salted caramel sauce. Even a dusting of cinnamon or a few apple chips can make your No-Bake Apple Cheesecake Jars look like they came from a high-end bakery.
Side Dishes
Since this dessert is rich and creamy, let it shine by pairing it with lighter options. Freshly brewed tea, apple cider, or a hot cup of coffee can be perfect companions. If you want a dessert platter, pair the jars with crisp butter cookies, vanilla wafers, or simple shortbreads to complement their flavors.
Creative Ways to Present
The beauty of No-Bake Apple Cheesecake Jars is in the presentation—clear glass jars or even small tumblers let those gorgeous layers peek through. For parties, mini mason jars with ribbon make fantastic take-home treats; for a homey vibe, try mismatched tea cups. Add personalized name tags for that extra-special touch at holiday gatherings.
Make Ahead and Storage
Storing Leftovers
Your jars will keep beautifully in the fridge, covered tightly with a lid or plastic wrap, for up to four days. The crust might soften slightly but the flavors only get cozier, making this the perfect make-ahead dessert for busy weeks or special events.
Freezing
If you need to make No-Bake Apple Cheesecake Jars well in advance, freezing is an option! Freeze the assembled jars (without the apple topping) for up to a month. Thaw them overnight in the fridge, add fresh apple topping, and you’re ready to serve.
Reheating
For the best texture, it’s not recommended to reheat these jars, as the filling is meant to stay cold and creamy. However, if your apple topping needs freshening up, a quick zap in the microwave or on the stovetop before adding to the jars will revive its caramelized qualities.
FAQs
Can I use a different fruit instead of apples?
Absolutely! Pears, peaches, or berries work beautifully in place of apples. Just keep the measurements and cooking time similar to ensure the perfect topping texture.
Do I have to use glass jars?
Nope! Any small container will do—ramekins, clear cups, or even sturdy paper cups work if you’re serving a crowd. Just make sure they’re deep enough for all the layers to shine.
Can I make No-Bake Apple Cheesecake Jars ahead of time?
Definitely. In fact, they taste even better after a night in the fridge as the flavors have more time to mingle and deepen. Just wait to add crunchy toppings until serving time, so they stay crisp.
Can I make this recipe gluten-free?
Yes! Just swap out the graham crackers for your favorite gluten-free alternative. There are plenty of gluten-free cookies or graham-style crackers at most supermarkets that work perfectly.
What’s the best kind of apple to use?
Tart, firm apples like Granny Smith hold their shape and balance the sweetness of the cheesecake, but you can experiment with Gala, Honeycrisp, or Fuji for a different flavor profile. Use what you love or have on hand!
Final Thoughts
There’s nothing more delightful (or impressive) than serving up homemade No-Bake Apple Cheesecake Jars to friends and family—especially knowing they’re as fun to make as they are to eat. Once you try these, you’ll reach for them again and again, whether it’s for a cozy fall night or a summer afternoon treat. Grab your jars and get whisking—you’re in for a real sweet adventure!
Print
No-Bake Apple Cheesecake Jars Recipe
- Total Time: 32 minutes (plus chilling)
- Yield: 4 jars 1x
- Diet: Non-Vegetarian
Description
Indulge in the delightful combination of creamy cheesecake, sweet spiced apples, and buttery graham cracker crust in these easy and elegant No-Bake Apple Cheesecake Jars. Perfect for a quick dessert fix or a fancy individual treat!
Ingredients
For the crust:
- 1 cup graham cracker crumbs
- 3 tablespoons unsalted butter, melted
- 1 tablespoon brown sugar
For the cheesecake filling:
- 8 oz cream cheese, softened
- 1/3 cup powdered sugar
- 1/2 teaspoon vanilla extract
- 1/2 cup heavy whipping cream, cold
For the apple topping:
- 2 apples, peeled, cored, and diced
- 2 tablespoons butter
- 2 tablespoons brown sugar
- 1/2 teaspoon ground cinnamon
- Pinch of nutmeg
- 1 tablespoon water
Instructions
- Prepare the crust: Mix graham cracker crumbs, brown sugar, and melted butter in a small bowl until combined. Divide among 4 small jars, press gently into the bottom to form the crust.
- Make the cheesecake filling: Beat cream cheese until smooth. Add powdered sugar and vanilla, beat until combined. In a separate bowl, whip heavy cream to stiff peaks, then fold gently into cream cheese mixture. Spoon or pipe filling over crusts in jars.
- Prepare the apple topping: Melt butter in a skillet over medium heat. Add diced apples, brown sugar, cinnamon, nutmeg, and water. Cook for 5–7 minutes until apples are tender and caramelized. Let cool slightly, then spoon over the cheesecake layer in each jar.
- Chill and serve: Refrigerate jars for at least 2 hours before serving.
Notes
- Best served chilled.
- You can make these up to 24 hours ahead.
- For added texture, sprinkle crushed granola or chopped nuts on top before serving.
- Prep Time: 25 minutes
- Cook Time: 7 minutes
- Category: Dessert
- Method: No-Bake
- Cuisine: American
Nutrition
- Serving Size: 1 jar
- Calories: 390
- Sugar: 26g
- Sodium: 180mg
- Fat: 27g
- Saturated Fat: 16g
- Unsaturated Fat: 9g
- Trans Fat: 0g
- Carbohydrates: 34g
- Fiber: 1g
- Protein: 4g
- Cholesterol: 70mg


