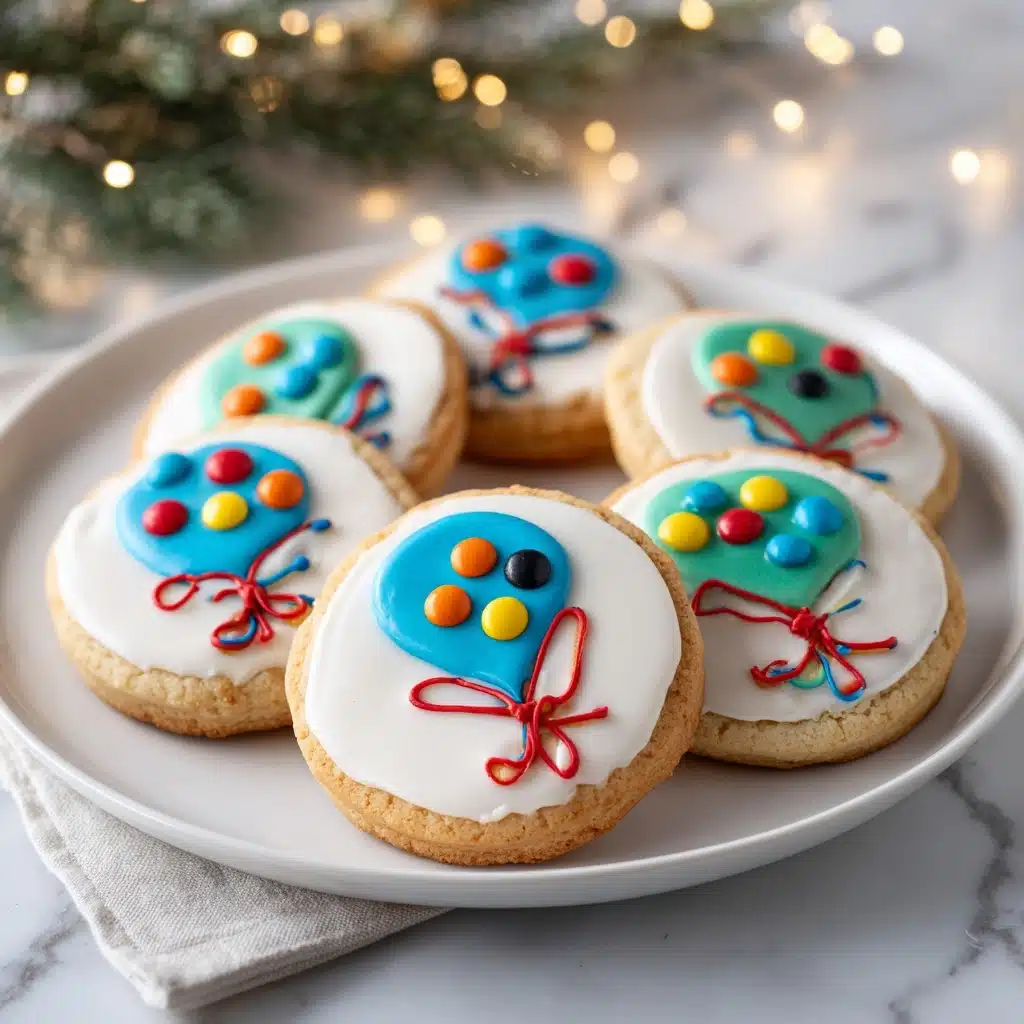
Christmas Lights Royal Icing Sugar Cookies Recipe
Just imagine a plateful of festive, twinkling treats to brighten up your holiday dessert table—that’s exactly what you’ll get with these Christmas Lights Royal Icing Sugar Cookies! Delicate, buttery sugar cookies serve as the perfect canvas for bold, colorful royal icing piped in whimsical Christmas light patterns. Whether you’re sharing with friends, gifting to neighbors, or enjoying with a cozy mug of cocoa, these cookies are pure holiday magic in every bite.
Ingredients You’ll Need
Gathering the right ingredients is half the fun for any festive bake, and with these cookies, each component brings something special—structure, flavor, and those stunning pops of color. With just a few pantry staples and some gel food coloring, you’ll be ready to create a full string of Christmas cookie lights.
- All-purpose flour: Gives the cookies their sturdy, classic sugar cookie structure—perfect for cutting and decorating.
- Baking powder: Adds just the right lift for tender, puffed edges that hold their shape.
- Salt: A pinch brightens and balances all the sweet, buttery flavors.
- Unsalted butter (softened): Key for a supremely tender, melt-in-your-mouth cookie base—make sure it’s truly soft for easy creaming!
- Granulated sugar: Not just for sweetness—it also helps create that classic crisp edge.
- Large egg: Binds everything together and adds richness, ensuring your cookies hold their shape.
- Vanilla extract: For warm, familiar holiday notes with every bite.
- Almond extract: Just a hint delivers an irresistible bakery-style flavor—totally magical!
- Powdered sugar: Essential for the royal icing; it blends smooth and dries to a pretty, glossy finish.
- Meringue powder: This secret weapon gives royal icing its structure and classic crisp setting power.
- Warm water: Needed to bring your royal icing together—warming helps everything dissolve into a silky texture.
- Gel food coloring: Vibrant and easy to use, you’ll want black for “wires” and an assortment of bold colors for all your “light bulbs.”
- Mini round piping tips or squeeze bottles: For decorating precision—these tools make you feel like a pro, even if you’re just having fun at the kitchen table.
How to Make Christmas Lights Royal Icing Sugar Cookies
Step 1: Mix the Dry Ingredients
In a medium bowl, whisk together the flour, baking powder, and salt. This simple but crucial first step ensures your cookies bake with an even texture (and prevents any lumps hiding in your dough). Set this bowl aside, and get ready for the fun part—creaming!
Step 2: Cream the Butter and Sugar
In your largest mixing bowl, combine the softened butter and granulated sugar. Beat them together until the mixture is pale and fluffy, about two to three minutes. The more air you whip in here, the lighter your cookies will bake up—think snowy winter clouds!
Step 3: Add Egg and Extracts
Creamed butter and sugar ready? Beat in the egg, vanilla extract, and almond extract. The combination brings both structure and a lovely, bakery-style aroma to your dough—the almond is especially festive!
Step 4: Combine Wet and Dry Ingredients
Gradually add the flour mixture to the wet ingredients, mixing just until the dough holds together. Don’t overmix; you want a soft, cohesive dough, not tough cookies. Divide the dough into two discs, wrap in plastic wrap, and chill them for at least an hour. This step helps the flavors meld and makes rolling and cutting so much easier.
Step 5: Shape and Bake the Cookies
Preheat your oven to 350°F (175°C) and get those creative juices flowing! Roll out the chilled dough on a lightly floured surface to a ¼-inch thickness, then cut into your favorite shapes—ovals and bulbs are great for Christmas Lights Royal Icing Sugar Cookies, but any fun holiday shape works. Arrange them on a parchment-lined baking sheet and bake for 8–10 minutes. You’re looking for edges that are just barely golden. Transfer cookies to a wire rack to cool completely.
Step 6: Prepare the Royal Icing
Once your cookies are cooling, make the icing. In a stand mixer (or with electric beaters), combine powdered sugar, meringue powder, and warm water. Beat for 7–10 minutes, or until the icing is thick and forms stiff peaks. Divide into several bowls and color with gel food coloring as desired—keep one plenty for black “wires” and several others for your cheerful bulbs. Thin the icing with a few drops of water for flooding consistency as needed.
Step 7: Decorate Your Cookies
Now for the part everyone loves! Outline your cookies with slightly thicker white royal icing, then flood the center to create a smooth base layer. Let them dry completely—several hours or overnight is ideal. Once they’re set, pipe a curvy black string (this is your “wire”), then use bright colors to dot on tiny “bulbs” along the line. This is where Christmas Lights Royal Icing Sugar Cookies really come to life!
How to Serve Christmas Lights Royal Icing Sugar Cookies

Garnishes
Add an extra dash of magic to your Christmas Lights Royal Icing Sugar Cookies by finishing them with a sprinkle of edible glitter or tiny nonpareils over the lights. The shimmer will catch the light, making your cookie platter look as enchanting as a string of real lights strung across the fireplace.
Side Dishes
These cookies are delightful on their own, but why not tuck them alongside mugs of spiced hot cocoa or glasses of chilled milk? For a grown-up gathering, a platter of cookies next to a bowl of fresh berries or a creamy bowl of vanilla pudding makes a whimsical dessert spread that’s perfect for sharing with loved ones.
Creative Ways to Present
Turn your Christmas Lights Royal Icing Sugar Cookies into edible gifts by wrapping them individually in clear cellophane bags tied with festive ribbon—perfect for teachers, neighbors, or as a sweet stocking stuffer. Or, arrange them in overlapping strands on a tray to mimic a real lights display. The possibilities for spreading cheer are endless!
Make Ahead and Storage
Storing Leftovers
Once decorated and dried, store your cookies in an airtight container at room temperature for up to a week. Place parchment paper between layers to help preserve the beautiful icing detail and keep each Christmas Lights Royal Icing Sugar Cookie crisp and fresh.
Freezing
If you love to plan ahead, these cookies freeze beautifully before decorating. Place undecorated baked cookies in a freezer-safe bag or container, separating layers with parchment paper, and freeze for up to three months. Thaw at room temperature before icing and decorating for fresh-from-the-oven taste all season long.
Reheating
While these cookies are meant to be enjoyed at room temperature, if you want to take the chill off a frozen or refrigerated batch, just let them sit out uncovered for 10–15 minutes. Avoid microwaving decorated cookies, as the royal icing may soften or crack.
FAQs
Can I make the cookie dough ahead of time?
Absolutely! You can prepare the dough a day or two ahead, wrap it tightly in plastic, and store it in the fridge. When you’re ready to bake, just let it warm up a few minutes for easier rolling and cutting.
How can I get vibrant colors in my royal icing?
Gel food coloring is your secret weapon! It offers deep, vibrant hues without thinning the icing, which is important for crisp designs on Christmas Lights Royal Icing Sugar Cookies.
Why does my icing bleed or run together?
The key is patience! Always let each layer or color of icing dry completely before adding the next. Humid kitchens can also cause colors to bleed, so use a fan or dehumidifier if needed.
Can I use natural food colors?
Yes, natural gel-based food colors are available and work nicely in royal icing. Just be aware that some natural shades may be less vibrant than artificial colors, but the cookies will still look and taste fantastic.
What’s the best way to store decorated cookies for gifting?
Let the icing dry fully, then package each cookie individually in cellophane bags. This keeps them fresh and protects your festive designs during transit or in gift boxes.
Final Thoughts
Gather your mixing bowls and unleash your inner artist—it’s time to make a batch of Christmas Lights Royal Icing Sugar Cookies! There’s truly nothing like the joy of creating colorful, twinkling treats to share with friends and family. Give this recipe a try, and let your kitchen glow a little brighter this holiday season!
Print
Christmas Lights Royal Icing Sugar Cookies Recipe
- Total Time: 40 minutes active (plus drying time)
- Yield: 24 cookies 1x
- Diet: Vegetarian
Description
Delight your holiday guests with these festive Christmas Lights Royal Icing Sugar Cookies. These beautifully decorated cookies are perfect for spreading Christmas cheer and indulging in sweet treats.
Ingredients
For the Sugar Cookies:
- 2 ¾ cups all-purpose flour
- 1 teaspoon baking powder
- ½ teaspoon salt
- 1 cup unsalted butter (softened)
- 1 cup granulated sugar
- 1 large egg
- 1 teaspoon vanilla extract
- ½ teaspoon almond extract
For the Royal Icing:
- 4 cups powdered sugar
- 3 tablespoons meringue powder
- 6 tablespoons warm water (more as needed)
- gel food coloring (black for wire, multiple colors for lights)
- mini round piping tips or squeeze bottles
Instructions
- Prepare the Sugar Cookies: In a bowl, whisk together flour, baking powder, and salt; set aside. In a large mixing bowl, cream butter and sugar until light and fluffy. Beat in the egg, vanilla, and almond extract. Gradually mix in the dry ingredients until a smooth dough forms. Divide dough into two discs, wrap in plastic, and chill for at least 1 hour.
- Bake the Cookies: Preheat oven to 350°F (175°C). Roll out dough on a floured surface to about ¼-inch thickness and cut into desired shapes. Place on a parchment-lined baking sheet and bake for 8–10 minutes, until edges are just golden. Cool completely on a wire rack.
- Make the Royal Icing: Beat powdered sugar, meringue powder, and warm water together until stiff peaks form. Divide into bowls and tint with food coloring. Thin icing with water for flooding consistency.
- Decorate the Cookies: Outline and flood cookies with white icing. Let dry completely. Pipe a black icing string to resemble a wire. Use brightly colored icing to dot on ‘light bulbs’ along the wire.
Notes
- Let each layer of icing dry fully before adding the next to prevent colors from bleeding.
- Store cookies in an airtight container for up to a week or freeze undecorated cookies for up to 3 months.
- Prep Time: 30 minutes (plus chilling and decorating time)
- Cook Time: 10 minutes
- Category: Dessert
- Method: Baking
- Cuisine: American
Nutrition
- Serving Size: 1 cookie
- Calories: 190
- Sugar: 18g
- Sodium: 65mg
- Fat: 8g
- Saturated Fat: 5g
- Unsaturated Fat: 2g
- Trans Fat: 0g
- Carbohydrates: 27g
- Fiber: 0g
- Protein: 1g
- Cholesterol: 25mg

