Chocolate Chip Teddy Bear Cookies Recipe
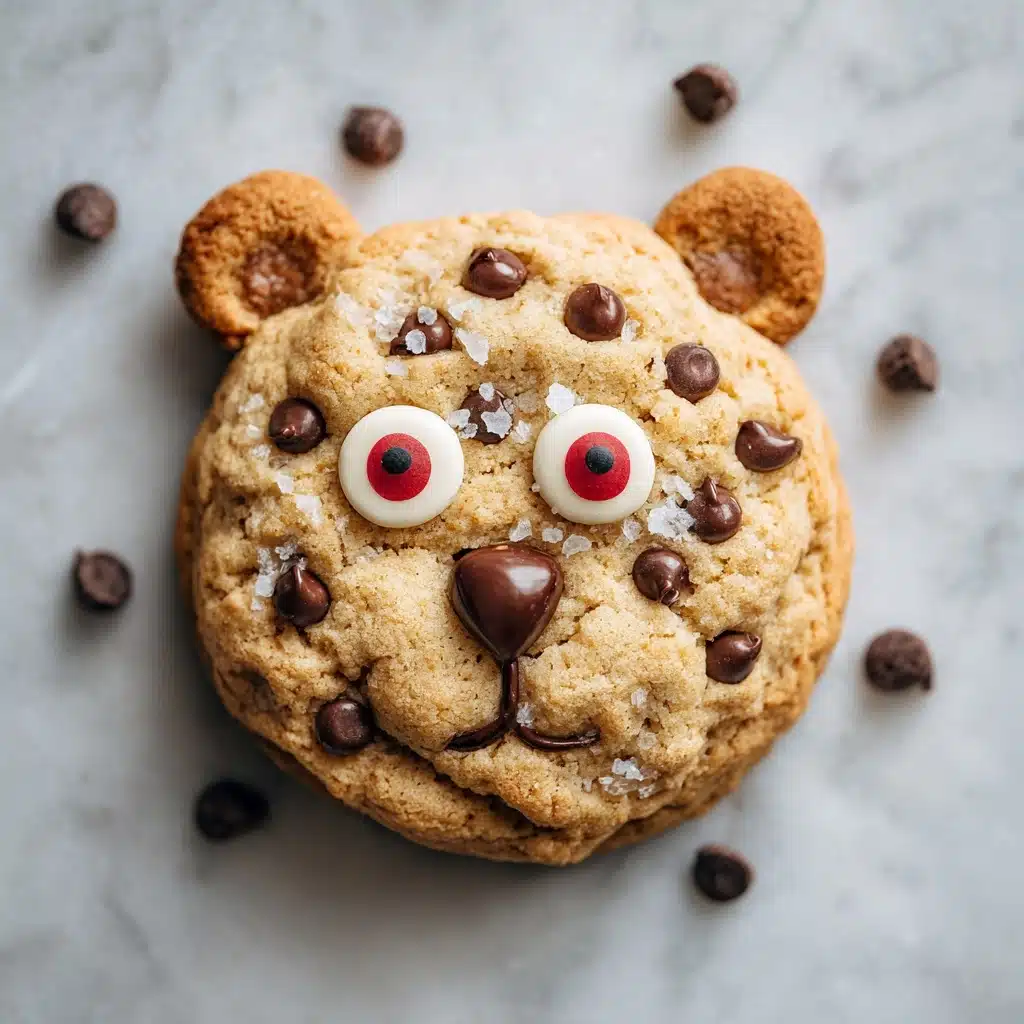
Few treats light up a room quite like a batch of Chocolate Chip Teddy Bear Cookies. These cookies take classic chocolate chip goodness and transform it into an adorable, hand-crafted snack that’s equal parts fun and delicious. With their little chocolate noses, expressive eyes, and perfect golden edges, they bring out the child in everyone—making them perfect for parties, gifts, or a playful weekend project with kids. The combination of rich butter and two types of sugar delivers soft, flavorful cookies speckled with melty chocolate chips in every bite. Get ready to fall in love with these whimsical and irresistible Chocolate Chip Teddy Bear Cookies!
Ingredients You’ll Need
Ingredients You’ll Need
When it comes to Chocolate Chip Teddy Bear Cookies, a handful of pantry staples is all you need. Each ingredient plays a key role, from tender texture to classic cookie flavor, and a few clever décor touches transform them into sweet little bears that will steal your heart.
- Unsalted Butter (1 cup, softened): Creates a soft, rich dough and that classic cookie flavor; bring to room temp for the best results.
- Granulated Sugar (¾ cup): Adds sweetness and helps the cookies bake up with golden edges.
- Packed Brown Sugar (¾ cup): Lends a slight molasses note and keeps the cookies extra chewy.
- Large Eggs (2): Bind everything together for perfect structure and tenderness.
- Vanilla Extract (2 teaspoons): Enhances every other flavor and gives the cookies a cozy warmth.
- All-Purpose Flour (2½ cups): The backbone of the dough, providing the perfect cookie crumb.
- Baking Soda (1 teaspoon): Helps the cookies spread just right and stay light.
- Baking Powder (½ teaspoon): Works with baking soda for that ideal rise and soft texture.
- Salt (½ teaspoon): Balances the sweetness and brings out the chocolate flavor.
- Semi-sweet Chocolate Chips (2 cups): Classic chips for big, melty pockets of chocolate in every bite.
- Mini Chocolate Chips (for decoration): The secret to creating those irresistible teddy bear eyes.
- Chocolate-covered Candies or Mini M&Ms (for noses): Makes each bear look extra cute with a pop of color and crunch.
- Optional Candy Eyes: If you want your bears to be extra expressive, pop on some ready-made candy eyes after baking.
How to Make Chocolate Chip Teddy Bear Cookies
Step 1: Prep Your Workspace
Set the stage for cuteness by preheating your oven to 350°F and lining a couple of baking sheets with parchment paper. This prevents sticking and makes cleanup a breeze, so you can focus on crafting each Chocolate Chip Teddy Bear Cookie.
Step 2: Cream the Butter and Sugars
In a large mixing bowl, beat your softened butter with the granulated and brown sugars until the mixture is light, fluffy, and pale. This step is all about building a soft, tender base for your cookies and ensuring every bite is deliciously rich.
Step 3: Add Eggs and Vanilla
Beat in the eggs one at a time, making sure each is fully incorporated before adding the next. Pour in your vanilla extract and give it a good mix—this ensures your batter is smooth, luscious, and infused with that classic homemade aroma.
Step 4: Combine the Dry Ingredients
In a separate bowl, whisk together the flour, baking soda, baking powder, and salt. Gradually add this dry mixture to your wet ingredients, stirring until just combined. Avoid over-mixing to keep your Chocolate Chip Teddy Bear Cookies soft and tender.
Step 5: Fold in the Chocolate Chips
With the dough just mixed, fold in your chocolate chips so every cookie boasts plenty of chocolatey goodness. This is where the classic flavor comes in—and don’t be shy, you want a chip in every bite!
Step 6: Chill the Dough
Pop the dough in the fridge for about 30 minutes. This quick chill makes the dough easier to handle and helps the cookies hold their teddy bear shape in the oven without spreading too much.
Step 7: Shape the Teddy Bears
Scoop 1-inch balls of dough for each teddy bear’s head. Make smaller balls for ears and snouts, gently pressing them onto the heads to form the bear faces. Place them spaced apart on your prepared baking sheets—it’s creativity time!
Step 8: Decorate and Bake
Now for the fun part! Use mini chocolate chips or optional candy eyes for the eyes, and press a mini M&M or chocolate candy into each snout for the nose. Bake for 10–12 minutes, until edges are just turning golden and the bears look irresistible.
Step 9: Cool and Serve
Allow the cookies to cool on the baking sheet for 5 minutes to set their shapes, then move them to a wire rack to finish cooling. Now you have a parade of delightful Chocolate Chip Teddy Bear Cookies, ready to enjoy!
How to Serve Chocolate Chip Teddy Bear Cookies
Garnishes
Sprinkle a little extra magic by adding a dusting of powdered sugar after the cookies cool, or enhance their cuteness with a tiny swirl of royal icing for rosy cheeks. Edible glitter or colored sugar can also give each bear a festive personality, making them perfect for birthdays, baby showers, or holiday gatherings.
Side Dishes
While a tall glass of cold milk is a classic, don’t underestimate the charm of serving your Chocolate Chip Teddy Bear Cookies with a scoop of vanilla ice cream or alongside fresh berries for a splash of color and a hint of freshness. They also pair delightfully with hot cocoa or rich coffee for kids and adults alike.
Creative Ways to Present
Pile your cookies into a “bear den” on a platter surrounded by greenery from edible herbs or place each one in a cupcake liner for an easy grab-and-go treat. For party favors, tuck a few Chocolate Chip Teddy Bear Cookies into clear bags tied with ribbon—they make sweet and memorable gifts for any age!
Make Ahead and Storage
Storing Leftovers
Keep your Chocolate Chip Teddy Bear Cookies soft and fresh by storing them in an airtight container at room temperature. Layer with wax paper to prevent their decorations from smudging, and they’ll stay picture-perfect—and delicious—for up to 4 days.
Freezing
To freeze, arrange cooled cookies in a single layer on a baking sheet to set, then transfer to a freezer-safe bag or container. This keeps them from sticking together and preserves their adorable details. When you’re ready for a cookie fix, simply thaw at room temperature.
Reheating
Warm chilled or thawed cookies in a 275°F oven for just a few minutes if you want to bring back that fresh-from-the-oven coziness. They’ll emerge with gooey chocolate chips and a gentle aroma that invites everyone back to the kitchen.
FAQs
Can I use other types of chocolate chips in these cookies?
Absolutely! Milk chocolate, dark chocolate, or even white chocolate chips will taste wonderful in Chocolate Chip Teddy Bear Cookies. Feel free to mix and match for a unique twist.
How do I keep the bear faces from spreading too much during baking?
Chilling the dough before shaping is key—this helps the bears keep their features distinct. If your kitchen is warm, pop the shaped cookies back in the fridge for 10 minutes before baking.
My cookies turned out a bit dry. What went wrong?
Dry cookies usually happen when they’re slightly over-baked or if the dough was over-mixed. Next time, pull them from the oven just as the edges turn golden and mix only until the flour vanishes into the dough.
Can I make these cookies gluten-free?
Yes! Substitute a 1-for-1 gluten-free flour blend for the all-purpose flour, and keep everything else the same. Your Chocolate Chip Teddy Bear Cookies will still be cute, chewy, and absolutely tasty.
Can I decorate the bears with something other than chocolate or candies?
Of course! You can use raisins, dried cranberries, or even tiny pieces of nuts as eyes or noses, or try a drizzle of colored icing for creative details—the possibilities are endless!
Final Thoughts
If you’re looking for a cookie that brings as many smiles as it does delicious bites, Chocolate Chip Teddy Bear Cookies are your answer. They’re as much fun to make as they are to eat—even the tiniest hands can help! Share them at your next gathering, gift them to a friend, or just treat yourself. Either way, these playful cookies are guaranteed to brighten your day.
Print
Chocolate Chip Teddy Bear Cookies Recipe
- Total Time: 37 minutes
- Yield: About 24 cookies 1x
- Diet: Vegetarian
Description
These adorable Chocolate Chip Teddy Bear Cookies are perfect for adding a touch of whimsy to your baking. With a classic chocolate chip cookie base, these cute treats are fun to make and even more fun to eat!
Ingredients
Cookies:
- 1 cup unsalted butter, softened
- ¾ cup granulated sugar
- ¾ cup packed brown sugar
- 2 large eggs
- 2 teaspoons vanilla extract
- 2½ cups all-purpose flour
- 1 teaspoon baking soda
- ½ teaspoon baking powder
- ½ teaspoon salt
- 2 cups semi-sweet chocolate chips
Decoration:
- Mini chocolate chips for decoration
- Chocolate-covered candies or mini M&Ms for noses
- Optional candy eyes
Instructions
- Preheat oven and prepare baking sheets: Preheat oven to 350°F and line baking sheets with parchment paper.
- Prepare cookie dough: In a large bowl, cream butter, granulated sugar, and brown sugar until light and fluffy. Beat in eggs one at a time, then add vanilla extract. In a separate bowl, whisk together flour, baking soda, baking powder, and salt. Gradually mix dry ingredients into wet until just combined. Fold in chocolate chips.
- Shape cookies: Chill dough for 30 minutes to make shaping easier. Roll dough into 1-inch balls for teddy bear heads and use smaller balls for ears and snouts, attaching them gently. Place on prepared baking sheets spaced apart. Use mini chocolate chips for eyes and press a candy piece or mini M&M into each snout for the nose.
- Bake and cool: Bake for 10–12 minutes until edges are lightly golden. Cool on the baking sheet for 5 minutes before transferring to a rack.
Notes
- Chilling the dough helps the cookies hold their shape.
- You can use peanut butter cookie dough instead of chocolate chip for a different flavor.
- Decorate with royal icing details once cooled for extra cuteness.
- Prep Time: 25 minutes
- Cook Time: 12 minutes
- Category: Dessert
- Method: Baking
- Cuisine: American
Nutrition
- Serving Size: 1 cookie
- Calories: ~180
- Sugar: ~15 g
- Sodium: ~95 mg
- Fat: ~9 g
- Saturated Fat: ~5 g
- Unsaturated Fat: ~3 g
- Trans Fat: 0 g
- Carbohydrates: ~24 g
- Fiber: ~1 g
- Protein: ~2 g
- Cholesterol: ~25 mg


