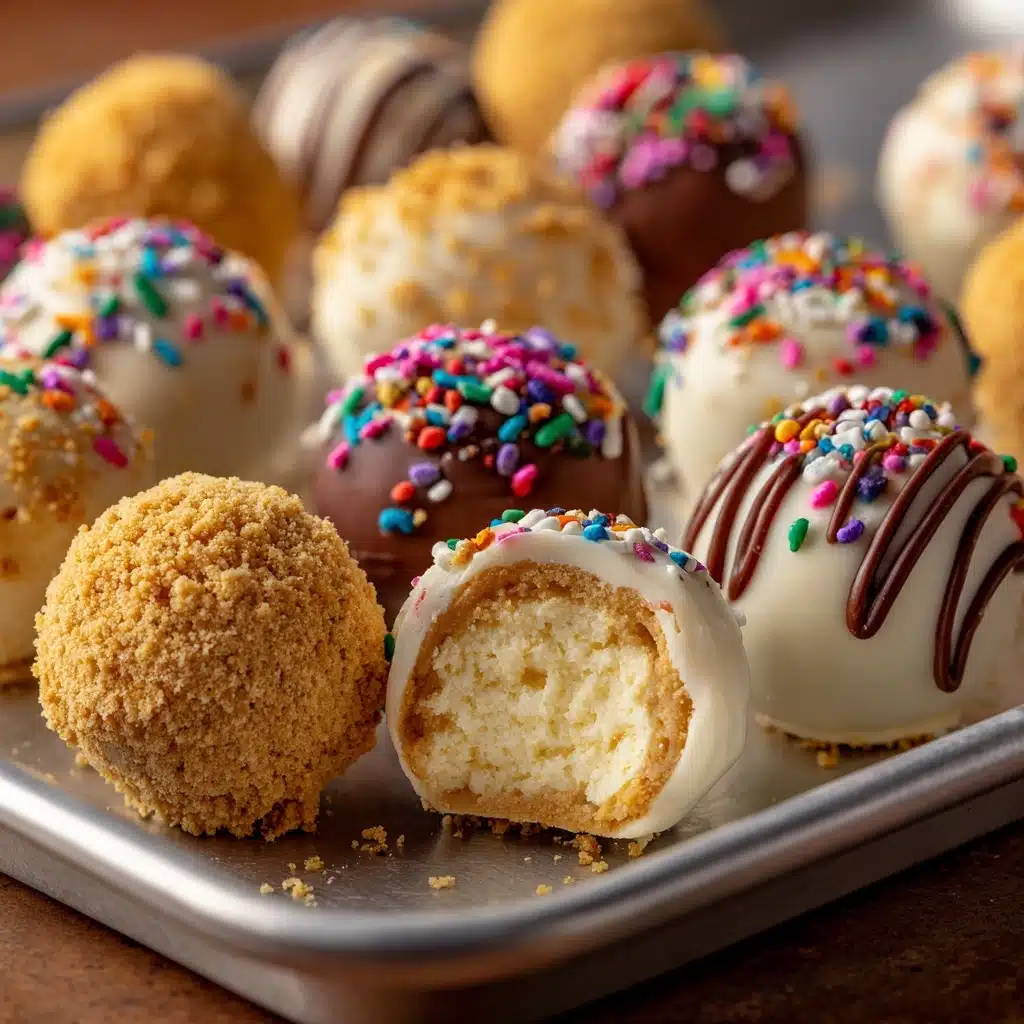
Cheesecake Balls Recipe
Imagine everything you love about creamy, tangy cheesecake, conveniently wrapped up in a delightful, bite-sized treat. These Cheesecake Balls are a surefire hit for any occasion — they’re sweet, tangy, and wonderfully rich, with just the right touch of crunch and chocolate. Best of all, they require no baking at all! Whether you’re whipping them up for a party, gifting them during the holidays, or just treating yourself, this no-fuss recipe delivers crave-worthy cheesecake flavor in every single bite.

Ingredients You’ll Need
You won’t believe how just a handful of simple, familiar ingredients can completely transform into these decadent, crowd-pleasing treats. Every component plays a starring role, contributing to the signature smoothness, subtle crunch, and those little sparks of flavor that make Cheesecake Balls so memorable.
- Cream cheese (1 package, 8 oz, softened): The lush, velvety base that brings structure and unmistakable cheesecake tang.
- Powdered sugar (1/4 cup): Adds gentle sweetness and helps create a silky, creamy texture.
- Vanilla extract (1/2 teaspoon): Enhances the overall flavor, giving your Cheesecake Balls that classic cheesecake aroma and warmth.
- Crushed graham crackers (1/2 cup, plus more for coating): Adds crunch and a nostalgic graham flavor—extra is perfect for an outer coating.
- White or semi-sweet chocolate chips (1/2 cup, optional): For a burst of chocolate in every bite—choose your favorite type!
- Melted chocolate or candy coating (1/2 cup, for dipping): A glossy, delicious finish that turns each ball into a chocolate-dipped delight.
- Sprinkles, crushed nuts, or more graham cracker crumbs (for garnish): These toppings add fun, varied textures and plenty of festive personality.
How to Make Cheesecake Balls
Step 1: Mix the Cream Cheese Base
Start by combining your softened cream cheese, powdered sugar, and vanilla extract in a medium bowl. Grab an electric hand mixer or sturdy spoon and beat everything together until smooth and fluffy. This is where the magic begins—the rich, creamy foundation that ensures your Cheesecake Balls are melt-in-your-mouth delicious.
Step 2: Add Crunch and Chocolate
Stir in crushed graham crackers and (if you’re feeling a little indulgent) a handful of chocolate chips. Use a spoon or silicone spatula to gently fold these in, making sure every bit of that luscious cream cheese mixture gets a pop of crunch and, optionally, some delectable chocolate pieces.
Step 3: Chill the Mixture
Now, patience is key! Cover your bowl with plastic wrap and refrigerate for 30 minutes. This helps the mixture firm up, making it far easier to shape into those irresistible little balls. It’s the perfect moment to set up your coatings and get excited about what’s next.
Step 4: Shape the Cheesecake Balls
Once chilled, use a small cookie scoop or spoon to portion out about 1-inch rounds. Roll each portion gently between your palms to create smooth balls. Expect a bit of stickiness—embrace it! That means they’ll be rich and creamy when you bite in.
Step 5: Coat and Garnish
Decide how you want to finish your Cheesecake Balls. Roll them in extra graham crumbs, crushed nuts, or colorful sprinkles for a quick (and mess-free) win. Or, for the grand finale, dip them in melted chocolate or candy coating—then set them on parchment paper while the coating firms up in the fridge for about 15–20 minutes.
How to Serve Cheesecake Balls
Garnishes
A final flourish makes all the difference! Roll your Cheesecake Balls in sprinkles for a pop of color, dust them with graham cracker crumbs for classic flavor, or try crushed pistachios and pecans for irresistible crunch. You can even finish with a drizzle of melted white or dark chocolate for a truly special touch.
Side Dishes
Set out a platter with fresh berries, sliced strawberries, or seasonal fruits to complement the creamy richness. A few savory snacks on the side—think salty pretzels or crackers—will make your Cheesecake Balls the sweet centerpiece of any dessert spread.
Creative Ways to Present
Arrange your Cheesecake Balls on a tiered cake stand for a party-ready dessert display, or tuck them into mini cupcake liners for individual servings. They’re also adorable as edible gifts—just pop them into a bakery box with wax paper dividers and share the love!
Make Ahead and Storage
Storing Leftovers
If you have leftovers (a big “if”), store your Cheesecake Balls in an airtight container in the refrigerator. They’ll stay fresh for up to 5 days, maintaining that creamy texture and luscious flavor.
Freezing
To make Cheesecake Balls well ahead of time, arrange them in a single layer in a freezer-safe container. Once frozen solid, transfer to a zip-top bag or container with parchment paper between layers. They’re good for up to 2 months—just thaw in the fridge overnight before serving.
Reheating
These are best enjoyed chilled! If you’ve frozen your Cheesecake Balls, simply let them defrost in the refrigerator for several hours or overnight. There’s no need to heat them up—just enjoy straight from the fridge.
FAQs
Can I use low-fat cream cheese for this recipe?
Yes, you can substitute low-fat cream cheese, but keep in mind that the Cheesecake Balls may be a little less rich and not quite as creamy. For best texture, full-fat cream cheese is recommended.
What other mix-ins can I add to the filling?
Get creative! Some tasty mix-ins include mini chocolate chips, crushed cookies, dried fruit, a pinch of lemon zest, or even a swirl of peanut butter. Just be sure not to overload the mixture, or it might get too crumbly.
Can I make these Cheesecake Balls ahead of time?
Absolutely! These are a dream make-ahead treat. Chill them until ready to serve, up to 5 days in advance, or freeze for up to 2 months. Perfect for prepping before busy events or holidays.
How can I make them gluten-free?
Simply swap regular graham crackers for your favorite gluten-free variety and ensure any add-ins or coatings are gluten-free, too. Everything else stays exactly the same!
Are these Cheesecake Balls safe to leave at room temperature?
Because of the cream cheese base, these should be kept chilled as much as possible. If serving at a party, try not to leave them out for longer than 1–2 hours to keep them at their very best.
Final Thoughts
If you’re looking for a treat that’s easy, impressive, and downright delicious, Cheesecake Balls are your new dessert secret weapon. Trust me, once you’ve tried them, you’ll be dreaming up endless ways to make them your own and sharing the joy with everyone you know!
Print
Cheesecake Balls Recipe
- Total Time: 1 hour
- Yield: 20 cheesecake balls 1x
- Diet: Non-Vegetarian
Description
Delight your taste buds with these easy-to-make Cheesecake Balls – a no-bake treat perfect for any occasion. Creamy cream cheese, sweet powdered sugar, and crunchy graham crackers come together to create bite-sized balls of deliciousness. Customize with your favorite coatings like chocolate, nuts, or sprinkles!
Ingredients
- 1 package (8 oz) cream cheese, softened
- 1/4 cup powdered sugar
- 1/2 teaspoon vanilla extract
- 1/2 cup crushed graham crackers
- 1/2 cup white or semi-sweet chocolate chips (optional)
- Additional crushed graham crackers
- Crushed nuts
- Sprinkles
- 1/2 cup melted chocolate or candy coating
Cheesecake Mixture:
Coating and Garnish:
Instructions
- Prepare Cheesecake Mixture: In a medium bowl, beat softened cream cheese, powdered sugar, and vanilla extract until smooth. Stir in crushed graham crackers and chocolate chips if desired. Chill mixture for 30 minutes.
- Form Cheesecake Balls: Roll chilled mixture into 1-inch balls. Coat each ball in graham crumbs, nuts, or sprinkles. For chocolate-dipped balls, dip in melted chocolate and refrigerate until set (15–20 minutes).
- Serve: Enjoy chilled or store in the fridge for up to 5 days.
Notes
- Customize flavors with crushed Oreos, mini chocolate chips, or lemon zest.
- Perfect for holidays, parties, or as gifts.
- Prep Time: 15 minutes
- Category: Dessert
- Method: No-Bake
- Cuisine: American
Nutrition
- Serving Size: 1 ball
- Calories: 110
- Sugar: 8g
- Sodium: 60mg
- Fat: 7g
- Saturated Fat: 4g
- Unsaturated Fat: 3g
- Trans Fat: 0g
- Carbohydrates: 10g
- Fiber: 0g
- Protein: 1g
- Cholesterol: 15mg


