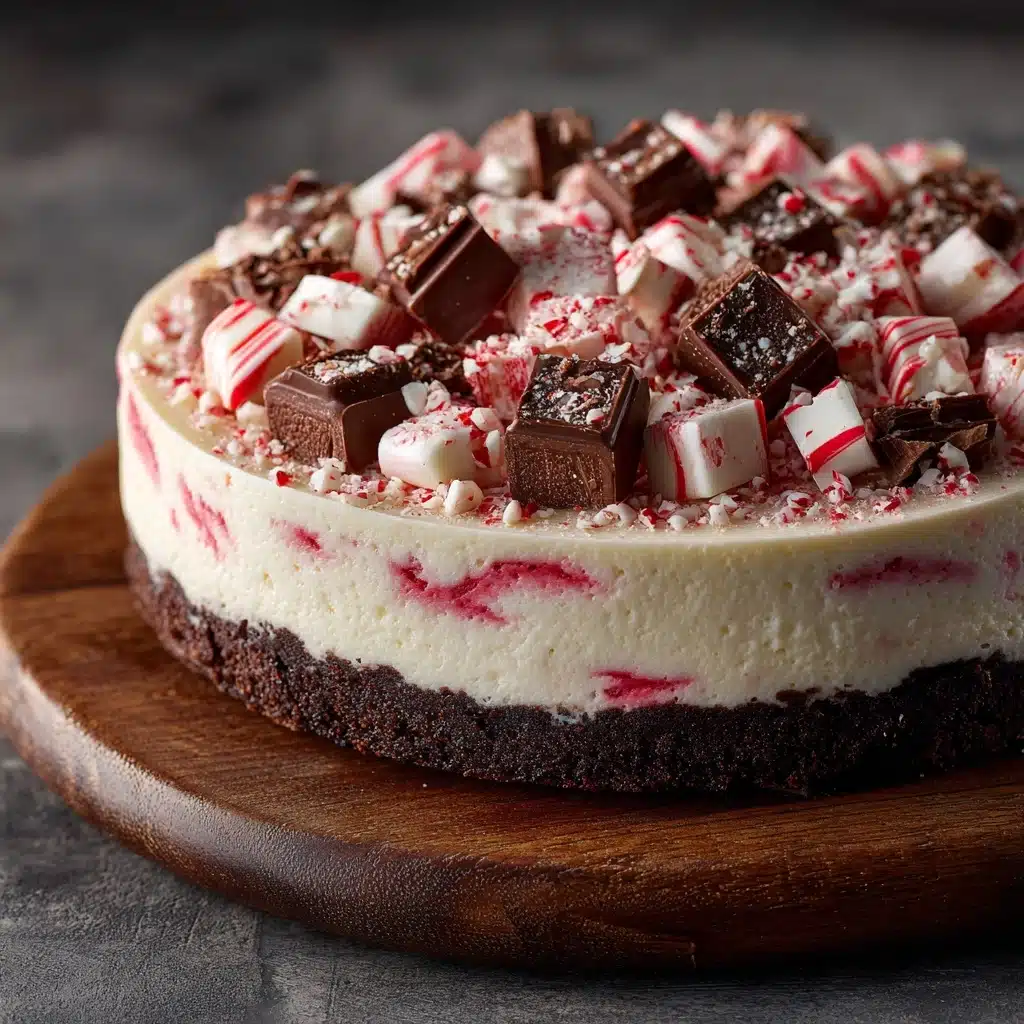
Peppermint Ice Cream Cake Recipe
If you’re looking to dazzle your friends and family with a show-stopping holiday dessert, the Peppermint Ice Cream Cake Recipe is your ticket to instant celebration. Layers of creamy peppermint and chocolate ice cream sit atop a crunchy chocolate cookie crust, finished with fluffy whipped cream and a sprinkle of crushed peppermint candies. Every bite is a frosty, festive burst of chocolate-mint magic that feels as effortless as it is impressive. Whether you’re celebrating Christmas or just want a wintery treat, this cake is a guaranteed crowd-pleaser that will have everyone asking for seconds!

Ingredients You’ll Need
This Peppermint Ice Cream Cake Recipe comes together with just a handful of simple ingredients, each playing an important role in making the flavors and textures pop. From the crisp cookie crust to the vibrant peppermint candies, every item brings something special to the party.
- Chocolate sandwich cookies (like Oreos): These crushed cookies form the rich, crunchy base that holds the whole cake together.
- Unsalted butter: Melted butter binds the cookie crumbs, creating a sturdy and flavorful crust.
- Peppermint ice cream: The star of the show! Its cool, minty flavor gives this cake its signature holiday twist.
- Chocolate ice cream: Provides a luscious, chocolatey layer that perfectly complements the peppermint.
- Heavy whipping cream: Whipped into soft peaks for a cloud-like topping that’s both light and decadent.
- Powdered sugar: Sweetens the whipped cream without any gritty texture.
- Vanilla extract: Adds a hint of warmth and rounds out the flavors in the whipped cream.
- Crushed peppermint candies or candy canes: A festive, crunchy finishing touch that adds color and holiday sparkle.
- Chocolate sauce or hot fudge (optional): For an extra touch of indulgence, drizzle over the top just before serving.
How to Make Peppermint Ice Cream Cake Recipe
Step 1: Make the Cookie Crust
Start by combining the crushed chocolate sandwich cookies with melted butter in a medium bowl. Mix until all the crumbs are evenly moistened. Press this mixture firmly into the bottom of a 9-inch springform pan, making sure it’s packed tightly for the best base. Pop the pan into the freezer for 15 minutes so the crust can firm up. This simple step is the key to a sliceable, crunchy foundation for your Peppermint Ice Cream Cake Recipe.
Step 2: Add the Peppermint Ice Cream Layer
Once your crust is set, take your slightly softened peppermint ice cream and spread it evenly over the cookie base. Smooth the top with a spatula so you get a nice, even layer. Return the pan to the freezer for another 30 minutes, or until the ice cream is firm to the touch. This helps keep the layers distinct and makes assembling the next step a breeze.
Step 3: Top with Chocolate Ice Cream
Now it’s time for the chocolate ice cream! Again, make sure it’s softened just enough to be spreadable but not melted. Spoon the chocolate ice cream over the chilled peppermint layer and smooth it into an even finish. For the best results, freeze the entire cake for at least 4 hours or, even better, overnight. This patience pays off with perfect, clean slices when serving.
Step 4: Whip Up the Cream Topping
While the cake chills, whip together the heavy cream, powdered sugar, and vanilla extract in a large bowl. Beat until stiff peaks form for a stable, fluffy whipped cream that holds its shape on top of your cake. If you’re short on time, a store-bought whipped topping can also work in a pinch.
Step 5: Decorate and Serve
Just before serving, carefully remove the cake from the springform pan. Spread or pipe the whipped cream over the top, making it as simple or fancy as you like. Sprinkle with crushed peppermint candies for a festive crunch and, if desired, drizzle with chocolate sauce or hot fudge for a truly decadent finish. Slice with a sharp knife dipped in hot water for the cleanest cuts, and serve immediately to enjoy every chilly, creamy layer.
How to Serve Peppermint Ice Cream Cake Recipe
Garnishes
A Peppermint Ice Cream Cake Recipe deserves to be shown off! Scatter extra crushed peppermint candies on top for a pop of color and crunch. A drizzle of glossy chocolate sauce or hot fudge adds irresistible richness. For a touch of elegance, try a few fresh mint leaves or even a dusting of cocoa powder.
Side Dishes
Pair this cake with a mug of hot chocolate or peppermint mocha for a cozy winter treat. If you want to go all out, serve alongside a platter of chocolate-dipped strawberries or a scoop of vanilla bean ice cream for extra indulgence. Light, crisp cookies like biscotti also make a lovely crunchy contrast.
Creative Ways to Present
For special occasions, try slicing the cake into small squares and serving them as bite-sized frozen treats on a dessert platter. Layer individual servings in mason jars for a fun, portable twist. If you’re making this Peppermint Ice Cream Cake Recipe for a party, add festive cupcake liners or mini flags to each slice for a playful touch!
Make Ahead and Storage
Storing Leftovers
Any leftover Peppermint Ice Cream Cake Recipe can be covered tightly with plastic wrap or foil and stored in the freezer. It will keep well for up to a week, making it a perfect make-ahead treat for busy holiday gatherings or late-night sweet cravings.
Freezing
This dessert is designed for the freezer! Assemble the entire cake ahead of time, cover it well, and freeze for up to one week. For longer storage, wrap the cake in an extra layer of aluminum foil to prevent freezer burn and preserve its fresh, festive flavors.
Reheating
No reheating needed—just let the cake sit at room temperature for about 5 to 10 minutes before slicing. This softens the layers just enough for easy serving while keeping every bite deliciously cold and creamy.
FAQs
Can I use different flavors of ice cream?
Absolutely! While peppermint and chocolate are a classic combo for this Peppermint Ice Cream Cake Recipe, you can swap in mint chocolate chip, cookies and cream, or even coffee ice cream for a fun twist.
What if I don’t have a springform pan?
No problem! You can use a deep cake pan lined with parchment paper for easy removal. Just lift out the cake using the parchment before decorating and serving.
How do I keep the layers from mixing together?
Make sure each layer is nice and firm before adding the next. Freezing between layers is the secret to those beautiful, distinct stripes in your Peppermint Ice Cream Cake Recipe.
Is there a shortcut for the whipped cream?
Yes! Store-bought whipped topping works well if you’re short on time. Just spread it over the cake right before serving and garnish as you wish.
Can I make this cake ahead of time?
Definitely. The Peppermint Ice Cream Cake Recipe is ideal for making in advance since it needs several hours to freeze. Just decorate with whipped cream and candies right before you’re ready to serve for the freshest look.
Final Thoughts
If you’re searching for a magical, crowd-pleasing dessert, give this Peppermint Ice Cream Cake Recipe a try. It’s delightfully easy, bursting with holiday flavor, and guaranteed to become a favorite at your table. Gather your ingredients, invite some friends, and treat everyone to a slice of frosty, festive fun!
Print
Peppermint Ice Cream Cake Recipe
- Total Time: 4 hours 25 minutes
- Yield: 12 servings 1x
- Diet: Vegetarian
Description
This Peppermint Ice Cream Cake is a festive and refreshing no-bake dessert perfect for holiday celebrations. With a crunchy chocolate cookie crust, layers of peppermint and chocolate ice cream, and a luscious whipped cream topping sprinkled with crushed peppermint candies, it’s both visually stunning and deliciously satisfying.
Ingredients
Crust
- 24 chocolate sandwich cookies (like Oreos), crushed
- 1/4 cup unsalted butter, melted
Ice Cream Layers
- 1.5 quarts peppermint ice cream, softened slightly
- 1.5 quarts chocolate ice cream, softened slightly
Topping
- 1 cup heavy whipping cream
- 2 tablespoons powdered sugar
- 1/2 teaspoon vanilla extract
- 1/3 cup crushed peppermint candies or candy canes
- Chocolate sauce or hot fudge for drizzling (optional)
Instructions
- Make the crust: In a medium bowl, combine the crushed chocolate sandwich cookies and melted butter. Press the mixture firmly into the bottom of a 9-inch springform pan to form an even crust. Freeze for 15 minutes to set.
- Add peppermint ice cream layer: Spread the softened peppermint ice cream evenly over the chilled crust, smoothing the surface with a spatula. Return to the freezer and freeze for at least 30 minutes, or until firm.
- Add chocolate ice cream layer: Spread the softened chocolate ice cream over the peppermint layer, smoothing the top carefully. Freeze the cake for at least 4 hours or preferably overnight to fully set all layers.
- Prepare whipped cream topping: In a large bowl, whip the heavy cream with powdered sugar and vanilla extract until stiff peaks form, ensuring a light and fluffy texture.
- Assemble and serve: Remove the cake from the springform pan just before serving. Spread or pipe the whipped cream evenly over the top. Sprinkle the crushed peppermint candies over the whipped cream and drizzle with chocolate sauce or hot fudge if desired. Slice using a knife dipped in hot water for clean cuts, and serve immediately.
Notes
- Dip a sharp knife in hot water between slices to achieve clean and easy cutting.
- You can substitute store-bought whipped topping for the homemade whipped cream as a time-saving alternative.
- If peppermint ice cream is difficult to find, mint chocolate chip ice cream makes a great substitute while maintaining a similar flavor profile.
- Prep Time: 25 minutes
- Cook Time: 0 minutes
- Category: Dessert
- Method: Freezing
- Cuisine: American
Nutrition
- Serving Size: 1 slice
- Calories: 420
- Sugar: 32g
- Sodium: 190mg
- Fat: 25g
- Saturated Fat: 14g
- Unsaturated Fat: 9g
- Trans Fat: 0g
- Carbohydrates: 42g
- Fiber: 1g
- Protein: 5g
- Cholesterol: 70mg


