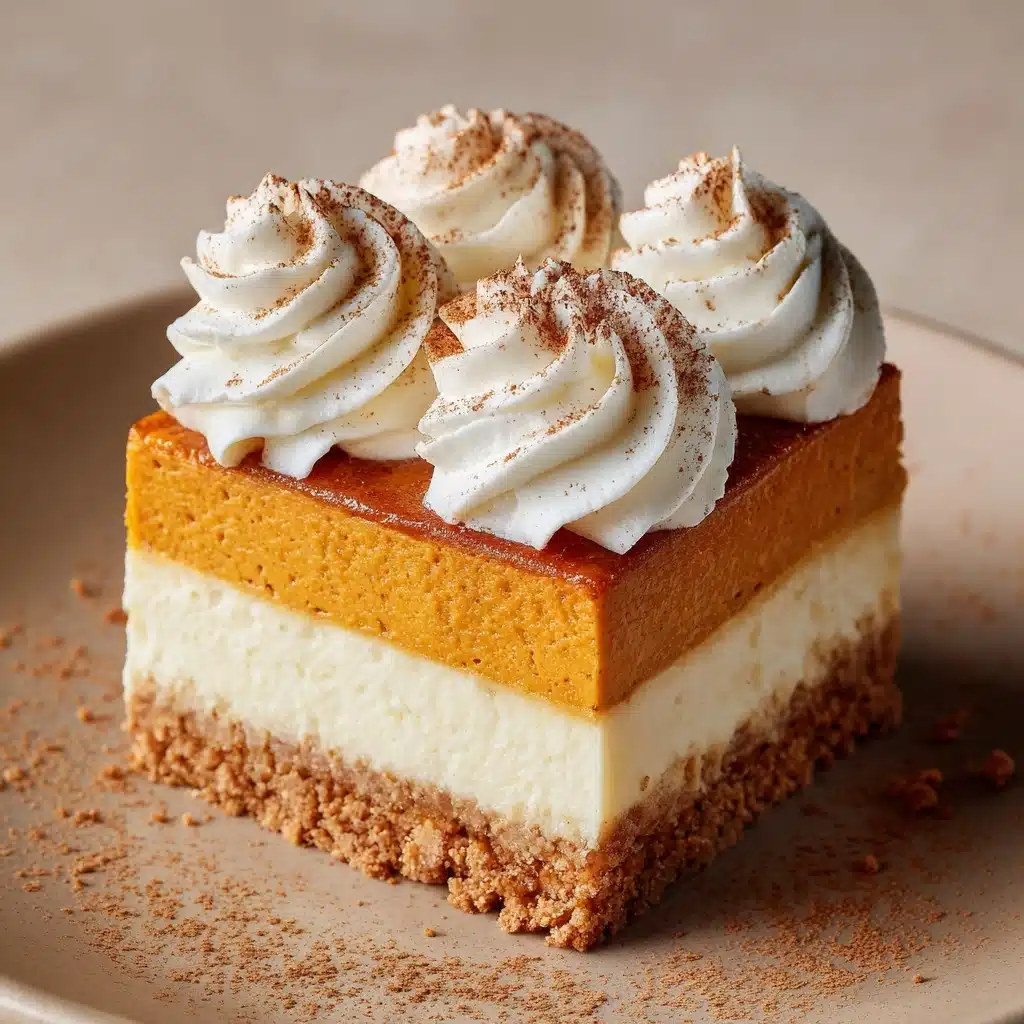
Pumpkin Pie Bars Recipe
If you’re looking for a cozy treat that captures everything we love about fall, these Pumpkin Pie Bars are about to become your new go-to dessert. Imagine all the creamy, spiced deliciousness of classic pumpkin pie, but in a super shareable, fuss-free bar form. Whether you’re hosting a holiday dinner, packing a lunchbox, or just craving something sweet with your coffee, these bars deliver comfort and flavor in every bite. Easy to make and even easier to love, this recipe brings all the pumpkin pie nostalgia—no pie crust rolling required!
Ingredients You’ll Need
One of the best things about Pumpkin Pie Bars is how each simple ingredient plays a starring role, coming together to create a dessert that’s rich, flavorful, and irresistibly creamy. Don’t skip or swap—each component adds something special to the taste, texture, or signature golden color.
- Graham cracker crumbs: Bring a buttery, slightly sweet crunch that makes a perfect sturdy base for the bars.
- Unsalted butter, melted: Helps bind the crumbs and adds that melt-in-your-mouth richness to the crust.
- Granulated sugar: Lends just the right amount of sweetness to balance the graham crackers.
- Pumpkin purée: The heart of these bars—make sure to use 100% pure pumpkin for the best flavor and color.
- Packed brown sugar: Gives the filling a deep, caramel-like sweetness and a hint of molasses.
- Large eggs: Bind the filling together and provide structure so the bars slice beautifully.
- Evaporated milk: Makes the filling luscious, silky, and creamy without being too heavy.
- Pumpkin pie spice: The signature blend that brings all those cozy, autumnal notes to life.
- Cinnamon: Adds an extra touch of warmth and spice that makes these bars special.
- Salt: Just a pinch to round out the flavors and keep everything balanced.
- Whipped cream (optional): A light, fluffy finish that takes your Pumpkin Pie Bars over the top.
How to Make Pumpkin Pie Bars
Step 1: Prep Your Pan
Start by preheating your oven to 350°F. Line a 9×13-inch baking pan with parchment paper, leaving an overhang on the sides. This little trick makes it a breeze to lift the bars out later for neat, perfect slices.
Step 2: Make the Crust
In a medium bowl, mix the graham cracker crumbs, granulated sugar, and melted butter until the mixture resembles wet sand. Press this mixture firmly and evenly into the bottom of your prepared pan. Bake for 10 minutes, then set aside—your kitchen is going to start smelling amazing already!
Step 3: Whisk Together the Filling
Grab a large bowl and whisk together the pumpkin purée, brown sugar, eggs, evaporated milk, pumpkin pie spice, cinnamon, and salt. Take your time here—make sure everything is smooth and combined for the silkiest pumpkin layer.
Step 4: Assemble and Bake
Pour the pumpkin filling over your pre-baked crust, spreading it into an even layer. Pop the pan back into the oven and bake for 40 to 45 minutes. You’ll know it’s ready when the center is set and a toothpick comes out mostly clean, but with a few moist crumbs.
Step 5: Cool and Chill
Let your Pumpkin Pie Bars cool completely at room temperature, then refrigerate for at least 2 hours. This helps the bars set up perfectly, so you get neat, creamy squares every time you slice.
How to Serve Pumpkin Pie Bars

Garnishes
For a classic finish, top each bar with a generous dollop of whipped cream or a sprinkle of cinnamon. If you’re feeling fancy, add a pinch of freshly grated nutmeg or some candied pecans for extra crunch and flair.
Side Dishes
These bars pair beautifully with a hot cup of coffee, spiced chai, or a glass of apple cider. If you’re serving a crowd, set out fresh fruit or a scoop of vanilla ice cream to complement the warm spices in the Pumpkin Pie Bars.
Creative Ways to Present
Cut your bars into small squares for a party platter, or use cookie cutters for fun shapes at holiday gatherings. For an elegant dessert plate, drizzle each bar with caramel sauce or chocolate, and scatter a few crushed graham crackers on top.
Make Ahead and Storage
Storing Leftovers
Cover any extra Pumpkin Pie Bars tightly and store them in the refrigerator for up to four days. They stay moist and delicious, making them a fantastic make-ahead dessert for busy weeks or holiday prep.
Freezing
These bars freeze surprisingly well! Once fully cooled and sliced, layer them with parchment paper in an airtight container. Freeze for up to two months, and thaw overnight in the fridge when you’re ready to enjoy.
Reheating
If you prefer your Pumpkin Pie Bars slightly warm, zap individual bars in the microwave for 10-15 seconds. Just be careful not to overheat, or you’ll lose that perfect creamy texture.
FAQs
Can I use a different crust instead of graham crackers?
Absolutely! A gingersnap crust is a fun and spicy twist that pairs beautifully with the pumpkin filling. You can also try vanilla wafers or digestive biscuits for something a little different.
Is it possible to make Pumpkin Pie Bars dairy-free?
Yes, you can substitute plant-based butter for the crust and use coconut milk or another non-dairy cream in place of the evaporated milk. Just keep in mind the flavor and texture might vary slightly.
Do I need to refrigerate Pumpkin Pie Bars?
Yes, because the filling contains eggs and milk, these bars should be stored in the refrigerator. This also helps them set up and makes slicing a breeze.
Can I make these bars gluten-free?
Definitely! Use gluten-free graham crackers or cookies for the crust. Double-check that your other ingredients are gluten-free, and you’re all set.
How do I know when the bars are done baking?
Look for the center to be set and a toothpick inserted to come out mostly clean with just a few moist crumbs. The edges may pull away slightly from the pan—that’s your cue they’re ready!
Final Thoughts
There’s something undeniably special about sharing homemade Pumpkin Pie Bars with family and friends. They’re simple, festive, and packed with all the flavors of fall. Give this recipe a try—you might just find it becomes a new holiday tradition!
Print
Pumpkin Pie Bars Recipe
- Total Time: 1 hour 10 minutes
- Yield: 12 bars 1x
- Diet: Non-Vegetarian
Description
These Pumpkin Pie Bars are a delightful twist on the classic holiday favorite, combining a crunchy graham cracker crust with a creamy, spiced pumpkin filling. Perfect for fall gatherings or Thanksgiving dessert, they are easy to prepare and deliciously satisfying.
Ingredients
Crust
- 1 3/4 cups graham cracker crumbs (about 14 full sheets)
- 1/2 cup unsalted butter, melted
- 1/4 cup granulated sugar
Filling
- 1 can (15 oz) pumpkin purée
- 3/4 cup packed brown sugar
- 2 large eggs
- 1 can (12 oz) evaporated milk
- 1 1/2 teaspoons pumpkin pie spice
- 1/2 teaspoon cinnamon
- 1/4 teaspoon salt
Optional
- Whipped cream for topping
Instructions
- Prepare the oven and pan: Preheat your oven to 350°F (175°C) and line a 9×13-inch baking pan with parchment paper, leaving an overhang on the sides to help lift out the bars later.
- Make the crust: In a medium bowl, combine the graham cracker crumbs, granulated sugar, and melted butter. Stir until the mixture resembles wet sand. Press the mixture firmly and evenly into the bottom of the prepared pan. Bake the crust for 10 minutes, then remove from the oven and set aside.
- Mix the filling: In a large bowl, whisk together the pumpkin purée, brown sugar, eggs, evaporated milk, pumpkin pie spice, cinnamon, and salt until the mixture is smooth and well combined.
- Assemble and bake: Pour the pumpkin filling over the pre-baked crust and spread it evenly. Return the pan to the oven and bake for 40 to 45 minutes, or until the center is set and a toothpick inserted comes out mostly clean.
- Cool and chill: Allow the bars to cool completely at room temperature. Once cooled, refrigerate for at least 2 hours to firm up before slicing into 12 bars.
- Serve: Optionally, top each bar with whipped cream before serving for an extra creamy finish.
Notes
- You can use a gingersnap crust instead of graham crackers for a spicier crust option.
- Store leftovers in an airtight container in the refrigerator for up to 4 days.
- Make sure to chill the bars well before slicing to get clean cuts.
- For a dairy-free option, substitute the evaporated milk with coconut milk.
- Prep Time: 15 minutes
- Cook Time: 55 minutes
- Category: Dessert
- Method: Baking
- Cuisine: American
Nutrition
- Serving Size: 1 bar
- Calories: 230
- Sugar: 18 g
- Sodium: 150 mg
- Fat: 11 g
- Saturated Fat: 6 g
- Unsaturated Fat: 4 g
- Trans Fat: 0 g
- Carbohydrates: 30 g
- Fiber: 2 g
- Protein: 4 g
- Cholesterol: 50 mg

