Halloween Zombie Fingers Recipe
If you’re searching for a show-stopping treat that’s as fun to make as it is spooky to serve, look no further than this Halloween Zombie Fingers Recipe! These creepy cookies are wickedly delicious, with a buttery, melt-in-your-mouth texture and a gory, realistic appearance that’s guaranteed to thrill both kids and adults. Whether you’re planning a haunted house party or just want to surprise your family with something unforgettable, these zombie fingers will become the talk of your Halloween spread.
Ingredients You’ll Need
The magic of this Halloween Zombie Fingers Recipe lies in its simple, pantry-friendly ingredients—each one plays a key role in flavor, texture, or that eerily convincing look. Gather everything below to transform basic baking staples into edible, spine-chilling fun.
- Unsalted butter (1 cup, softened): Gives your cookies that irresistible richness and soft crumb.
- Powdered sugar (1 cup): Ensures the dough stays tender and sweet, with a fine, melt-in-your-mouth texture.
- Egg (1): Binds everything together for a cohesive dough and helps the cookies hold their finger shape.
- Vanilla extract (1 teaspoon): Adds a subtle, comforting aroma that balances out the spooky theme.
- All-purpose flour (2 2/3 cups): The backbone of your dough, creating structure for shaping those bony fingers.
- Baking powder (1/2 teaspoon): Gives just a hint of lift, so your cookies don’t spread too much while baking.
- Salt (1/4 teaspoon): Brightens and balances the sweetness, making every bite pop.
- Whole almonds (1/2 cup): These become the gruesome “fingernails”—almonds with skin-on look especially gnarly!
- Red gel food coloring or strawberry jam: For that gory “blood” effect under the nails and around the knuckles.
- Green food coloring (optional): A few drops can tint the dough a sickly zombie green for extra creep factor.
How to Make Halloween Zombie Fingers Recipe
Step 1: Cream the Butter and Sugar
Start by beating together the softened butter and powdered sugar in a large mixing bowl until the mixture is light, fluffy, and almost cloud-like. This step is essential for achieving that delicate cookie texture and ensures the sugar dissolves fully into the butter. Don’t rush this part—the more air you incorporate, the more tender your zombie fingers will be!
Step 2: Add the Egg and Vanilla
Crack in your egg and pour in the vanilla extract, then beat until everything is silky and well combined. The egg acts as the glue, bringing all those rich, sweet flavors together, while vanilla adds a warm, comforting undertone that sneaks through the spooky exterior.
Step 3: Mix the Dry Ingredients
In a separate bowl, whisk together the all-purpose flour, baking powder, and salt. This step ensures the leavening and seasoning are distributed evenly, so every finger bakes up perfectly. Gradually add the dry mixture to your wet ingredients, mixing just until a soft dough forms. If you want your fingers to look extra undead, now’s the time to knead in a few drops of green food coloring until the color is even.
Step 4: Chill the Dough
Divide your dough into two equal portions, wrap them tightly in plastic wrap, and chill for at least 30 minutes. This not only makes the dough easier to handle, but also helps the cookies keep their finger shape while baking. Chilling is key—don’t skip it!
Step 5: Shape the Zombie Fingers
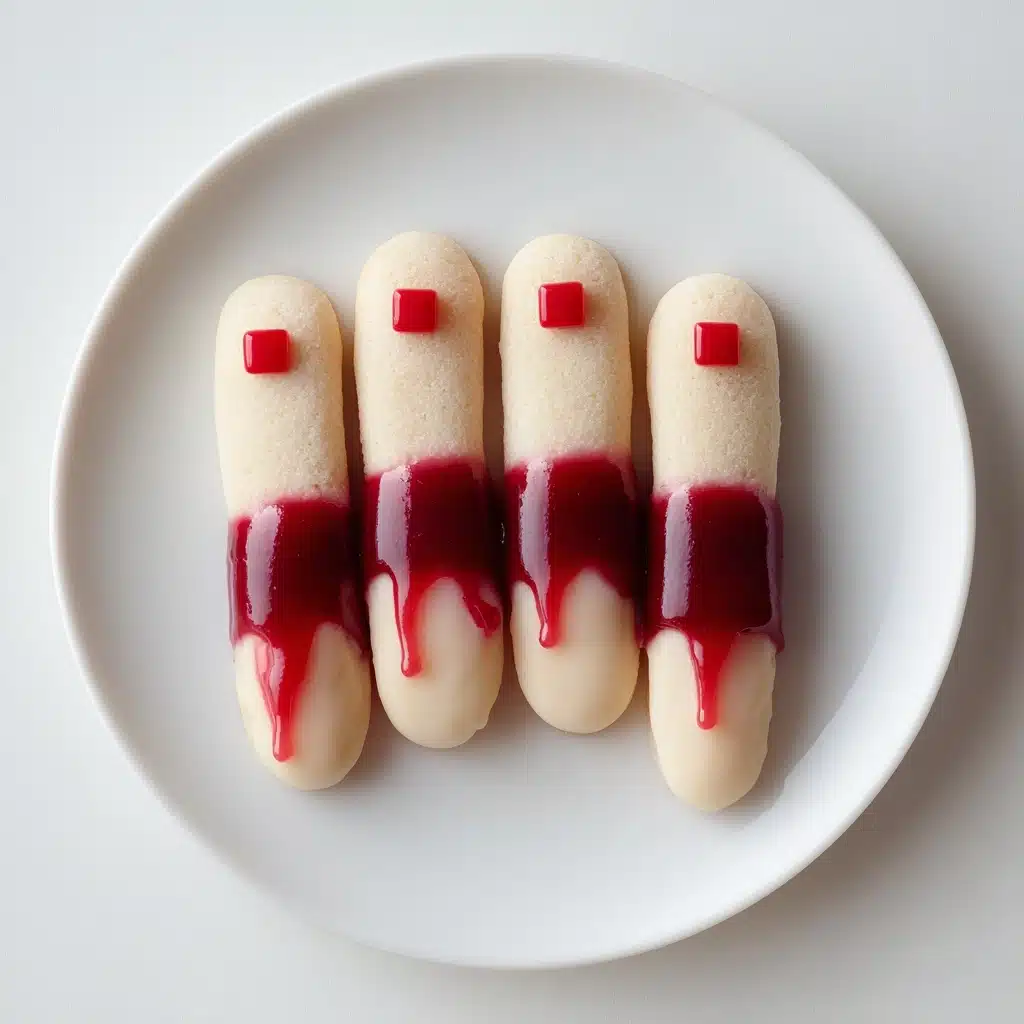
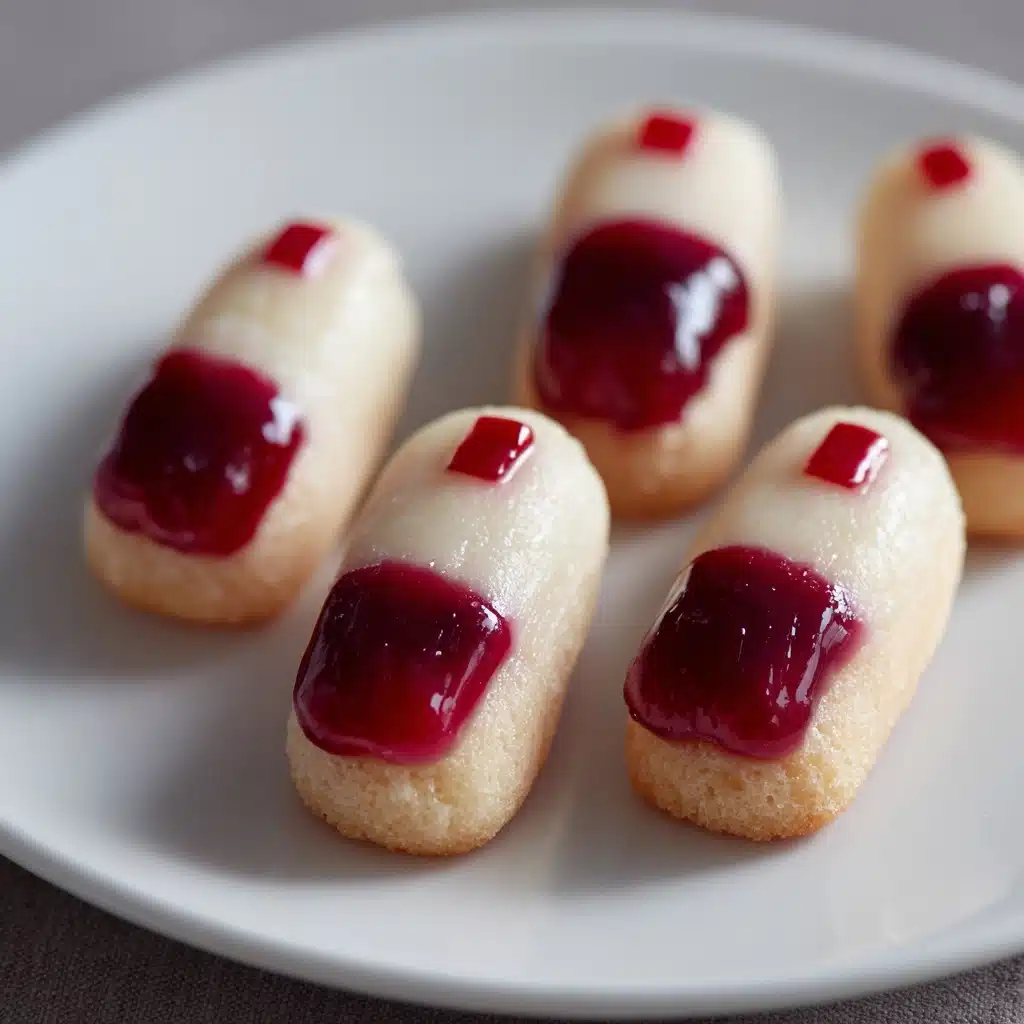
Once the dough is chilled, preheat your oven to 350°F (175°C) and line a baking sheet with parchment paper. Scoop heaping tablespoons of dough and roll them into finger-like shapes, slightly thinner than a real finger (they’ll puff up just a bit in the oven). Press a whole almond into one end to form the nail, and use a small knife to create knuckle lines and wrinkles for that disturbingly lifelike look.
Step 6: Bake to Perfection
Arrange your shaped fingers on the prepared baking sheet, spacing them slightly apart. Bake for 12 to 15 minutes, or until the fingers are just starting to turn golden at the edges. Keep an eye on them—over-baking will dull the colors and make the fingers too crisp!
Step 7: Add the Bloody Details
Once baked, let the fingers cool just enough to handle. Gently remove the almond “nail,” dab a little red gel food coloring or strawberry jam onto the exposed end, and press the almond back in place for a gruesome, bloody nail effect. For extra gore, smear some “blood” in the knuckle creases or even down the sides. If you want to go all-out, dust the knuckle lines with a touch of cocoa powder or use melted chocolate to darken the creases.
How to Serve Halloween Zombie Fingers Recipe
Garnishes
For maximum shock value, serve your zombie fingers on a platter splattered with extra strawberry jam or red gel to mimic a bloody scene. You can also sprinkle a bit of crushed chocolate cookie “dirt” around the fingers, or add gummy worms for a playful and revolting touch.
Side Dishes
Balance out the sweet, buttery flavor of these cookies with a tray of fresh fruit, or pair them with a steaming mug of spiced cider or rich hot chocolate. If you’re throwing a party, a bowl of green “witches’ brew” punch makes an especially fun (and thematic!) companion.
Creative Ways to Present
Get creative with your Halloween Zombie Fingers Recipe! Arrange the cookies sticking out of a chocolate “graveyard” cake, serve them poking up from bowls of pudding “mud,” or wrap them in cellophane bags as ghoulish party favors. For the ultimate haunted-house effect, scatter them around a foggy, dry-ice-laden table centerpiece.
Make Ahead and Storage
Storing Leftovers
Store any leftover Halloween Zombie Fingers Recipe cookies in an airtight container at room temperature for up to 4 days. The flavors stay fresh, and the cookies hold their spooky shape beautifully. If you used jam for the blood effect, layer parchment paper between cookies to prevent sticking.
Freezing
These cookies freeze surprisingly well! Place cooled, decorated zombie fingers in a single layer on a baking sheet, freeze until solid, then transfer to a zip-top bag or freezer-safe container. They’ll keep for up to 2 months—just be sure to thaw them gently at room temperature before serving.
Reheating
While these cookies are delightful at room temperature, you can freshen up their texture by popping them in a preheated 300°F (150°C) oven for 3 to 5 minutes. This revives their crisp edges and makes them taste freshly baked. Just let them cool slightly before handling, as the “bloody” details can soften with heat.
FAQs
Can I make the dough ahead of time?
Absolutely! You can prepare the dough for the Halloween Zombie Fingers Recipe up to two days in advance. Simply wrap it tightly in plastic and keep it in the fridge until you’re ready to shape and bake.
What if I don’t have almonds for the fingernails?
No almonds? No problem! Try using pumpkin seeds, chocolate chips, or even pieces of pretzel for a creative twist on your zombie fingers.
How do I get the fingers to look extra realistic?
For truly ghastly fingers, make sure to add deep knuckle lines with a knife and don’t be afraid to make the shapes a little misshapen. Tinting the dough with green food coloring and using almonds with the skin on adds that perfect undead effect.
Can I use gluten-free flour?
Yes, a good-quality gluten-free flour blend works well in this Halloween Zombie Fingers Recipe. Just check that your blend contains xanthan gum or a similar binding agent for the best results.
Is there a dairy-free version?
For a dairy-free option, substitute the butter with your favorite plant-based alternative. The texture may vary slightly, but you’ll still get spooky, delicious results.
Final Thoughts
I can’t wait for you to try this Halloween Zombie Fingers Recipe! It’s the perfect blend of creepy and delicious, and making them is just as much fun as eating them. Whether you’re baking with kids or whipping up a platter for a party, these cookies are sure to bring some ghoulish joy to your Halloween festivities. Happy haunting and happy baking!
Print
Halloween Zombie Fingers Recipe
- Total Time: 35 minutes
- Yield: 24 fingers 1x
- Diet: Vegetarian
Description
Create spooky and delicious Halloween Zombie Fingers cookies that are perfect for your Halloween party. These creepy finger-shaped cookies are lightly sweet, with realistic almond fingernails and a bloody effect created using red gel food coloring or strawberry jam. The dough can be tinted green for an eerie look, adding to the festive vibe while delivering a crunchy, buttery treat that’s fun to make and eat.
Ingredients
Wet Ingredients
- 1 cup unsalted butter, softened
- 1 cup powdered sugar
- 1 egg
- 1 teaspoon vanilla extract
Dry Ingredients
- 2 2/3 cups all-purpose flour
- 1/2 teaspoon baking powder
- 1/4 teaspoon salt
Decorations
- 1/2 cup whole almonds
- Red gel food coloring or strawberry jam (for blood effect)
- Green food coloring (optional for dough tint)
Instructions
- Cream Butter and Sugar: In a large bowl, beat together the softened butter and powdered sugar until the mixture is light, fluffy, and well combined.
- Add Egg and Vanilla: Beat in the egg and vanilla extract until fully incorporated, creating a smooth batter base.
- Mix Dry Ingredients: In a separate bowl, whisk together the all-purpose flour, baking powder, and salt to ensure even distribution of leavening and seasoning.
- Combine Wet and Dry Ingredients: Gradually add the flour mixture to the wet ingredients, stirring until a cohesive dough forms. If you desire, add several drops of green food coloring and mix until the dough is evenly tinted for a spooky effect.
- Chill Dough: Divide the dough into two equal portions. Wrap each piece in plastic wrap and refrigerate for 30 minutes to firm up for easier shaping.
- Preheat Oven and Prepare Sheet: Preheat your oven to 350°F (175°C) and line a baking sheet with parchment paper to prevent sticking and promote even baking.
- Shape Fingers: Take heaping tablespoons of dough and roll them into finger-like shapes that are slightly thinner than an actual finger. Use your fingers to taper the ends and elongate the shape.
- Add Almond Fingernails: Press an almond into one end of each finger shape to resemble a fingernail, pressing firmly so it stays in place during baking.
- Make Knuckle Details: Use a knife to make small horizontal slashes or cuts along the finger shapes to mimic knuckle creases and add realism.
- Bake Cookies: Place the shaped fingers on the prepared baking sheet and bake for 12–15 minutes, or until they are lightly golden around the edges.
- Add Blood Effect: Remove from the oven and let cookies cool slightly. Carefully lift off the almonds, place a small dab of red gel food coloring or strawberry jam underneath, then replace the almond to create a bloody nail appearance. You can also add small dabs of red gel around the knuckle slashes for extra gore.
Notes
- For extra creepiness, tint the dough with green food coloring and after baking, darken the knuckle lines with cocoa powder or melted chocolate paste.
- Using almonds with skin on gives a more realistic and gruesome look to the fingernails.
- Prep Time: 20 minutes
- Cook Time: 15 minutes
- Category: Dessert
- Method: Baking
- Cuisine: American
Nutrition
- Serving Size: 1 finger
- Calories: 140
- Sugar: 6g
- Sodium: 55mg
- Fat: 8g
- Saturated Fat: 4g
- Unsaturated Fat: 3g
- Trans Fat: 0g
- Carbohydrates: 15g
- Fiber: 0.5g
- Protein: 2g
- Cholesterol: 20mg

