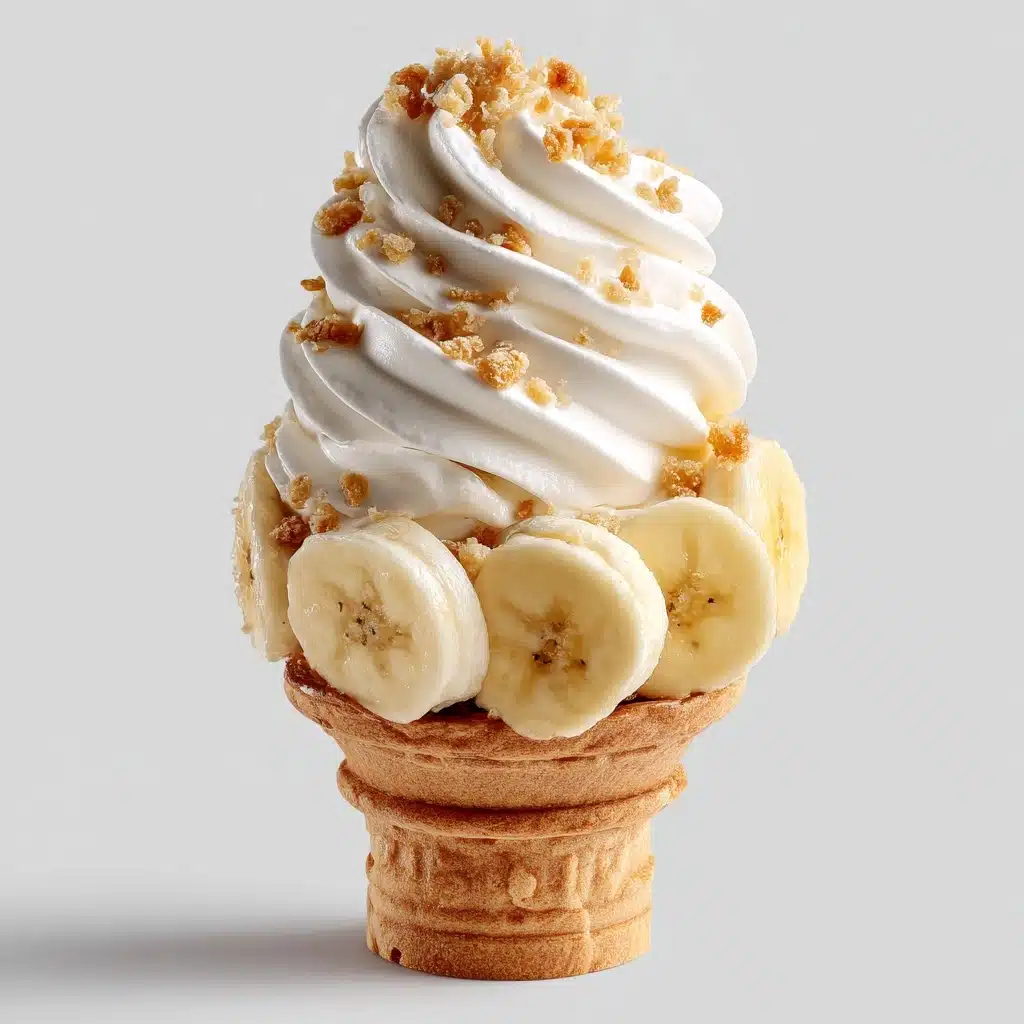
Banana Pudding Cheesecake Cones Recipe
Imagine the dreamy combo of creamy cheesecake, classic Southern banana pudding, and the pure fun of an ice cream cone, all rolled into one handheld treat. That’s exactly what you get with these Banana Pudding Cheesecake Cones! Every bite is a playful, swoon-worthy blast of banana flavor with luscious cheesecake filling, crunchy cookie bits, and fluffy whipped topping. They’re easy, eye-catching, and pretty much guaranteed to be the star of any potluck, birthday, or backyard hangout.

Ingredients You’ll Need
Banana Pudding Cheesecake Cones are delicious and straightforward, thanks to a short list of essential ingredients. Each one brings something special to the show, from creamy richness to a playful crunch. Here’s what you’ll need, plus a tip for each.
- Waffle cones: The crisp, sturdy base that holds your sweet creation—pick sturdy ones to keep them nice and crunchy until the last bite.
- Instant banana pudding mix: The superstar behind that classic banana flavor, plus it gives your filling a silky, spoonable texture with tons of nostalgic charm.
- Cold milk: Brings the pudding together quickly and ensures it sets perfectly soft and dreamy.
- Cream cheese (softened): Delivers luxurious tang and body for that cheesecake vibe—room temperature is key for a smooth blend.
- Sweetened condensed milk: The ingredient that sweetens and enriches the filling with creamy decadence.
- Vanilla extract: Just a splash, but it deepens the flavor and brings out the best in both the banana and the cheesecake components.
- Whipped topping (thawed): Lifts the filling into airy, cloud-like territory—make sure it’s fully thawed so it incorporates beautifully.
- Crushed vanilla wafers: For heavenly, cookie-like crunch throughout, plus a nostalgic, banana pudding twist.
- Banana (sliced): Fresh banana slices on top make every cone feel bakery-special and extra fruity.
- Extra whipped topping and wafer crumbs (for garnish): Adds show-stopping flair and a final textural punch.
How to Make Banana Pudding Cheesecake Cones
Step 1: Make the Banana Pudding
Start by whisking the instant banana pudding mix and cold milk in a medium bowl. In about two minutes, you’ll see the mixture thicken up into the perfect pudding. This is your base for all that dreamy banana flavor, so really whip until smooth. Let it sit for a minute or two so it can firm up while you move on.
Step 2: Prepare the Cheesecake Base
Grab a large bowl and beat the softened cream cheese until it’s completely smooth. This step is gold for getting that ultra-silky, no-lump cheesecake texture. Now pour in the sweetened condensed milk and vanilla extract. Continue mixing until it looks glossy, rich, and uniform—this is where the magic starts!
Step 3: Blend the Pudding and Cheesecake Mixture
Take your thickened pudding and fold it gently into the cream cheese mixture. Add half of the thawed whipped topping, and keep folding (not beating!) until everything comes together in a pale-yellow, cloudlike filling. The goal is to keep it fluffy, so a gentle hand is perfect here.
Step 4: Add the Crunch
Gently fold in the crushed vanilla wafers, which bring some decadent crunch and classic pudding-cookie vibes. The cookies will soften just a bit as they chill, turning into the most satisfying bites inside each cone.
Step 5: Chill the Filling
Cover your bowl and let the mixture chill in the fridge for at least 30 minutes. This lets all the flavors meld and the filling to thicken, making it way easier to scoop or pipe into your cones later on. Trust me: the wait is worth the reward!
Step 6: Fill and Decorate the Cones
Once everything is chilled and ready, carefully spoon (or pipe, for a bakery-wow look) the Banana Pudding Cheesecake filling into each waffle cone. Don’t be shy about mounding it up tall! Top each cone with a slice of fresh banana, a swirl of extra whipped topping, and a sprinkle of crushed vanilla wafers. Serve right away for the crispest, most irresistible bite.
How to Serve Banana Pudding Cheesecake Cones
Garnishes
For showstopping Banana Pudding Cheesecake Cones, go wild with toppings! Think fluffy whipped topping peaks, extra golden wafer crumbs, and a gorgeous, fresh banana slice perched on top. You can dip cone rims in melted white chocolate and wafer crumbs ahead of time for an ice-cream-parlor effect—they’ll look as fun as they taste.
Side Dishes
Since these cones are rich and creamy, they pair perfectly with lighter sides. Try serving them with a fresh fruit salad, a sparkling lemonade, or a chilled glass of sweet iced tea if you’re going for a Southern-inspired dessert spread. If you want a little contrast, mini chocolate-dipped strawberries on the side are a total crowd-pleaser.
Creative Ways to Present
Up the wow-factor by serving Banana Pudding Cheesecake Cones standing upright in a decorative glass or cone holder, so everyone can easily grab one. For parties, let guests customize their own cones at a DIY station with bowls of toppings—think mini chocolate chips, toasted coconut, or rainbow sprinkles. You could even layer the filling and toppings in mini mason jars if you want a no-mess, picnic-friendly version.
Make Ahead and Storage
Storing Leftovers
To keep the cones at their best, store leftover filling in an airtight container in the refrigerator for up to 2 days. Don’t fill the cones in advance, as the moisture can make them soggy. Assemble just before serving for the ultimate crunchy-creamy combo.
Freezing
While the cones themselves don’t freeze well (the texture suffers), you can freeze the cheesecake banana pudding filling separately. Scoop it into a sealed container, freeze for up to a month, then thaw gently in the fridge before using. Give it a fresh stir before piping into your cones.
Reheating
No reheating required! Banana Pudding Cheesecake Cones are strictly a chilled affair—just give the filling a quick stir if it’s been resting, then assemble and serve cold for the happiest results.
FAQs
Can I make Banana Pudding Cheesecake Cones a day ahead?
You can definitely prep the filling a day in advance and store it in the fridge, but don’t fill the cones until you’re ready to serve. This keeps the cones extra crisp and the flavors fresh.
What’s the best way to keep cones from getting soggy?
Only fill the cones just before serving—this is the golden rule for that all-important crunch. If you want extra insurance, coat the inside of each cone with a thin layer of melted chocolate and let it set before adding your filling.
Are there any fun variations for this recipe?
Absolutely! Try swapping banana pudding mix for vanilla or cheesecake flavors, folding in mini chocolate chips, or using strawberry slices instead of bananas for a playful twist. You can also use chocolate-dipped cones or add a caramel drizzle for extra pizzazz.
What if I don’t have whipped topping?
You can swap in homemade whipped cream (sweetened to taste) as long as it’s fairly stiff, so it holds the filling’s structure and gives you that cherished airiness.
Do Banana Pudding Cheesecake Cones work for parties?
They’re practically made for parties! Easy to grab, adorably photogenic, and universally loved—you’ll see people light up when they spot these on the dessert table.
Final Thoughts
These Banana Pudding Cheesecake Cones are the dessert you didn’t know you needed, but now you absolutely have to try! Each cone is a playful mix of creamy, crunchy, and sweet, guaranteed to spark big smiles and plenty of “wow, these are so good!” moments. Make a batch and watch them disappear—don’t forget to save one for yourself!
Print
Banana Pudding Cheesecake Cones Recipe
- Total Time: 50 minutes (includes chilling)
- Yield: 6 cones 1x
- Diet: Vegetarian
Description
Indulge in the delightful combination of banana pudding and creamy cheesecake in a convenient waffle cone form with this easy-to-make and delicious Banana Pudding Cheesecake Cones recipe. Perfect for a no-bake summer treat!
Ingredients
For the Cheesecake Filling:
- 6 waffle cones
- 1 (3.4 oz) box instant banana pudding mix
- 1 1/2 cups cold milk
- 8 oz cream cheese (softened)
- 1/2 cup sweetened condensed milk
- 1 teaspoon vanilla extract
- 1 (8 oz) tub whipped topping (thawed)
- 1 cup crushed vanilla wafers
For Garnish:
- 1 banana (sliced)
- extra whipped topping
- wafer crumbs
Instructions
- Prepare Banana Pudding: In a medium bowl, whisk the banana pudding mix with cold milk until thickened.
- Make Cheesecake Filling: In a large bowl, beat cream cheese until smooth. Add sweetened condensed milk, vanilla extract, and mix until creamy. Fold in the banana pudding and half of the whipped topping. Gently fold in crushed wafers. Chill for 30 minutes.
- Assemble Cones: Spoon or pipe cheesecake filling into each waffle cone. Top with a banana slice, extra whipped topping, and wafer crumbs. Serve immediately.
Notes
- Fill cones just before serving to prevent sogginess.
- For decoration, dip cone rims in melted white chocolate and crushed wafers.
- Prep Time: 20 minutes
- Cook Time: 0 minutes
- Category: Dessert
- Method: No-Bake
- Cuisine: American
Nutrition
- Serving Size: 1 cone
- Calories: 340
- Sugar: 24g
- Sodium: 190mg
- Fat: 17g
- Saturated Fat: 10g
- Unsaturated Fat: 6g
- Trans Fat: 0g
- Carbohydrates: 41g
- Fiber: 1g
- Protein: 5g
- Cholesterol: 45mg

