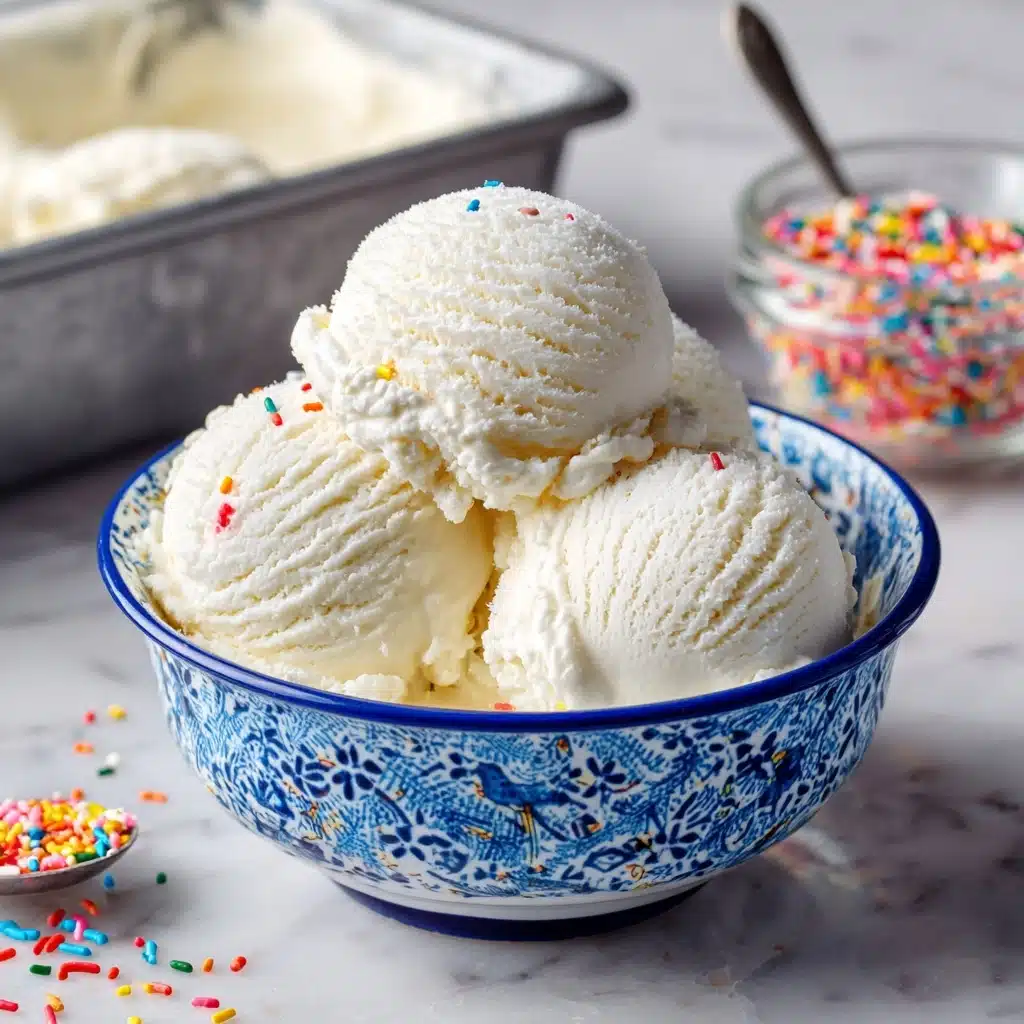
Creamy Vegan Vanilla Ice Cream Recipe
If you’ve dreamed of transforming just a handful of simple, wholesome ingredients into a dreamy, cloud-like treat, this Creamy Vegan Vanilla Ice Cream is your golden ticket. Each velvety scoop is rich, ultra-smooth, and packed with luscious vanilla flavor, but it’s somehow made with just nuts, coconut milk, and a touch of maple syrup. Whether it’s your first adventure with dairy-free desserts or you’re a long-time plant-based ice cream enthusiast, this recipe is all about pure joy, easily whipped up in your own kitchen.
Ingredients You’ll Need
The true beauty of this Creamy Vegan Vanilla Ice Cream lies in its short, powerful ingredient list. Every component is carefully chosen to create that classic scoopable ice cream texture and true vanilla taste, all while staying utterly vegan and dairy-free.
- Raw cashews: Soaked until soft, these are the secret to transforming nuts into the silkiest, creamiest base you’ve ever tasted.
- Full-fat coconut milk: Adds rich body and that classic creamy mouthfeel; don’t skimp on the fat for best texture!
- Maple syrup or agave nectar: Just the right amount of natural sweetness with a gentle flavor that lets vanilla shine.
- Vanilla extract: The superstar flavor, making every spoonful taste like pure vanilla bliss; use real extract for maximum wow.
- Salt: Just a pinch wakes up the flavors and balances the sweetness—don’t skip it!
- Coconut oil (optional): An extra richness booster if you want that truly decadent, melt-in-your-mouth finish.
How to Make Creamy Vegan Vanilla Ice Cream
Step 1: Soak the Cashews
Start by letting the raw cashews soak in hot water for at least 2 hours or, for extra creaminess, overnight. This softening step is crucial—it ensures they’ll blend perfectly smooth, which is exactly what you want in a luxurious Creamy Vegan Vanilla Ice Cream.
Step 2: Blend Everything Until Creamy
Drain and rinse the soaked cashews, then add them straight into your high-powered blender. Pour in the coconut milk, maple syrup (or agave), vanilla extract, salt, and coconut oil if you want that extra pop of silkiness. Set your blender on high and let it work its magic until you have a completely smooth, velvety batter—no grit, no lumps, only pure creamy delight.
Step 3: Chill the Ice Cream Base
Pour your blended mixture into an airtight container and pop it in the refrigerator for at least 2 hours. This chilling step helps the flavors meld and ensures that your ice cream maker will whip up a beautifully thick texture when it’s time to churn.
Step 4: Churn
Now for the fun part! Transfer your cold base into your ice cream maker and churn according to its instructions, usually about 20 to 25 minutes. Watch as it magically thickens into a luscious, creamy soft serve. If you don’t have an ice cream maker, no worries at all—just freeze the mix in a shallow dish, stirring every 30 minutes until set and smooth.
Step 5: Freeze Until Scoopable
Scoop the churned ice cream into a freezer-safe container (a loaf pan works great!), smooth out the top, and freeze for 2 to 4 hours. This is when your Creamy Vegan Vanilla Ice Cream goes from soft-serve to perfect scoopable firmness. Let it sit at room temperature for 5 to 10 minutes before serving for utterly dreamy scooping.
How to Serve Creamy Vegan Vanilla Ice Cream

Garnishes
Give your ice cream a show-stopping finish with a variety of toppings! Try a sprinkle of toasted chopped nuts, a drizzle of vegan chocolate sauce, fresh berries, or even a flutter of edible flowers for color and charm. The soft vanilla canvas makes every garnish pop.
Side Dishes
This Creamy Vegan Vanilla Ice Cream loves a sidekick. Serve it alongside warm vegan brownies, fresh fruit crisps, or sandwiched between cookies for an irresistible ice cream sandwich. Even a scoop placed on tangy grilled pineapple or caramelized bananas is an absolute delight.
Creative Ways to Present
Switch up your presentation for every gathering. Think adorable mini waffle cones, elegant coupe glasses with a sprig of mint, or even layered parfait-style with vegan granola and fresh fruit. Swirl in fruit purée or chocolate chips during the last few minutes of churning for a personalized twist!
Make Ahead and Storage
Storing Leftovers
Leftover Creamy Vegan Vanilla Ice Cream keeps beautifully in a sealed, freezer-safe container. Lay a layer of parchment paper directly on the ice cream’s surface before sealing to help prevent freezer burn and keep every scoop as good as the first.
Freezing
For best results, store the ice cream in the back of your freezer (away from the door) so it stays at a consistent temperature. It’s happiest enjoyed within two weeks, though good luck making it last that long with its irresistible taste!
Reheating
No reheating needed here! Just let your ice cream sit on the counter for 5 to 10 minutes after removing from the freezer. It softens quickly, making it easy to scoop for those impromptu dessert cravings or midnight snacking moments.
FAQs
Can I use a different nut instead of cashews?
Cashews are the MVP for their creamy texture, but you could try soaked macadamia nuts or blanched almonds. Keep in mind the flavor and texture might change a bit—cashews really do deliver the smoothest result!
Do I have to use coconut milk?
Full-fat coconut milk creates that lush, creamy texture, but you can experiment with other rich plant milks like oat or soy. Just ensure it’s a full-fat version, or your Creamy Vegan Vanilla Ice Cream may turn out more icy than creamy.
How can I make this without an ice cream maker?
No ice cream maker? No problem! Freeze the blended base in a shallow dish and stir vigorously every 30 minutes until set and smooth. The stirring helps prevent large ice crystals and mimics churning for a scoopable, creamy texture.
Can I add mix-ins to the ice cream?
Absolutely! Add crushed cookies, chocolate chips, swirled fruit preserves, or even a spoonful of nut butter during the last few minutes of churning, or fold them into the soft ice cream before the final freeze for extra fun and flavor.
Is this Creamy Vegan Vanilla Ice Cream gluten-free?
Yes, the recipe is naturally gluten-free! Just be sure any mix-ins or toppings you choose are also certified gluten-free if you’re serving guests with sensitivities.
Final Thoughts
This Creamy Vegan Vanilla Ice Cream is about to become your go-to treat for any season. With its unbeatable texture, glorious vanilla flavor, and simple, nourishing ingredients, it’s pure happiness by the spoonful. Give it a try, share a scoop with someone you love, and watch how quickly it disappears!
Print
Creamy Vegan Vanilla Ice Cream Recipe
- Total Time: 2 hours 10 minutes (plus freezing time)
- Yield: 6 servings 1x
- Diet: Vegan
Description
Indulge in the creamy goodness of this homemade vegan vanilla ice cream. Made with wholesome ingredients, this dairy-free treat is easy to prepare and utterly delicious. Perfect for a hot summer day or a sweet ending to any meal.
Ingredients
Main Ingredients:
- 1 1/2 cups raw cashews (soaked in hot water for 2 hours or overnight)
- 1 1/2 cups full-fat coconut milk
- 1/2 cup maple syrup or agave nectar
- 1 tablespoon vanilla extract
- 1/8 teaspoon salt
Optional for Creaminess:
- 1 tablespoon coconut oil
Instructions
- Prepare Cashews: Drain and rinse the soaked cashews.
- Blend Ingredients: In a high-speed blender, combine cashews, coconut milk, maple syrup, vanilla extract, salt, and coconut oil if using. Blend until smooth.
- Chill Mixture: Transfer the blend to a container, chill in the refrigerator for at least 2 hours.
- Churn Ice Cream: Pour the chilled mixture into an ice cream maker and churn for 20–25 minutes until creamy.
- Freeze: Transfer the churned ice cream to a container and freeze for 2–4 hours for optimal texture.
- Serve: Allow the ice cream to sit at room temperature for a few minutes before scooping and serving.
Notes
- No ice cream maker? Freeze the mixture in a dish, stirring every 30 minutes until firm.
- For added flavor, swirl in fruit puree or chocolate chips while churning.
- Prep Time: 10 minutes
- Cook Time: 0 minutes
- Category: Dessert
- Method: Freezing
- Cuisine: American
Nutrition
- Serving Size: 1/2 cup
- Calories: 210
- Sugar: 10g
- Sodium: 25mg
- Fat: 15g
- Saturated Fat: 10g
- Unsaturated Fat: 5g
- Trans Fat: 0g
- Carbohydrates: 17g
- Fiber: 1g
- Protein: 3g
- Cholesterol: 0mg

